
How to Enable TRIM in Windows 10
TRIM is an important feature of Windows 10 which helps to keep your SSD data safe. It’s not just important to keep your files safe, but it can also help you increase your PC’s performance. Enable TRIM In Windows 10
TRIM is a feature which can help in increasing the performance of your Solid State Drive. It is a command used on the ATA interface, which tells the SSD controller about unused or obsolete blocks. This feature is also useful for ensuring that your SSD has a long lifespan Google.
In order to enable the TRIM function, you will first need to ensure that your operating system supports this feature. Generally, this feature is enabled by default. However, you can still turn it off if you believe it is bogging down your drive’s performance.
How To Disable TRIM On SSD:
One of the best ways to check if your SSD has the TRIM function is to open the Command Prompt. You can do this by navigating to the Windows search box in the taskbar and typing “command prompt”. You can also do this from the Power User menu by pressing the Windows key and X at the same time. Enable TRIM In Windows 10
Once you have opened Command Prompt, you will be able to check if your SSD has the tiniest bit of this feature. This is not the best option, however, if you have data you need to recover. In this case, you will have to resort to data recovery software.
How To Check If TRIM Is Enabled:
While the TRIM function is a must have, it is not always the best choice. You should always use reliable file recovery software. In addition, you should always back up your important files.
TRIM is a feature in Windows that is designed to improve performance and ensure the longevity of your SSD. When enabled, Windows will automatically clean up storage blocks that contain deleted or invalid data. This is similar to the process of defragmenting your drive. TRIM is enabled by Windows and can be disabled manually. It’s important to note that this feature isn’t supported by USB connections.
How To Check If Trim Is Enabled Windows 10:
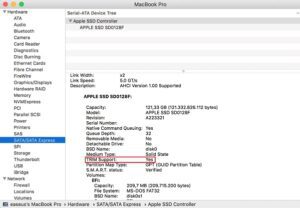
To check if Trim is enabled on your SSD, you can use the Windows key + X keyboard shortcut or use the Windows Properties menu to check. The TRIM feature will show up under the System Information menu. You can also use the Samsung Magician Software to check your SSD’s performance. This will display information about the storage functions and temperature of your SSD.
You can also manually enable TRIM with the help of special tools. This feature will enable your operating system to notify your SSD when it’s no longer in use. It’s also possible to use the feature to recover data that’s been deleted from your SSD.
How To Keep Your SSD Data Safe With TRIM Enabled:
To enable TRIM in Windows, you can start the Command Prompt (Admin) or use Windows PowerShell. If you choose PowerShell, you can also open it with elevated privileges. If you choose Command Prompt (Admin), you can also start it from the Start menu.
Keeping your SSD data safe with TRIM enabled in Windows 10 is essential for the longevity of your storage device. The TRIM function is designed to tell your hard drive when data is no longer needed, thus reducing its storage space and improving its performance.
How To Trim SSD Windows 10:
A TRIM command can be enabled by Windows or can be disabled manually. TRIM is an ATA interface command that tells the controller of a solid-state drive which data pages should be erased during garbage collection. This helps the controller manages storage space more efficiently.
If you do not enable the TRIM function, your SSD will not be able to erase information that has been written by other applications. This means that you will not be able to recover data that has been deleted. TRIM can be enabled by Windows or can be disabled by using a command prompt. You can run the Command Prompt as an administrator, or you can use the Taskbar Search Box.
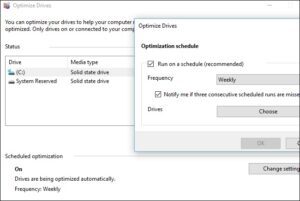
Open The Settings App:
- Open the Windows 10 Start menu and type “optimize” in the search box.
- Select the “Defragment and optimize disks” application from the search results.
- The Optimize Disks window displays the attached disks that can be optimized.
- Select the SSD connected via USB from the list, then press the “Optimize” button to start trimming manually.
You can also enable TRIM by using a program such as Samsung Magician. This program will monitor your SSD and notify you of any issues that may affect its performance. You can also use a third-party application, such as Data Recovery Wizard, to find and recover lost files. However, you will need to use a reliable application to ensure that your data is recovered successfully.
Leave a Reply