
How to Enable SMB2 in Windows 10
Disable SMB v1 and check whether SMB2 is enabled. If it’s not, you’ll have to re-enable it. Here are some simple steps to enable SMB2. Make sure to save and close any open documents before continuing. Enable SMB2 Windows 10 Then, you’ll be able to use SMB as normal again.
There are two ways to disable SMB v1 in Windows 10. The first is to use the command-line interface. To do this, you need to be an administrator of the system. On server systems, you will need to run PowerShell as administrator. The second method is to edit the system’s registry. While this method is not as user-friendly as PowerShell, it is still possible to disable SMB1 using a registry editor Google.
Disabling SMB v1 is important for security reasons. There are a number of security vulnerabilities in the SMBv1 protocol, which could allow an attacker to take control of your system. For example, the Wanna Cry ransomware attack exploited vulnerabilities in SMBv1, allowing it to infect as many computers as possible. Fortunately, Microsoft has already fixed many of these vulnerabilities.
How To Disable SMB v1:
To disable SMBv1, you need to modify the registry key on your Windows 10 PC. This key contains the SMBv1 value. To disable SMBv1, right-click the Parameters key and choose New>DWORD (32-bit) Value. Make sure to select a value that says “0” – this means that SMBv1 is disabled. You can also delete this value if you do not want it to be enabled.
Once you’ve disabled SMBv1, you can re-enable the protocol by using the PowerShell command. To do this, you need to have PowerShell 2.0 or a later version. Also, you’ll need a registry editor. Make sure to back up the registry before performing these changes.
How To Enable Check If SMB2:
If you’re looking for a way to see if Windows 10 has SMBv2 enabled on your computer, you can check the status of this feature in the Control Panel. Open the Network and Sharing Center and look for the SMB option. Click the Yes button to enable the feature. Alternatively, you can use the Turn Windows features feature to check if SMBv2 is enabled.

Next, go to the Registry Editor and type regedit into the address bar. Next, you will need to find the DWORD named “SMB2”. The value of this DWORD can be either 0 or 1. If you see that SMB2 is enabled, your computer is set to connect to SMBv2 hosts.
How Do I Enable SMB v2:
To enable SMBv2 on Windows 10, you need to first enable the protocol on your computer. You can do this with the “get-smb serve reconfiguration” command. You will need to log on as an administrator to run the command. After that, restart your computer and confirm that it is enabled.
SMBv2 is a protocol that allows computers to share files with each other. It also supports name resolution, service announcements, and authentication. This protocol is also available on Unix servers. It uses TCP port 445 for communication. Earlier protocols such as NetBIOS and NetBT used IEEE 802.2 for communications.
How To Re-Enable SMB v1:
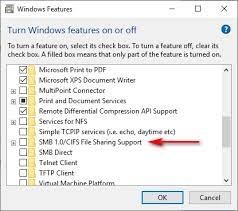
To re-enable SMB v1 in the Windows 10 operating system, you should first open the control panel. This is the user interface for the server manager. It’s located in the Programs and Features menu. From here, you can select the SMB 1.0/CIFS File Sharing support and then click Next. This will open the Windows features dialog box, which will allow you to enable or disable SMB v1 and CIFS file sharing.
The control panel is a vital part of Windows and allows you to manage installed protocols and software. From the Start menu, go to Control Panel and then type in “control panel”. In the control panel, click “Programs and Features”. Next, click on “SMB v1 support” in the list. There, you’ll see three sub-options: the SMB client, SMB server, and automatic removal.
Go To Settings:
- To enable SMB2 in Windows 10, you need to press Windows key + S, start typing and click Turn Windows features on or off.
- You can also search for the same phrase in the Start menu, Settings.
- Scroll down to SMB 1.0/CIFS File Sharing Support and check that top box.
Another way to disable SMB v1 is to use PowerShell or a command-line program. If you are running Windows 10 in administrator mode, run the command-line tool and select “Server Message Block” to disable SMBv1. After the change, you will need to restart your PC. If you need to undo the changes, you can delete the SMBv1 registry key.
Leave a Reply