
How to Enable SSH in Windows 10
If you’ve been wondering how to enable SSH in Windows 10, the good news is that it’s pretty simple. Windows 10 has a built-in SSH server. The feature is currently in the BETA phase, but should soon be a very useful feature. In this article, we’ll look at the configuration options, Port number, Authentication, and the built-in commands.
Configuration for SSH on Windows 10 is relatively simple. There are some pitfalls, though. One common mistake is putting the wrong owner and permissions on a file. That will result in permissions issues for the SSH server. To solve this problem, you need to change the owner and permissions on the authorized keys file Google.
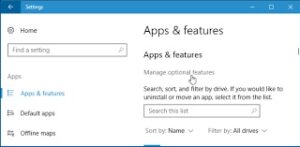
To enable SSH, first install OpenSSH. You can do this by going to Windows Settings -> Apps -> Optional features. Next, enable the port 22 in the firewall. You can also use the ssh-keygen command from the command prompt, as in Linux.
How to Enable SSH Port Number:
You can also specify the path to the control socket, which allows multiple SSH sessions to use one connection. SSH port forwarding is a way to let remote machines to connect to your computer. To enable it, configure ssh -g to enable remote hosts to connect to forwarded ports. You can also specify the smartcard device used to authenticate. By default, the SSH service does not add host keys to the known-hosts file.
There are several options for configuring port numbers on your SSH Windows 10 server. The first is to enable iptables on the server and make sure you are running as the root user. This way, incoming SSH connections will be allowed. The second option is to specify a per-user configuration file. By default, this file is located at /.ssh/config.
How to Enable SSH Configuration:
In the past, using SSH on Windows 10 required the use of a third-party application called PuTTy, but in 2018 Microsoft made native SSH commands available. The SSH client is a command-line application that lets you connect to a remote server and run commands. This allows you to access the server without a restart or the need to enter a password.

Open Computer Management and click Users. Click the “New” option in the Users list. Type the name of the new user and password in the respective fields. Click the Close button when you are done. The next step is to open the Select group window, where you can search for groups. In the Select group window, click the Administrator account. This will open the properties window for the user’s profile.
How to Enable SSH Authentication:
When using SSH authentication on Windows, you’ll need to have a public RSA key, otherwise known as a certificate. This is important because it allows you to safely connect to a remote server. Moreover, it will automatically forward ports in the SSH tunnel. In addition, you can use this key to run scripts and automate tasks.
The first step in setting up SSH authentication on Windows 10 is to enable a service called ssh. This service starts automatically and can be started in the Windows command prompt. The service will generate a public key pair for a specific host on the first use.
How To Using The Built-in Commands:
The next step in setting up SSH authentication on Windows 10 is to create a private key. There are several ways to create a private key, but RSA is preferred. This key can be created locally or using the node-manta CLI. DSA keys will work with such agent, but you must have a separate private key from the public one.
When you install the latest version of Windows, you’ll find the SSH Client and the OpenSSH server installed as default. Using these tools, you can easily connect to servers and manage their security settings. You can also specify the default shell for SSH sessions. You can set the SSH server to run on the command line or to automatically start after you log in.
How Do I Enable SSH On Windows:
There are two ways to enable SSH on Windows 10. The first is to log in using Power shell, while the second is to use CMD. Both will work, but you may want to use CMD if you’d prefer more features. You should also make sure that you’ve configured the correct trust levels for the different networks on your system. You can find this information by using the Windows Settings app.
Go To Setting:
- Open Settings, select Apps, then Optional Features.
- Search the list to see if OpenSSH is already installed.
- If not, select Add Feature at the top of the page and then:
- Find OpenSSH Client and then select Install.
Using the built-in commands to enable SSH will enable secure shell access to the local machine, as well as allowing you to connect with remote systems. In the built-in commands, you can select cipher specifications, assign a socket on the local side, and set the default per-user configuration file. By default, this file is located at /.ssh/config. This file contains your identity key.
Leave a Reply