How to Enable IIS in Windows 10
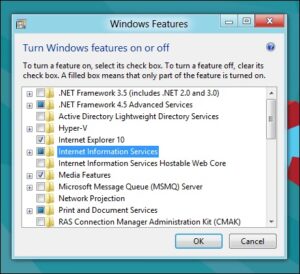
To enable Internet Information Services on your Windows 10 computer, you will need to go into the Control Panel. To do so, click on the Start menu and then Type “Run” and search for Control Panel. The Control Panel window will show several options, such as Uninstall a program, Installed Updates, and more. In the Installed Updates window, click the Turn Windows feature on or off link. In the Internet Information Services category, select the option you want to turn on or off. Enable IIS in Windows 10
When you are ready to install Lansweeper on a Windows 10 machine, you can choose to install it in two ways: the Advanced Install and the Easy Install. The Easy Install installs all components on one machine. IIS Express and SQL Local DB are limited to 10GB of data. If you need more, you can install Lansweeper on more than one machine Google.
Lansweeper is a Windows agent-free application that will scan your entire network. Although it is agent-free, it requires a Windows computer. You can also install additional scanning agents on Linux, Unix, VMware servers, and other systems. Lansweeper is designed for both 32-bit and 64-bit architectures.
How Do I Enable Local IIS In Windows 10:
The Lansweeper installation consists of three components: a web console, a database, and a scanner. After downloading the installer, install it on a machine. After the installation screen appears, click the Advanced install option and point it to a SQL Server instance.
Registering OECGI4 as a CGI extension in windows 10 is a fairly straightforward process. First, you need to know what environment variables are. These are values that float around your computer and determine what information is sent to your web server. For example, you can specify the type of terminal you are using or the type of browser you are using. These variables can be accessed through the command line.
How Do I Enable IIS Permissions:
Once you have done this, you can navigate to the Internet Information Services (IIS) Manager. This is located under the Server Manager tab and is in the Tools section. Once you’re there, click the “CGI” option to enable it.
Then, you’ll need to edit the settings for OECGI4. Select the option for Handler Mappings and check the option for OECGI4. If you’re creating a virtual directory, you’ll need to repeat these steps.
How To Creating A Self-signed Certificate In IIS:
To create a self-signed certificate in IIS, follow the steps below: Firstly, open the IIS Manager console. In the Actions column, select Create Self-Signed Certificate. Then, click OK. You should then see the certificate appear in the list of Self-Signed certificates. Note that the IIS Self-Signed Certificate has a one-year validity.
To create a self-signed certificate, you need to first generate a public/private key pair. You can then use this file to create a self-signed certificate. The certificate will be valid for one year and will contain your private key. You can use the certificate for testing purposes and as a quick solution to buying an SSL certificate every year.
Required IIS Components On Windows 10:
- Open Control Panel and click Programs and Features > Turn Windows features on or off.
- Enable Internet Information Services.
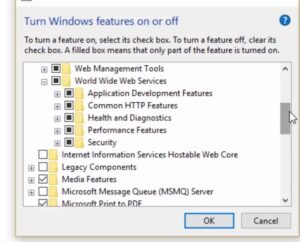
- Expand the Internet Information Service feature and verify that
- The Web server components listed in the next section are enabled.
- Click the OK button.
Self-signed certificates are widely used for testing purposes and can be a great alternative to purchasing a certificate from a public CA. A self-signed certificate is created by the responsible developer or company and has the same encryption level as a trusted CA-signed certificate. Self-signed certificates are recommended for development environments only, and should not be used for production websites.
Leave a Reply