
How to Enable Administrator Account in Windows 10
If you’re locked out of your Microsoft account, you can use the built-in administrator account. But before you can use this account, you must enable it first. If you’re an OEM system builder, you can also use this account to fix your problems. To enable this account, follow the steps below. Enable Administrator Account Windows 10
The built-in Administrator account in Windows 10 allows users to take control of the computer’s resources. It is hidden by default, and you can disable it if necessary. To enable the built-in Administrator account, open the Computer Management control panel. From the User Account Control dialog box, type net user administrator /active yes. You’ll then see the built-in Administrator account enabled Google.
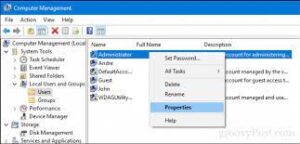
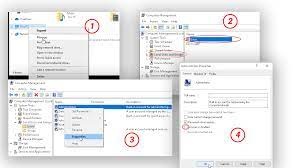
The Administrator account is the default account in Windows 10, and it allows you to make administrative changes. This account is disabled by default, but you can enable it through the Command Prompt. From the Start menu, go to Users and click the Users option. Next, select the Administrator account in the list of users and click on its properties. Once this account is enabled, it will be shown in the user’s list, and you’ll need to run the previous command again to confirm the change.
How To Enable The Administrator Account In Windows 10:
If you’re unable to log in to the administrator account, you can disable it. You’ll notice a warning message at the bottom of the window. Click OK. You’ll notice that the Administrator account no longer appears in the login screen. Alternatively, you can disable it completely. To disable it completely, click “Current Users” and click “Disable administrator account”. Then, click “Disable administrator account” to disable it.
Having an administrator account is a valuable asset when troubleshooting Windows. By default, the built-in account is hidden and can only be used when you need to make changes that will impact the overall system. For this reason, it’s best to disable the built-in Administrator account if you are only using the built-in administrator account for troubleshooting purposes.
How To Disable The Administrator Account In Windows 10:
Whether you’re using a shared computer or you want to protect your privacy, there are several ways to disable your administrator account. The first way is to sign in as an administrator. Then, open the Command Prompt and type the word regedit. This will open the Registry Editor. In the left panel, find HKEY_LOCAL_MACHINE. From there, click the Load Hive option, and then select the SAM file.
Now, you should be able to see a list of the different accounts. Click on the first one, which is probably the administrator. You can also choose to disable a specific user, but it’s best to be safe. Disabled administrator accounts can be resolved by modifying security policies.
How Do I Enable A Disabled Administrator Account In Windows 10:
If you’re not an administrator, you can also disable your account from the Security Settings by selecting the “Accounts” tab. Click on the “General” tab and uncheck the checkbox next to “Account is disabled”. Note that this method doesn’t work in Windows 10 Home editions. You may need to consult the IT specialists or administrators at your company to disable your administrator account.
To enable or disable the administrator account, open the command prompt. To open the command prompt, type cmd in the search box next to the Start button. Then, click the “Command Prompt” shortcut and choose “Run as administrator.” The elevated Command Prompt will open. Next, type net user administrator /active: yes or “active:no” to disable or enable your administrator account. After you complete the steps, make sure to back up your files.
How To Log In As An Administrator In Windows 10:
Logging in as an administrator allows you to access your system’s control panel and perform management tasks. Although this account does not require a password, you will need to reboot your computer to use it. To log in as an administrator, open the Administrative Tools from the Start menu, Control Panel, or Local Users and Groups.
To log in as an administrator, you must have the correct permissions. This is possible by going to the local group’s manager and changing the permissions of your user account. To change the permissions of a user account, go to System > Local Users and Groups. In the left pane, click on ‘Users’. Select Administrators from the list of available groups.
How Do I Enable Administrator Account After Disabled:
In Windows 10, there is a built-in administrator account. To log in as an administrator, you must use the administrator account. If you do not have one, you can create one by following Windows instructions. You should select “admin” as the type of account and follow the steps to configure it.
Click Start Settings:
- Select Start > Settings > Accounts.
- Under Family & Other Users, select the name of
- The account owner (you should see “Local Account” under the name),
- Then select Change Account Type. …
- Under Account Type, select Administrator, and then select OK.
- Sign in with a new administrator account.
Besides the local Administrator account, you can also use the built-in Administrator account, otherwise known as the Super Administrator account. This account has elevated privileges and will not prompt you with the UAC prompt. Using this account will enable you to perform serious troubleshooting and recover user accounts.
Leave a Reply