
Enable Telnet on Windows 10
Enable telnet Windows 10 is a similar process to those used in Windows 7 and 8. If you want to install Telnet on a new computer, go to the control panel and search for the Telnet option. Once you have installed Telnet, you can use telnet commands to check the status of a server.
Logging in as a regular user on your Windows 10 PC is possible in several ways. The easiest way is to go into the Settings app and click the Other users option. Then, select Family & other users, and click the Add someone to this PC link. If you use Microsoft Outlook on your PC, you need to create an account for it. Once you have done that, you can switch between your various sign-in options Google.
If you’re having trouble logging in to your PC, you can try restarting the computer. Click the power icon at the bottom-right corner of the screen and choose “Restart”. Alternatively, you can also press the power button, which is usually found on a PC. To use this option, you must have administrative privileges. You can also try disabling the “fast startup” option in your power menu. If all else fails, you should consider updating to the latest Windows 10 release. This will help you resolve known bugs and security issues.
How To Logging In As A Regular User:
After rebooting, select the users and groups icon. Select the users you want to switch to. If the user does not have a password, you will need to change the password.
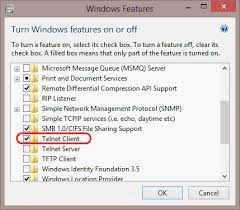
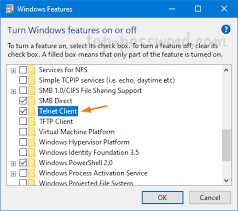
Windows 10 has a feature called Telnet Client. You can enable or disable this feature from the Control Panel. First, open Programs and Features and select the “Turn Windows features on or off” option on the left side. Next, click the “Telnet Client” option and click “OK.” After enabling the Telnet Client, the feature will appear in the list of features.
How To Configuring Telnet Client:
You can also enable or disable the telnet client by opening the “Turn Windows Features” window from the start menu. You can then check “Telnet Client” by scrolling down to the bottom of the list. When the feature is enabled, it will begin to load. You can also open a command prompt and type “telnet” to connect to the internet.
Telnet is an application that connects to other systems through a virtual terminal connection. It sends data over TCP and is used to run remote commands. Windows 10 does not include a native telnet server, but third-party apps can be installed to serve telnet on port 23. One example is HK Telnet Server.
How Do I Enable Telnet On Windows 10:
The command prompt will appear on the desktop taskbar. You can use the graphical interface or command prompt to install the Telnet client. To install it, ensure that you have administrator permissions on the machine. When the installation is complete, you can close the command prompt by clicking on the X button in the top right corner. Alternatively, you can use the PowerShell interface to configure telnet in Windows 10.
If you are looking for a way to check the status of a server in a different computer, you can use the Telnet protocol. This protocol is a text-based network protocol, which means that it does not support file transfer or graphics. Once you have installed the Telnet program on your computer, you can use the command line to check the server’s status.
How To Enable Telnet In Windows Server:
To use the telnet utility, you need to know the name of the remote machine and the port number. You can check this information by using the netstat -an command. On Unix systems, this command will show whether the server is connected to a particular network port. To use the Telnet command on Windows 10, you must have a telnet client installed on your machine.
Using telnet is a useful tool to access other computers on the network and to test IP access. For this, you need to enable the protocol in Windows features. This is usually a simple task that only takes a few minutes. The Telnet protocol works on TCP port 23 and connects to a remote computer with another computer. This allows you to access the remote computer’s software and services, just as if you were sitting in front of it.
Following Steps:
- Click the Start button.
- Select Control Panel.
- Select Programs and Features.
- Click Turn Windows features on or off.
- Select the Telnet Client option.
- Click the OK button.
- A dialog box will appear to confirm the installation.
- The telnet command should now be available.
The Telnet protocol was developed decades ago and is still used today to access remote systems. This protocol does not require any encryption, so all data sent and received is plain text. If you are concerned about security, you should use Secure Shell as an alternative to Telnet. Secure Shell uses Windows features to protect your computer and makes using Telnet protocol safe and secure.
Leave a Reply