
How to Enable Password in Windows 10
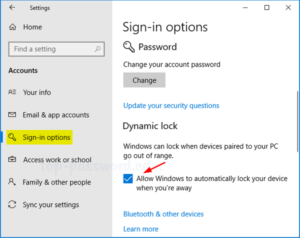
When you want to enable a password for your Windows 10 computer, you can go to the settings of your PC and click on Account Settings. Then, click on Sign-in Options. Then, click the Password menu and click on the two grey boxes on the right side. Enter your password in both boxes, and click OK. Then, reboot your computer. The changes will take effect immediately, so make sure to save the changes and log out before continuing.
In Windows 10, selecting a password will require you to set a PIN. PINs are unique to the system they are set on, so you will have to type them for each machine you use. To make sure that you remember your PIN, create a unique password and change it whenever you want. This will ensure that your system is secure and you don’t lose it. You can use the same password for all your accounts, and you’ll need to change it every time you need to log in Google.
The first step is to enable the password on your computer. You will need to type your current password twice. You can also set a “password hint” that will help you remember the new password. This will help you remember it if you forget it again. If you don’t want to enter your old password, you can simply disable this feature. But, you’ll need to know how to remove your password if you decide to change it in the future.
Windows 10 Sign-In Options No Password:
If you’d prefer not to set a password, you can remove it from the settings menu. It’s not hard to remove the password, but this process can be risky. If you’re concerned about security, you might want to enable a password for your computer. You’ll be glad you did. If you don’t, you’ll end up removing your account altogether. There’s no need to delete your computer or change the settings. You can always restore them at a later time.
You can also enable the password in Power Settings to allow your computer to sign in automatically when it’s plugged in or running on battery. To do this, double-click Settings and click Enabled. Now, your computer will ask for a password whenever it wakes from sleep. To enable the password on your Power Settings, open the Control Panel and then type “power settings” or “enabled”.
How To Set Password For Application In Windows 10:
Creating a password is easy in Windows 10. You can also do it in the Control Panel, either from the Start menu or in the Run dialog box. You can also find it on the Power User Menu. In Windows 8, you can access the Power User Menu by pressing Win+X and selecting “System” (or ‘Power’). Once there, you can right-click on Microsoft and Power Settings, and click on the DWORD32-bit value in the subkey 0e796bdb.
In Windows 10, you can also enable password for Windows 8 or Windows 10. You can also create a password for your Power Settings. You can create this password in three ways. If you’re using the built-in Administrator account, you’ll need to enter your administrator password. In order to enable the password for Power Settings, you need to press the Win+X key to open the Run dialog box. Next, you need to right-click Microsoft and then choose ‘Power Settings’. Lastly, you need to double-click the subkey and then click on DWORD.
How To Change Computer Password Windows 10:
You can also enable password for your Windows 10 computer by changing the settings of the user accounts. You can choose a password for the system you use in the Settings dialog box to access it. This way, your password will be protected while you are not using your computer. It will also keep you from being hacked. Once you’ve changed the password, you’ll be able to sign into your PC. Then, you’ll be able to log in without a hassle.
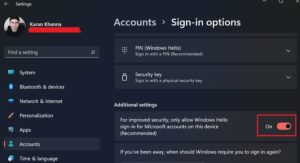
Enable Password Sign-In On Windows 10:
The good thing about signing in without a password is that it can be locked. Doing so will return the login option with your password to the lock screen.
- Open the Settings application (Win + I keyboard shortcut).
- Go to Settings Group Account.
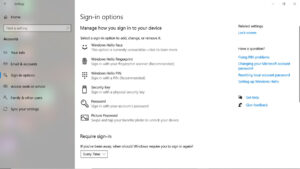
- Select the Login Options tab.
- Scroll down, and turn off the “Require Windows Hello sign in to Microsoft account” button.
- Tap Win + L to lock the desktop.
- On the lock screen, you will see the ‘Login Options’ option.
- Click and select the password option.
- Sign in with your Microsoft Account password.
The second way to enable password in Windows 10 is to disable the login password for the Local User Account. It’s important to note that turning off a Windows 10 password will make it more vulnerable to unauthorized access. To enable the password, open the Settings menu and select Sign-in options. You can then click on the Change button under the Password section. Once you’ve set a new password, you’ll have to reset your current account.
Leave a Reply