
How Do I Enable SSL on Windows Server 2022?
In order to enable SSL on your Windows server, you need to install a certificate. You can either install the certificate on your server or import one from another server. In this article, we will discuss how to install an SSL certificate and change it. Then, you can use the certificate to protect your website.
If you want to secure your website and other services running on Windows Server 2022, you can install an SSL certificate to protect the traffic. First, open a text editor. Avoid using a Word Processor, as Word includes formatting characters that may prevent the installation of SSL certificates. In the BEGIN CERTIFICATE field, enter 5 dashes. After this, remove any white space and click OK to import the certificate to the server’s storage Google.

After you’ve selected an SSL certificate provider, you should install it on your Windows server. This is important because it’s the only way for your website visitors to see your secure content. After you’ve installed the certificate, you can check to see if everything is configured correctly. If you’re unsure, you can use the Microsoft Management Console to find out.
How To Installing An SSL Certificate:
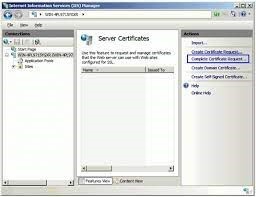
To install an SSL certificate on a Windows server, you can either log in remotely using Remote Desktop or by logging in from another computer. Once you’ve installed the certificate, use the Remote Desktop to log in to your Windows server. Open Remote Desktop, then select Start, Administrative Tools, Internet Information Services Manager, and select your server. From the list, select the Server Certificates icon. You’ll need to enter a certificate path and a friendly name. The friendly name should include the name of your CA and expiration date. When the installation is complete, the newly installed certificate should appear in the refreshed Server Certificate List.
When you’ve installed your SSL certificate on a Windows server, you can configure its use. Once the server has been configured to use an SSL certificate, you can use it for secure communication with customers. Alternatively, you can use a self-signed certificate to secure your website. Self-signed SSL certificates are commonly used on internal networks. But, if you’re communicating with websites outside your network, you should check the certificate’s issuer to make sure it’s authentic. If it’s not, you’ll be communicating with a malicious party, putting your information at risk.
How To Importing An SSL Certificate From Another Server:
Before you can import an SSL certificate from another server, you must export the one that is currently installed on your server. Then you must convert it to the appropriate certificate format and add the private key and intermediate certificates to it. In this article, we will talk about different types of servers, how to export an SSL certificate, and how to import it into the new server.
Importing an SSL certificate from another server is easy and simple. If you have a Windows server, you can export your certificate in a PFX file. This file contains the certificate, private key, and intermediate certificates, all in a password-protected container. You can do this from the Microsoft Management Console or from the IIS Manager. After you have exported the certificate, you should assign it to your new server. Enable SSL On Windows Server
How Do I Enable SSL On My Server:
You should follow certain steps before importing an SSL certificate. First, you must purchase a new SSL certificate. Then, you should go to the Certificate Manager section of your server. Click Manage, then click the View/Download Certificate Info link. After completing the process, you should copy the Certificate, Chain Certificates, and Private Key.
Now, you can install the newly imported certificate on your domain. To do this, you must have administrator privileges on your server. In the IIS Manager, click the Server Certificates tab. Next, you should select the new SSL certificate and bind it to the domain. Once you’ve done that, restart IIS and your website will be secure.
How To Changing The SSL Certificate:
To change the SSL certificate on a Windows server, you will first need to bind it to the website you want to secure. To do this, open IIS and browse to the website where you wish to bind the SSL certificate. Then, right-click the site and select Edit Bindings. In the Type of the request section, change the value to https.
You can also use the Certificate Manager to check the certificate’s validity. The sigcheck utility from Sysinternals can help you identify the TLS version of your certificate. Also, you can look for trusted Microsoft root certificate lists. Finally, make sure that the certificate was issued by a legitimate certificate authority (CA). This is done by applying a CSR or a new SSL certificate.
How Do I Enable An SSL Certificate In Windows:
Once you’ve selected the certificate, click Next to continue. If you don’t see it in the SSL Bindings list, try exporting it in the Base64 format. This will save your certificate in the Windows server’s Certificate List. You can also bind it to a website to ensure secure connections to it.
Add Site Binding Dialog Box:
- Under Type, select https.
- In SSL certificate, select the appropriate certificate from the available options. …
- Click the OK button.
Changing the SSL certificate on a Windows server is not a difficult task. The Windows server’s command-line interface will make it easy for you to change the certificate. First, you must copy the certificate file to the certificate store on your operating system. Once the certificate is added, reboot your computer to ensure that the changes are made.
Leave a Reply