
How to Enable SSL in WordPress
Installing an SSL certificate on your enable SSL in WordPress site is essential if you want your visitors to be able to access your website safely and securely. To do this, firstly, you need to go to the Security -> SSL Manager page on the WordPress admin panel. Once there, you need to select your domain, and then choose the type of certificate you’d like to use. You can either choose a free Let’s Encrypt certificate, or you can purchase a premium wildcard SSL certificate.
After you’ve selected your domain, you should go to the SSL settings tab. Then, type “SSL” into the search bar. Once you’ve done this, click “SSL Certificates” in the drop-down menu. After clicking “Secure”, you’ll see the option for adding an SSL certificate. You’ll notice the SSL Settings section. You’ll see a list of options Google.
Once you’ve selected a certificate, you’ll need to activate it. The process varies with the caching plugin that you’ve installed on your WordPress site. The process shouldn’t take more than a few minutes. WP Super Cache, W3 Total Cache, and WP Fastest Cache will show you how to enable the SSL on your WordPress site. Some caching plugins may require additional steps for activating them. To ensure that your website’s URL remains encrypted, you should clear your cache.
How To Really Simple SSL Certificate:
After you’ve completed these steps, you can enable an SSL certificate on your WordPress site. This step will require a small amount of coding and will improve your website’s authority online. You can use a plugin to help you manage this process. To get an SSL certificate on your WordPress website, you’ll need to buy one from your hosting company. Alternatively, you can obtain one for free from a website like Green Geeks.
Once you’ve found a plugin, you need to activate it. You can find it by searching for the “Install Now” button in the top right corner of your WordPress dashboard. Afterwards, you can configure SSL settings in your website from the settings area of your plugins. This will enable SSL for your WordPress site. When you’re ready, you should go to your settings to configure SSL.
Install SSL Certificate WordPress GoDaddy:
Once you’ve enabled SSL, you should install a certificate on your web server. This will prevent your site from being hacked. Your SSL certificate will also fix JavaScript and mixed-content errors that can occur. In addition, you’ll be able to access your site securely via any browser without any hassle. Your hosting company will be able to assist you in the setup of your SSL certificate.
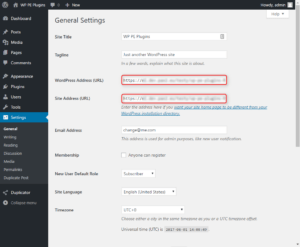
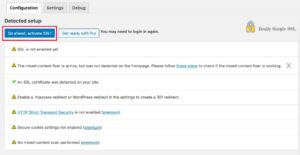
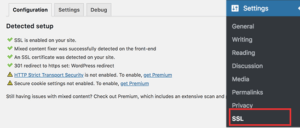
Once you’ve activated SSL on your WordPress website, you’ll need to configure your website to use HTTPS. This is easy for new sites, but for existing ones, you’ll need to update your settings to use HTTPS. Once you’ve done that, you can check whether your site is encrypted with an SSL certificate or not. This step is essential if you want to secure your website.
How To Enable SSL Certificate Installed Website:
An SSL certificate is an excellent way to boost your website’s security. In addition to a higher ranking in Google, an SSL certificate will make your content more accessible for your visitors. An SSL certificate will also fix problems related to mixed content and JavaScript on your website. However, there are some common errors that can occur with a WordPress website. So, to avoid these problems, you should make sure to install an SSL certificate on your site.
Once you have an SSL certificate installed on your website, you need to enable it on your domain. This will help you avoid a lot of common security issues. Your SSL certificate will protect your website from malicious software, so it is important to keep your site updated. Besides ensuring that your visitors’ data is safe, an SSL certificate can also help you improve your Google ranking. It will also fix any problems with mixed content and JavaScript.
Enable SSL In WordPress With The Help Of A Plugin:
Different types of servers have a different CSR production process. We have compiled the process of producing a CSR for the most popular platform, cPanel.
- Log in to your cPanel account and search the Security section.
- Click on SSL / TLS Manager there.
- Go to ‘Generate, view, or delete SSL certificate signing requests’ under Certificate Signing Request (CSR).
- Fill in the fields Domains, City, Country, Country, Company, Company Category.
- Email, Login, and Description with alphabetical letters and numbers only.
- Click Generate
To enable SSL on your WordPress site, first install an SSL certificate on your web server. This will encrypt all of your website’s traffic, and it will ensure that your visitors feel safe and secure whenever they visit your website. By adding this feature, you will be able to increase your website’s visibility and make it easier to find. You can also add an SSL certificate if you’ve never had one before.
Leave a Reply