How to Enable Hyper-V on Your Windows PC
If you want to enable Hyper-V on your Windows PC, there are two steps you can take. First, disable Hyper-V in the Boot Manager. Next, you need to install the Hyper-V and configure your virtual machine. Once the installation process is complete, you should restart your PC. This will apply any changes you have made to the system.
Disabling Hyper-V in Windows Boot Manager is not difficult and you can perform the process in a couple of different ways. One method involves using the DISM utility, which is a command-line tool for managing Boot Configuration Data. This tool allows users to edit the Boot Configuration Data and add entries to the boot menu. However, you must run the command in administrator mode Google.
To disable Hyper-V, open the Windows boot manager and choose the option to disable it. Make sure that the option hasn’t changed since you last booted. If it hasn’t, you’ll have to restart your PC. If you can’t get to the boot manager, you can open the Command Prompt.
How To Install Hyper-V:
Another way to disable Hyper-V in Windows 10 is to disable the Security Center. However, it is important to remember that disabling Hyper-V may cause your PC to malfunction. In addition, you should disable Hyper-V if you plan to use another virtualization software like VMware Workstation or VirtualBox.
Hyper-V allows you to create virtual machines. In the Hyper-V Manager, you can set up the storage locations of your virtual machines. You can assign memory, connect to a virtual hard disk, and configure virtual switches. You can also choose the generation of your virtual machines. You should use Generation 1 if you have a 32-bit operating system, or Generation 2 if your computer supports UEFI boot.
How To Disable Hyper-V In Boot Manager:
To check if your operating system supports Hyper-V, you can run the system info command line tool. You can access this tool from the command prompt or by using the search bar in the taskbar. It will show you the system’s requirements and whether your machine meets them. If your system meets the requirements, you can install the Hyper-V.
After you have completed the installation, you can configure the server. To do so, open the Hyper-V Manager, and select the server name. Next, select the server role and features you want to use. Then, press the Save button to apply changes. Enable Hyper-V
How To Configure A Virtual Machine:
You can configure a virtual machine using Hyper-V. After downloading the necessary files, you need to install the software. If you are a beginner, it is recommended that you use the default installation location. However, if you have advanced software, you may need to modify the location of the virtual machine.
To configure a VM, you should first connect to the Hyper-V server. Once you are connected to the server, you can assign the virtual hard disk and assign memory to the virtual machine. You can also configure the network settings and connect to the virtual hard disk. Once you have completed all the steps, you can start using your virtual machine.
Following Steps:
- Right-click on the Windows button and select “Applications and Features”.
- Select Programs and Features on the right under related settings.
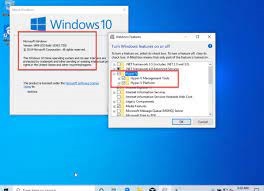
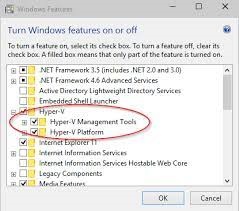
- Select Turn Windows features on or off.
- Select Hyper-V and click OK.
After selecting the location, you can configure the network and create the virtual switch. Creating the virtual switch is necessary for networking because the VM will not have network access without it. You can also create a virtual hard disk by specifying its name, size, and location. You can also choose to skip this step and attach it later.
Leave a Reply