
How to Enable SMB1 on Windows 10
There are two ways to enable SMB1 on Windows 10. The first is to open an elevated command prompt and type cmd in the Run dialog box. From here, type the command DISM /Online /Enable-Feature /All /FeatureName:SMB1Protocol. Once the command completes, you will need to restart your computer.
Disabling SMB1 is an easy way to make your computer more secure. Windows 10 has an option to enable or disable the SMB1 protocol. This can be useful if you want to access a network file server but want to be sure that you can access the files you share on that network without using the SMBv1 protocol. However, you should note that Windows 10 will not automatically detect if your computer is using SMBv1 or not Google.
The SMBv1 protocol is a very old technology. It has many vulnerabilities and exploits that can make your computer vulnerable to hackers. One of the most recent attacks, the Wanna Cry ransomware, targeted this protocol. To check if your computer is vulnerable to SMBv1, you can use programs like Metasploit to check the vulnerable areas of your PC.
How To Disable SMB1:
If you have multiple computers, you may want to disable SMBv1 for each one. To disable SMBv1, you need to ensure that the hosts are in a domain. Once you have created the domain, you will need to create a GPO to disable SMBv1. This registry policy will disable SMBv1 on all computers in the domain.
In Windows 10, you can disable SMBv1 by going to the Control Panel. In the Control Panel, look for the “Programs and Features” option. The Programs and Features section, you can manage installed software and protocols. If you are not using SMBv1, you should leave it checked.
How Do I Enable SMB1 On Windows 10:
Earlier this year, Microsoft announced its plans to disable SMB1 in Windows. SMBv1 is no longer supported in Windows Server. However, some applications still use it. Microsoft lists the applications that still support SMBv1 on its website. Disabling SMBv1 in Windows 10 will not affect SMBv2 and SMBv3 on the same computers.
If you want to protect your system from WannaCry, disable SMBv1. Also, make sure to update your software and patches.
How To Disable SMB 1.0:
In Windows 10, you can disable SMB 1.0 to make Windows use of other protocols. The SMB protocol is a standard for file access and communication between devices and processes on your computer. While it is still supported by current operating systems, it has received some negative attention recently due to its security vulnerabilities. You can safely disable SMBv1 by disabling it in the Programs and Features section.
You can disable SMBv1 in Windows 10 by editing the corresponding Group Policy settings. To disable SMBv1, you must be a member of a Windows domain. You can find full instructions on how to do this in Microsoft TechNet. Disabling SMBv1 should not affect modern hardware, but you may need to make some changes to consumer-grade network attached storage devices. You may need to update the firmware of such devices to make them use a more secure protocol.
How To Enable SMB1 Windows 7:
You can also disable SMB 1.0 by using PowerShell. To do this, use the Get-Windows Feature cmdlet, which is designed for Windows Server. This cmdlet will detect SMB 1.0 on Windows 10 and disable it. You’ll need Remote Server Administration Tools to perform this task.
For advanced users, disabling SMB1 through the command line is another method. First, you should know the SMB protocol. If you’re an administrator of a domain or workgroup, you must run PowerShell as an administrator. Afterwards, you need to restart the system.
How To Enable SMB1 Windows 11:
Besides disabling SMBv1 altogether, you can also try to fix any network errors in Windows 10 by disabling SMB v1 in Windows PowerShell. However, you should be aware that disabling SMBv1 is not a permanent fix. It may also prevent you from accessing shared files and folders on newer versions of Windows. If you disable SMBv1, you may experience problems accessing shared files or folders, either with legacy clients or NAS devices.
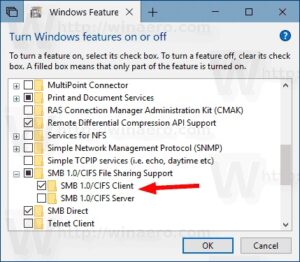
Following Steps:
- Click and open the Search Bar in Windows 10.
- Type Windows Features in the search bar. …
- Scroll down to SMB 1.0 / CIFS File Sharing Support.
- Check the net box in SMB 1.0 / CIFS File Sharing Support and all other child boxes will automatically fill up.
Another way to disable SMBv1 in Windows 10 is to disable it in the Windows registry database. To do this, you can use the standard editor Regedit to modify the SMBv1 entry in the registry database. However, you should remember that this method requires administrator rights and that you must restart the system after making changes in the registry.
Leave a Reply