
How to Enable SMB1 on Windows 10
Enable smb1 on windows 10 protocol and temporarily enabling SMB2 are two different ways of regaining access to your local network. The former method exposes your system to attack, while the latter option protects your data from attacks. Regardless, in this article I will show you how to restore SMB1 access to Windows 10.
To disable SMBv1 on Windows 10, follow the steps in this article. The first step is to open the Server Manager dashboard and click on the Add or Remove Roles and Features option. This will open the Add or Remove Roles and Features Wizard. Select the checkbox next to the SMB 1.0/CIFS File Sharing support and click Next. Once you’ve completed the process, you should restart your computer Google.
The next step in this process is to access the system registry. The registry contains entries for different protocols, and SMBv1 is an outdated version. By disabling SMBv1 on Windows 10, you can secure your data on your network and prevent other users from gaining access to your network. However, if you’d like to enable SMBv1 on Windows 10, you’ll need administrative rights.
How To Enable SMB1 Windows 10 CMD:
The next step is to change the registry key associated with SMBv1 (if necessary). This requires you to navigate to the Group Policy Management console and change its value from DWORD to 0 to avoid errors. Make sure to restart the PC to ensure that the changes have taken effect. You can also undo the change by deleting the key. However, you should take note that SMBv1 requires SYSVOL access.
SMB support has been disabled by default in Windows 10, but you can manually disable it. The process involves disabling the support for the SMBv1 protocol in Windows 10 through Control Panel, PowerShell, or the Windows registry. Following these steps will deactivate SMBv1 support and enable it again later. The instructions below will illustrate various ways to deactivate and reactivate the protocol.
How To Temporarily Activate SMB1:
To disable SMBv1, you need to change the status to “disabled.” To disable the feature, open the PowerShell command prompt and type “wsmb1” in the search box. Select “yes” to confirm your action. Then click Next. You will be asked to restart. Your Windows 10 computer will restart automatically. Then, you can try to reactivate SMBv1 and see if it works.
The process is similar to enabling SMB2 on Windows 10. To enable SMB1 on Windows 10, you must log in as an administrator. After that, go to the Control Panel and click on the Network icon. Now, you should see a new window in Windows 10 with the command “smb1 enable” listed. If you’re using Windows PowerShell, you can type “wsm1 enable” and hit Enter.
How Do I Enable SMB1 Group Policy:
If you want to disable SMBv2 on Windows 10, you should first enable Performance Optimizations. This will allow you to optimize small random read/write I/O. Similarly, to enable SMBv1 on Windows 10, open the System Configuration Utility and right-click the Start button. Then, expand Control Panel and select the Advanced system settings. Then, look for the SMBv2 option, and then click the Settings button to select it.
If you can’t locate this option in the Control Panel, you can use the Registry Editor. If you’re not familiar with registry manipulation, you can create a System Restore point to ensure that you don’t accidentally mess anything up. In the Registry Editor, enter the following command: regedit. Set the Value data to 0 or 1.
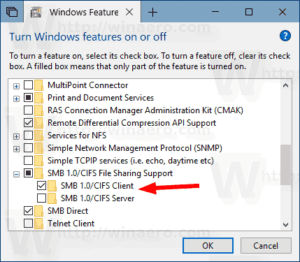
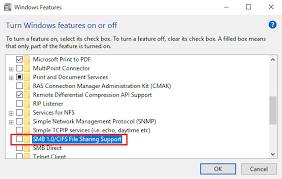
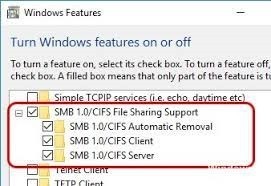
Following Steps:
- Click and open the Search Bar in Windows 10.
- Type Windows Features in the search bar. …
- Scroll down to SMB 1.0 / CIFS File Sharing Support.
- Check the net box in SMB 1.0 / CIFS File Sharing Support and all other child boxes will automatically fill up.
The SMBv2 protocol is a network protocol that allows you to connect to another computer over a network. This protocol has many advantages. It offers improved performance and security. However, there’s a new experimental exploit that can make a malicious user gain full control of a targeted Windows System. To disable SMBv2, all you need to do is edit the registry. After you’ve done that, you can check the SMB signing option and then click the OK button.
Leave a Reply