
How to Enable a VPN in Windows 10
In order to set up a VPN connection in Windows 10, you’ll need to follow a few easy steps. First, you’ll need to connect to a VPN server. Next, you’ll need to sign in with a preshared key. Once you have this information, you can click on the Network menu and select the VPN connection. Enable VPN In Windows 10
To set up a VPN connection on Windows 10, first open the Settings app. Next, click the Settings button (a cogwheel will appear in the lower-left corner of the screen). In the left-hand pane, click the Network and Internet option. Next, select VPN. A popup window will appear, where you can enter your connection details. If you are not sure what to enter, ask your employer or VPN provider to help you out Google.

You will need to enter your username and password to login to the VPN network. If you are using a work VPN, make sure that your boss has given you permission to use the network. Otherwise, a private VPN will require user credentials and a specific server address.
How To Connect To A VPN Server:
In Windows 10, you can use the Network Connections window to connect to a VPN server. To access this feature, press the ALT key and choose File from the menu that pops up. Next, click the Network Connections tab. Then, click the Add a VPN connection button. You will be asked to enter your username and password.
After you have selected the VPN service provider, you can begin setting up your VPN connection. First, you must select the Windows (built-in) VPN provider. After that, you will need to enter the server address provided by your VPN service. This address will be similar to the URL of a website. It will contain a five or six-character alphanumeric string that represents your VPN server. You should also choose the type of connection you wish to use.
How To Sign In To A VPN:
Once you’ve installed the VPN on your PC, the next step is to sign in. This can be done by visiting the VPN provider’s website and entering the username and password. Using a username and password is preferred for most commercially available private VPNs. Sign in information will vary by provider.
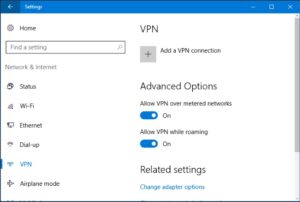
To sign in to a VPN in Windows 10, open the Settings app and navigate to Network and Internet. On the left side, click on VPN. You should see an icon for your VPN provider. Next, click on the name of your VPN service in the server field. If you have any questions, click on the “help” button.
How To Set Up A VPN Connection On Windows 10:
Alternatively, you can install a software application that connects to a VPN whenever you turn on your PC. These programs usually have an administrator-level feature that allows you to control the connection, but they are more complicated to install. Once installed, you’ll need administrator rights to install and run them.
To enable a VPN in Windows 10, you must first create a limited user account. This type of account allows you to connect to a VPN without using your regular account credentials. To do this, open the Settings app and click on the Network icon. On the Network tab, click the VPN connection option and click the Connect button. After a couple of seconds, you should see a popup that asks you to enter your username and password.
How To Create A Limited User Account:
Click the Network Connections icon in the system tray on the bottom right corner of your screen. Next, click the VPN icon. This will open the Network & Internet window. Click the Add VPN button and enter a new name and password. The username and password should be the same as your workplace username and password. Your new VPN connection should appear under VPN (12). Next, click on the Change adapter options button. Choose the Internet Protocol Version 4 and click OK.
Windows 10 users can configure their VPN provider in a few simple steps. To do so, open the network icon on the taskbar and right-click it to open Windows settings. Under Network & Internet, select the VPN connection option. The VPN connection name should be recognizable and include the server name, IP address, and hostname provided by the VPN service provider.
Set Up VPN On Windows 10:
- Select the Start button and enter the settings.
- Select Settings > Network & Internet > VPN > Add VPN.
After selecting the server, the VPN client software will begin configuring your connection. The connection type will vary depending on the VPN provider, but most will require a username and password. You must also be sure to know the protocol used by the VPN provider you’re using.
Leave a Reply