
How Do I Enable SMB2 on Windows 11
In this article, we will learn how to enable SMB2, Disable SMB2, and test SMB2 for Windows 11. Before we proceed, let’s take a look at the steps involved in the process. If you follow the steps in this article, you will be able to connect to a network and share files on the other side.
First, open the Network and Sharing Center and go to the properties of your network connection. You’ll notice a REG_DWORD key named SMB2 that has a value of either 1 or 0. If the value is 0, your SMB connection is disabled. To enable SMB2 on your PC, you need to change the value to 1 in the Registry Editor Google.
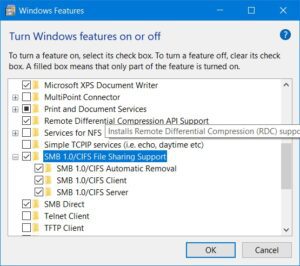
You can enable or disable SMB servers using PowerShell. Another option is to use the Control Panel. Go to Control Panel and search for “control panel.” Select the “Turn Windows features on or off” option. Select SMB and confirm the change. After you’ve done that, you can close the PowerShell window.
How Do I Enable SMB2:
The original version of SMB was introduced back in the 1980s. Since then, there have been several iterations. Windows 95 introduced CIFS, which is a more modern implementation. Although SMB v1 is still supported by Windows, it’s not recommended for modern applications. The reason is two-fold. First, it lacks encryption and is prone to congestion and poor performance. Second, it is not as secure as SMBv2.
If you’d like to enable SMB2 on Windows 11, you’ll need to run the Set-SMB Server Configuration cmlet. This command opens up the Registry Editor, where you can make changes to SMB settings. For example, you can change the value of data to 1 to enable SMB2 for your system. If the value is 0, it means that SMB is disabled.
How To Set-SMB Server Configuration Cmdlet:
To disable SMBv1, you must first identify SMB 1.0 devices. After that, you should update or isolate those devices. If you’re not sure whether a device is SMBv1, you can use the Get-SMB Session cmdlet to see the SMB dialect being used by various clients.
SMB is a protocol used to share files between Windows computers. It requires two services, a server and a client. Every Windows computer includes the Lan man Server service and Lan man Workstation service. You can verify the status of these services by using the Get-SMB Server Configuration cmdlet.
How To Disable SMB2:
You can disable SMB2 on Windows 11 using a simple command. You must run PowerShell as an administrator before performing this task. Once you have run the command, you should be prompted for confirmation. After that, type the following command in the command window to confirm your actions. Now, you should see the option Disable SMB2 in your system settings.
Firstly, go to the Control Panel. You can find it by searching for “Control Panel” in the Start menu. There, you can see the program list and choose the option “Turn Windows features on or off.” After launching the command, you can see whether it says “EnableSMB2Protocol” or “False”.
Open The App In Admin Mode:
- Open PowerShell as administrator.
- Check the SMB status on your Windows computer.
- Enable SMB from Windows PowerShell.
- Open Programs in Control Panel.
- Turn Windows features on or off.
- Enable SMB in Windows Features.
Another way to prevent the error is to disable SMB1 altogether. This is not possible in the Windows 11 Insider version, but you can disable it on the major version. Disabling SMB1 won’t affect in-place upgrades. In addition, you can intentionally re-install SMB1 on the system.
Leave a Reply