
How Do I Enable SMBv1 on Windows 10?
To enable SMBv1 on Windows 10 you need to change a registry key and set the value to 0. You can change the value of the registry key by using Group Policy Management console. You must restart your PC after making these changes. undo these changes by deleting the registry key.
Disabling SMBv1 in Windows 10 is simple and can be done from the Windows registry. You can do it by typing reedit in the Windows Run dialog box. After you’ve launched the registry editor, navigate to the SMBv1 entry. This is a DWORD 32-bit entry, and you can create it by right-clicking the Parameters key and naming it SMB1. Once you’ve created the entry, double-click it and change the value data to zero Google.
Disable SMBv1 in Windows 10 is not difficult, but it’s important that you know how to do it properly. Windows has an option called “Group Policy” that enables administrators to disable certain features. It can be found in the start menu, or you can open the Run window and type “control panel”. Once you’ve opened the control panel, you’ll see large and small icons. Click on Turn Windows features on or off, and double-click on SMBv1. You can also disable SMBv1 in Windows 10 by using PowerShell.
How To Disable SMBv1 In Windows 10:
Disabling SMBv1 in Windows 10 can help decrease the vulnerability of your machine. disable SMBv1, you need to modify the network settings. To do this, you need administrator privileges and access to the registry. To disable SMBv1 using PowerShell, you need to enter the command Set-Smb Server Configuration -EnableSMBv1Protocol with the value of 1. You can also disable SMBv1 through the Windows registry.
The SMBv1 protocol is disabled by default in Windows 10. However, you can turn it on to share files with your computer. You need to open the control panel by pressing the Windows key or the Start button. Then, click the “Programs” link and select “Windows Features.” In the Windows features dialog box, click the “Server Message Block” option and click “Enable.” You must have administrative rights to enable this feature.
How To Turn On SMBv1 In Windows 10:
The SMB1 protocol is not enabled by default in Windows 10. However, you can manually enable it by using the Windows PowerShell. Once you have enabled it, restart the computer and it should function normally. However, you may receive error messages while accessing your network. If you are experiencing this issue, you may want to temporarily disable SMBv1 on your system.
The first step to turn on SMBv1 on Windows 10 is to open the Programs and Features window. You should find the SMBv1 support option in the third tab. From here, you can choose the appropriate option depending on your needs. Remember that you should enable SMBv1 only if you need it.
How To Test SMBv1 In Windows 10:
You can also disable SMBv1 by using the Control Panel. This window is easier to use than the command line. To open the control panel, click the Windows key and then select “Programs and Features”. There, you will find a list of installed programs and protocols. Ensure that you have administrator privileges so you can choose SMB 1.0/CIFS File Sharing Support. After disabling SMBv1, you should restart the computer.
If you’re trying to configure SMBv1 file sharing on Windows 10, you’ll need to run a command from the command prompt in order to enable the feature. To do this, go to Control Panel and open the Programs and Features window. There, you’ll find a new option for SMBv1 support. This will enable or disable the SMBv1 server and client, and you can also select an automatic removal option.
How Do I Enable SMB1 Protocol In Windows 10:
In the new window that pops up, double-click on Server Manager. This will open the Add or Remove Roles and Features Wizard. In the Add or Remove Roles and Features Wizard, select SMB 1.0/CIFS File Sharing support. After you’ve selected this option, click the Next button. You’ll need administrative privileges to complete this step.
You can also use a SIEM tool to monitor network traffic and look for any unusual activity. These tools will extract file and folder information from network packets. If you find suspicious activity in this way, you can disable it. Alternatively, you can try the steps described above in a different way.
Perform The Following Steps:
- Click to open the search bar in Windows 10.
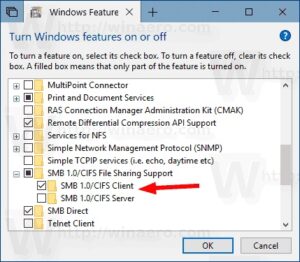
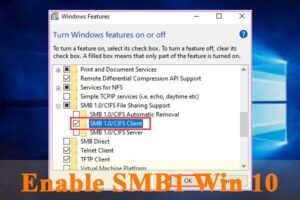
- Type Windows Features in the search bar. …
- Scroll down to SMB 1.0/CIFS File Sharing Support.
- Check the Net to SMB 1.0/CIFS File Sharing Support box and
- All other child boxes will be filled in automatically.
To enable SMBv1 in Windows 10, run the command cmd in the Run dialog box and select elevated command prompt. Enter the command DISM /Online /Enable-Feature /All /FeatureName:SMB1Protocol. Once this command is complete, Windows will restart.
Leave a Reply