How Do I Enable Local IIS in Windows 10?
The first step is to open the Run Command by clicking the start menu and searching for “Control Panel”. On the results page, click the Control Panel link and select the “Uninstall a program or feature.” Expand the window and select “Turn Windows features on or off” from the list. You should now see Internet Information Services listed. Enable Local IIS In Windows 10
Internet Information Services (IIS) is a Windows feature that allows you to run a web server. It uses the port 80 by default, but you can configure it to use a different port. Installing IIS on your PC is easy and can make your website secure and more reliable Google.
After installing IIS, you can test it out to make sure everything is installed correctly. You can install multiple instances of IIS on your system. After you are done, you can restart your computer and begin using your new application. To run a web server, you must first install IIS on your computer.
How Do I Enable Local IIS In Installing IIS:
You can enable or disable Internet Information Services in Windows 10. Open Control Panel and choose the category “Programs and Features” option. Click on “Internet Information Services” and then “Internet Explorer.” You’ll see a new window with a list of options. You can check the box next to “Install additional features.” Then, click on “OK.” Windows will look for the files required and apply them to your PC.
Configuring IIS in Windows 10 involves modifying the configuration of the web server. If you are using a web server that is new to your computer, you need to change the settings to make sure that your server is ready for use. The first step is to open the Start menu and search for the Server Manager tile. Once in the server manager, click Add Roles and Features. This wizard will walk you through the process of installing new server roles and features.
How Do I Enable Local IIS In Configuring IIS:
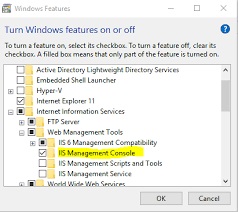
You can install the IIS management console to manage the server and the website. The console comes with features for performance and security. It also offers information about system status and diagnostics. You can also add an FTP server by clicking the “+” icon next to Internet information services. In Windows 10, you can also open the web-server manager by typing “webserver” into the search box.
You can now select the certificate that is necessary for your IIS web server. This certificate must be installed on the server. The certificate can be the same for both the Smart API Manager and the Internet Information Services Manager.
How Do I Enable Local IIS In Verifying IIS Status:
After you have enabled local IIS in Windows 10, the next step is to verify that your web server is running. The Internet Information Services control panel is located in the Windows Features dialog box. In it, you will find the World Wide Web Services and FTP Server. Enabling the two services will enable the management console for IIS. To verify that your server is running, try accessing localhost/ in your web browser. If the web site is working properly, you can see the default home page for your IIS server.
Next, you should enable HTTPS for the distribution point. You will also need to create an authentication certificate for your web site. You can do this by visiting Microsoft Certificate Services at the URL “http://MyCA/certsrv” and entering the domain name of the server machine.
How Do I Enable Local IIS In Turning On IIS:
To enable the HTTPS protocol, you must first enable the HTTP protocol. This will allow IIS to detect and report on issues affecting the server. In addition, it will prevent IIS from blocking HTTP requests.
You can turn on the local IIS on Windows 10 using two methods. The first method is a point-and-click, which is ideal for beginners who don’t have experience with PowerShell or Windows commands. First, you need to open the Control Panel and look for the Uninstall program or Installed Updates link. Select the Turn Windows feature on or off the link, which is located next to the Uninstall program or Updates link. You can then expand the window to see the Internet Information Services option. Once you have selected this option, the Internet Information Services will automatically be installed.
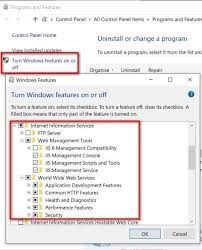
Required IIS Components On Windows 10:
- Open Control Panel and click Programs and Features > Turn Windows features on or off.
- Enable Internet Information Services.
- Expand the Internet Information Service feature and verify
- That the Web server components listed in the next section are enabled.
- Click the OK button.
Alternatively, you can use IIS 10.0, which is included in Windows 10. Setting it up on Windows 10 is just as easy as doing the same on a Mac or Linux.
Leave a Reply