How to Enable Remote Desktop in Windows 10
The Enable Remote Desktop Windows 10 app makes it easy to connect to other computers over the local network or internet. It can also help you troubleshoot a connection. However, you may need to adjust the firewall settings to ensure that the app can access necessary ports.
To enable remote desktop windows 10, navigate to the Settings menu and select System. You can also use the command prompt to do this.
Enabling Remote Desktop on a Windows 10 computer allows you to access it remotely from another device. Here’s how you can enable Remote Desktop on Windows 10:
- Open Settings:
- Press
Win + Ito open the Settings app.
- Press
- Go to System:
- In the Settings window, click on “System.”
- Navigate to Remote Desktop:
- In the left sidebar, click on “Remote Desktop.”
- Enable Remote Desktop:
- Toggle the switch under “Enable Remote Desktop” to the ON position.
- Make Note of PC Name:
- Below the toggle switch, you’ll see the name of your PC. You’ll need this information to connect remotely. If you’re not sure, you can check it by right-clicking on the Start button, selecting “System,” and looking under the “Computer name” section.
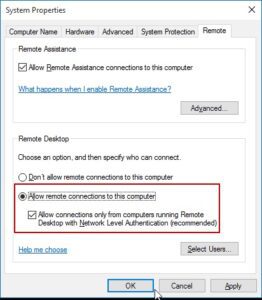
- Adjust Advanced Settings (Optional):
- You can click on “Advanced settings” to customize some options like allowing connections only from computers running Remote Desktop with Network Level Authentication (NLA).
- Configure Network Settings (Optional):
- Click on “Network settings” to specify the network level authentication settings and choose whether to use a private or public network connection.
- Set Up Firewall Rules:
- Ensure that your Windows Firewall allows Remote Desktop connections. Windows usually prompts you to allow access the first time you enable Remote Desktop, but you may need to check the firewall settings manually. You can do this by going to “Control Panel” > “System and Security” > “Windows Defender Firewall” > “Allow an app or feature through Windows Defender Firewall” and make sure “Remote Desktop” is checked.
- Connect Remotely:
- On the device you want to connect from, use the Remote Desktop client. This can be another Windows PC, a Mac, or a mobile device. Enter the name of your PC (from step 5) in the Remote Desktop client and click “Connect.”
- Enter Credentials:
- Enter the username and password for the account on your Windows 10 PC that you want to use for the remote connection.
- Complete Connection:
- After entering your credentials, click “OK” or “Connect” to establish the remote connection.
Setting up a connection
If you’re using Windows 10 Pro or above, you can enable remote desktop to connect to your PC from another computer. It can be used for a number of things, including resolving problems on a host machine while you’re away from work. Google
When you click the “Advanced settings” option, you can enable additional features to make your connection more secure. For example, you can require computers to use network-level authentication to connect remotely. This feature ensures that only authorized users can access the host computer.
You can also choose to limit which local devices and resources are available during a remote session. For example, you can select whether you want the remote PC to have access to your printers and clipboard. You can also choose to allow or disallow ports, disk drives, and plug-in devices. The options you choose depend on the tasks you need to perform. Once you’ve configured the settings, you can start connecting to the remote PC.
Using the app
If you have a Windows computer with the Remote Desktop feature enabled, you can use the app to connect to your device from other computers, tablets, or phones. To connect, open the app, tap the overflow menu (…) next to a PC name, and tap More options. This option will show you the current settings for that connection. To edit the settings, tap Edit.
If the PC is a domain or workgroup member, you can enable Network Level Authentication to make your connections more secure. This option is not available when using the Settings app, but it is possible to do through the Local Group Policy Editor.
Once you have the setting enabled, click Save to save the changes and close the window. After this, the Remote Desktop icon will appear on your home screen and you can start a session from here. You can also access a list of sessions and workspaces on the Workspaces page.
Troubleshooting a connection
If you are having trouble connecting to a remote desktop, there are some steps that you can try to fix the problem. For example, you can change your host file to allow RDP connections to pass through. You can also disable your firewall temporarily to see if this fixes the problem. You can do this by using the Windows Key + R command and launching Registry Editor. Once you have opened the registry, navigate to HKEY_CURRENT_USER Software Microsoft Terminal Server Client. Then, create a new DWORD value and name it RDG Client Transport. Next, set the value data to 1.
Another issue that can cause a remote desktop connection to fail is high network latency. This may be caused by resource-intensive programs on the host computer. You can try adjusting the graphics settings on your host computer to reduce network latency and improve performance. You can also run a diagnostic test from a different network to determine the cause of the problem.
Disabling the app
If you’re not using the app, it’s a good idea to disable it. It’s easy to do and can help keep your computer secure from hackers and prevent them from accessing private information or installing malware.
The Windows Settings app makes this process simple. Just navigate to the “System” tab and click on the “Allow remote access” option. The app will also display the current RDP port number, which can be helpful if you need to configure your router to allow remote connections outside of your network.
Disabling RDP can help keep your system secure, but there are a few other security measures you should take, including creating strong passwords and restricting access to the computer. Additionally, you should use firewalls and antivirus software to protect your computer from attacks. Additionally, it’s a good idea to update your software frequently. This will ensure that you have the latest version and reduce the risk of vulnerabilities.
Leave a Reply