How To Turn On Bluetooth Windows 10
Bluetooth is a wireless technology that allows you to connect various devices, such as headphones, speakers, mice, keyboards, and smartphones, to your Windows 10 computer. Turning on Bluetooth on your Windows 10 device is a simple process that involves a few steps. In this guide, we’ll take you through the process step by step.
Step 1: Verify Hardware Compatibility
Before you begin, ensure that your computer has built-in Bluetooth capabilities or that you have a Bluetooth adapter installed. Most modern laptops and desktops come with built-in Bluetooth, but if yours doesn’t, you can use a USB Bluetooth adapter to enable the feature.
Step 2: Open the Settings App
To get started, click on the Windows Start button located at the bottom-left corner of your screen. This will open the Start Menu. From the Start Menu, click on the “Settings” icon, which looks like a gear. Google
Step 3: Access the Devices Settings
In the Settings app, you’ll see various categories. Look for “Devices” and click on it to open the Devices settings window.
Step 4: Navigate to Bluetooth & Other Devices
Once you’re in the Devices settings, you should see a list of options on the left-hand side. Click on “Bluetooth & other devices” from this list.
Step 5: Check Bluetooth Status
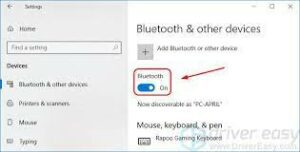
On the right-hand side, you’ll find the Bluetooth settings section. First, verify that the “Bluetooth” toggle switch is visible. If it’s not, it may indicate that your computer doesn’t support Bluetooth, or there’s an issue with the Bluetooth adapter.
Step 6: Turn On Bluetooth
If the Bluetooth toggle switch is visible, you can now proceed to turn on Bluetooth. Simply click on the toggle switch, and it should turn blue or show “On” status, indicating that Bluetooth is now enabled.
Step 7: Pairing a Bluetooth Device
With Bluetooth turned on, you can now pair your Bluetooth-enabled device. To do this, make sure the device you want to connect is in pairing mode. For most devices, this involves holding down the pairing button or following the manufacturer’s instructions.
Step 8: Add a Bluetooth Device
In the Bluetooth settings window, click on the “Add Bluetooth or other device” button. This will open a new window where you can choose the type of device you want to connect. Select “Bluetooth” as the device type.
Step 9: Select Your Device
Windows will now search for nearby Bluetooth devices. When your device appears in the list, click on it to select it. If prompted, follow any on-screen instructions to complete the pairing process.
Step 10: Successfully Connected
Once the pairing is successful, you’ll see a message indicating that your device is connected via Bluetooth. You can now use the device with your Windows 10 computer wirelessly.
Step 11: Troubleshooting
If you encounter any issues with Bluetooth, ensure that the Bluetooth drivers are up to date. You can visit your computer manufacturer’s website or the Bluetooth adapter manufacturer’s website to download the latest drivers.
If you experience connection problems, try restarting your computer or the Bluetooth device. Additionally, distance and obstacles between the devices can impact Bluetooth performance, so make sure your devices are within a reasonable range and have a clear line of sight.
Step 12: Turning Off Bluetooth
When you’re finished using Bluetooth or want to conserve battery power, you can turn it off. Simply return to the Bluetooth settings in the Devices app and click the Bluetooth toggle switch to turn it off.
Congratulations! You’ve successfully turned on Bluetooth and connected a Bluetooth device to your Windows 10 computer. Enjoy the convenience of wireless connectivity for various peripherals and devices.
Leave a Reply