
How to Enable Remote Desktop Authentication
When attempting to connect to another computer through Remote Desktop, you need to enable authentication on your computer. If your system does not allow remote connections, you can use Group Policy or PowerShell to allow access to RDP. Alternatively, you can use the Windows firewall to enable remote connections to your PC.
If you are having trouble establishing a remote desktop connection, you can use Group Policy to enable Remote Desktop authentication. To do this, you need to enable the RD protocol on the remote machine. You can do this by using the mats client. After setting up the RD protocol on the remote computer, you need to configure the Remote Desktop Session Host in the Group Policy Editor. You can then enable Network Level Authentication, which improves the security of the RD Session Host server by requiring user authentication before creating a remote session Google.
Remote Desktop is a feature of Windows that lets you connect to a remote computer and interact with it as if it were local to you. IT teams rely on this feature to access remote devices and perform remote administration. To enable Remote Desktop, you need to set up Group Policy and make sure that all computers are joined to an Active Directory domain. Also, you need to make sure that you have enabled Windows Defender Firewall on the domain profile for RDP traffic. You can access this setting by clicking on Computer Configuration, Network Connections, and Windows Firewall.
How To Enable Remote Desktop Power Shell:
To enable Remote Desktop authentication, you need to make sure that your Windows 10 computer is set to allow TCP connections from the network. You can do this by editing the firewall rules. Once the changes are made, reboot the computer and the Remote Desktop connection will be enabled. In addition, you must enable the firewall rule for Remote Registry service to work.
This power shell script relies on a WMI class called Win32_TerminalServiceSetting. This class is located under Root/CIMV2/Terminal Services and contains methods to enable and disable Remote Desktop access for a remote computer. It also provides methods for configuring several Remote Desktop options.
How Bypassing Duo Authentication When Offline:
Run the PowerShell script as an administrator on your Windows computer. Make sure to run it as an administrator so that you don’t accidentally modify the registry. Be careful with this command, because the registry can be damaged permanently.
If you have been experiencing problems logging into your Duo account when offline, there are several steps you can take to prevent the authentication process from failing. For example, you can disable UAC elevation protection on your machine and access the Duo service only from a protected RDP session or local session. These steps will prevent MFA bypasses and allow you to use Duo as a normal login.
How To Enable Remote Desktop Group Policy:
The first step is to disable MFA on the local login. To do so, you can modify the hosts file of your computer. This requires administrator privileges and will allow you to access RDP without a password. However, you must make sure to restore the hosts file after you are done.
You can also configure Duo policies to prevent an unknown user from logon. This step is important if you’re testing a new deployment. Some organizations leave this policy in bypass mode to avoid disruptions during testing.
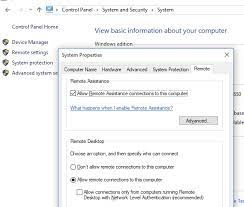
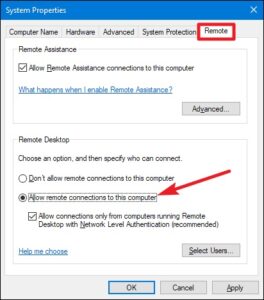
How To Enable Remote Desktop Windows 10:
To allow remote connections through Windows Firewall, you must first open the Group Policy Management Editor and add a new rule for the port 3389. Windows Firewall uses port 3389 for Remote Desktop connections. In the ‘Inbound Rules’ section, make sure that ‘Block all incoming connections’ is not checked. Also, make sure that the Remote Registry service is set to Manual startup.
You can also enable remote connections by creating a group named Remote Desktop Users. If you enable this group, you will be able to connect to the remote computer, but users who do not have this group can’t connect to the remote computer. If you have disabled remote connections, the target computer will maintain current connections but will no longer accept new connections. To enable remote connections, go to Computer Configuration> Policies > Administrative Templates> Windows Components>Remote Desktop Services > Connections.
How To Enable Remote Desktop:
- On the device you want to connect to, select Start, then click the Settings icon on the left.
- Select the System group, then select Remote Desktop.
- Use the slider to enable Remote Desktop.
- It is also recommended to keep the computer awake and discoverable to facilitate connection. Click Show Settings to enable.
- Add users who can connect remotely as needed by clicking Select users who can remotely access this computer.
- Members of the Administrators group automatically have access.
- Note the name of this computer under How to connect to this computer.
- You will need this to configure clients.
Once you have enabled Remote Desktop connections, you can configure them to use the IP address of the computer hosting the Remote Desktop Connection. You can also configure their appearance, devices, and other settings.
Leave a Reply