
How To Enable SSD In BIOS Windows 10
Using a SATA SSD requires you to change a setting in the enable SSD in BIOS Windows 10 to make it the first device that boots when you turn on your computer. To do this, you should right-click on the SSD and choose the Advanced boot option. Next, choose the GPT partition style, then select New Simple Volume. Finally, choose the NTFS file system and click Next. Now, restart your computer. Your SSD should now be recognized by the operating system.
Once the SSD has been installed, you can access BIOS to configure it. To do this, restart your computer and go to the BIOS configuration section. After entering the BIOS, turn on the SSD, then save your changes. You should now see it listed in your disk management. If you want to disable the SSD, you can go back to the BIOS and disable it again. After you disable the drive, you will have to format it Google.

Once the BIOS has detected the SSD, you must restart your computer. After this, you can confirm whether the drive is now enabled by opening the Disk Management window. Depending on the manufacturer, you may also need to update your driver. If your drive is not listed in the BIOS, visit the manufacturer’s website to obtain the latest version. Once you have updated the driver, your system should now detect and recognize your SSD.
SSD Not Showing Up In BIOS Windows 10:
You can enable the SSD by restarting the device. You should then open the BIOS config window. In the configuration window, look for the serial ATA. If it’s there, select it and click OK. This will confirm that the SSD is now active. Once the drive is detected, you will need to confirm that it has a name. Alternatively, you can select IDE compatibility mode to avoid conflicts.
Once you have enabled the SSD, you must enable it in the BIOS. You can then use the Upgrade All tool to download the correct driver for the SSD. This will prompt you to reboot your PC. After that, you should go back to the BIOS and check the drive. Then, you can now use the SSD. This is the first step in enabling the SSD in your BIOS. You can then select the option in the BIOS for your system to enable the SSD.
Enable The SSD BIOS Menu Of Your Computer:
To enable the SSD, you need to go to the BIOS menu of your computer. The BIOS menu is different for every manufacturer. To enable the SSD in BIOS, click on the “Device manager” icon. In the Device manager, expand Disk drives. In the Device Manager window, expand the ‘Policies’ tab. You must check Enable write caching for your SSD in the device.

Depending on the motherboard and type, your BIOS might have a different look. To enable your SSD, you should right-click on the computer and select the Disk drives tab. On the Policies tab, check Enable write caching on the device. This will make the SSD more effective. After enabling SSD, you will be prompted to reboot your PC. This is the first step to ensure that your SSD is working properly.
How To Enable SSD In BIOS MSI:
To enable the SSD, you need to ensure that the drivers for the SSD are updated. Changing the drive letter will change the drive’s identifier. Afterwards, you should choose the correct letter to use for the SSD. After ensuring that your SSD is formatted correctly, you can proceed to the next step. Then, you can enable the SSD in the BIOS by pressing the appropriate key.
Configure The SSD Settings In BIOS:
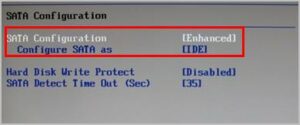
- Restart your computer, then press the F2 key after the start screen.
- Press the Enter key to enter Config.
- Select Serial ATA and press Enter.
- Then you will see the SATA Controller Mode Option. …
- Save your changes and restart your computer to enter the BIOS.
If you have a SATA SSD, you can enable it in the BIOS by selecting the SATA controller mode in the BIOS. You can also change the boot device by choosing a CD or MBR format. If your SSD volume is free and in RAW format, you can format it with the F2 key. Once you’ve done this, you can select the drive letter and the corresponding driver.
Leave a Reply