
How to Enable Remote Computer Management in Windows 10
Windows provides two ways to enable remote-computer management. You can use Desktop Central, which allows you to connect to another computer with administrative privileges, or you can manually enable remote management. Regardless of how you access the remote computer, you need to have the appropriate rights to connect. Follow these steps to set up remote management on your PC. Once you’ve done that, you can configure the settings to allow remote access and management.
After you’ve enabled remote management, you can configure which users have access to the remote computers. The first step is to open System Preferences on the remote computer and choose the permissions that you want to allow. This will give you more control over which people have access to the computer. After enabling the feature, define the users who will be allowed to access the computer. For instance, you can enable the privileges of certain Remote Desktop administrators Google.
You’ll need elevated user rights to manage your clients’ computers. To enable remote computer management, open the Server Manager from the Start menu or the GUI. Then, click on the Disabled text. This opens up the System Properties window. Click the Remote tab to enable remote desktop connections. You can also open this window through the Command Prompt or PowerShell. Just type system propertiesre mote into the CMD window.
Enable Remote Computer Management Windows 10:
To enable remote computer management, you need to create an account on the server. After you’ve created an account, you need to set the permissions of the user on the remote computer. Afterwards, you can set the permissions for other users and administrators. You’ll have to have elevated user rights to manage the computers. If you want to manage client computers remotely, you can also enable a domain-wide policy.
To turn on or disable remote computer management, you need to be a member of the server’s domain. To enable remote computer management, you need to be logged in as an administrator user. If you are not a member of the domain, you’ll need to create one first. Once you have done that, you’ll be able to add the server to the server manager. If you’re a domain admin, you need to be sure to grant remote access for the account.
Allow Semote Server Management Through Winrm:
Before you can use remote computer management, you need to enable it on the server. In order to enable remote access, you need to be a member of the domain and be a member of the Remote Desktop service. In addition, you need to enable the incoming remote connection. To enable remote management, you need to have a domain account. You need to make sure that the account is a member of the domain.
Once you’ve enabled remote access, you can enable it by enabling the Remote Desktop service. You must be a member of the domain before you can enable Remote Desktop. You must also be a member of the Administrators group to enable remote management on your PC. Once you’ve done that, you can start using Remote Desktop on your PC. There are a few steps to enable it, but it’s possible to configure it on all your machines.
Enable Remote Management Server 2019:
Ensure that you have administrative privileges on the target system. By default, remote management is disabled on Windows servers. You can enable it by logging in to the system and selecting the Remote Console option. Then, install the necessary tools. You’ll need to have the proper passwords and usernames for each system. Keeping the passwords on each system will prevent unauthorized access. When you’re ready to use remote management, you’ll need to install the software on each machine.
Instructions:
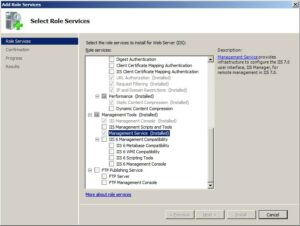
To enable Windows Remote Management access to computers using Windows Firewall with advanced security (Windows Vista, Windows 7, Windows 8, Windows Server 2008, Windows Server 2012) please follow these instructions.
- Edit an existing Group Policy item or create a new one using the Group Policy Management Tool.
- Expand Computer Configuration / Policies / Windows Settings / Security Settings / Windows Firewall For Advanced Security / Windows Firewall with Advanced Security / Inbound Node.
- Check out the predefined: radio button and select Windows Remote Management from the drop-down list. Click Next
- Check the Windows Remote Management Domain Profile rules and click Next.
- Check the Enable radio button and click Finish to exit and save the new rule.
- Make sure the Group Policy Object is used on the appropriate computers using the Group Policy Management Tool.
The best way to enable remote access is to configure the Server Manager on the destination computer. You’ll need a local account with Administrator permissions to enable remote management. If you’re not, you’ll need to install Group Policy Manager and the Windows Firewall with Advanced Security. These tools are essential for managing your server remotely. Then, install the necessary drivers and programs, and you’re ready to go. You’ll be able to use the Remote Desktop in a variety of different ways.
Leave a Reply