
How to Enable Excel Add-Ins
In order to use an enable Excel add-ins, the user must publish it in App Source or in the Excel add-ins catalog. These extensions allow users to interact with the content of a workbook. The most popular add-ins include calculators, custom functions, dialog boxes, and the Solver Add-In. They can also embed rich web-based objects and open external websites. However, before adding an Excel vBA extension, the user must publish it to App Source or the Office App Source.
The Excel Add-in is installed in your computer, but you can deactivate it at any time. When you do this, the add-in will appear in the list of Add-ins, but will not open automatically when Excel starts. If the add-in is causing problems, you can try these tips: Go to the Options window in Excel and select the Trust Center. Under Trust Center settings, click Add-ins. Deselect Disable all Application Add-ins and then check Path Integration Excel Add in from the list Google.
To deactivate an Add-in, go to the Apps for Office section. There, you will find individual categories and All. Next, open a document and click the Add-In you wish to enable. Once you have selected the Add-In, you will see the following dialog box: You can click on Disabled Items to enable the Add-In. Then, choose Enable to confirm that it is active.
How To Download Excel Add-Ins:
To test your Add-in, run the following command in the root directory of Excel. Once you have finished, open Excel with the add-in loaded and test the functionality. It should open with the add-in loaded. Then, click OK to close the dialog box. Then, you can start testing the functionality of your COM add-in. It is very important to test the COM API before enabling it on your microsoft computer.
Once the Add-in has been installed, you must enable it in your Excel program. Activate the security feature by adjusting the security settings. This way, you will ensure that your Excel program will continue to function as you expect it to. Therefore, it is best to open the application to allow the add-in to run properly.
How To Enable Add-Ins In Word:
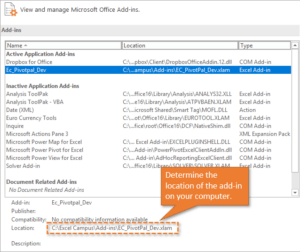
To enable an Excel add-in, you must change the path of the file. To change the path, click on the Developer tab and select Add-ins. You will see the Add-in in the list. Once enabled, the macro will be available on the Quick Access Toolbar. There are many benefits of using an Excel COM. If you are a business owner, the COM add-ins will help you manage your spreadsheets effectively.
Creating an Excel add-in is simple if you know how to do a few steps. First, you must open your workbook where the code is being inserted. To create an Excel XLAM file, you should select the Save As type as xlam. After saving the file, the COM icon should appear on the Quick Access Toolbar.
Best Excel Add-Ins 2021:
You can enable an Excel add-in by searching for it in the Windows or macOS version of the software. You can search for an application in the app store by typing the word “add-in” into the search bar and clicking it. Then, you can launch the application by clicking on the Add-in icon in the ribbon. Once installed, you can use the add-in to access emails. This will enable you to save time while working on large sheets.
To Activate An Excel Add-In:
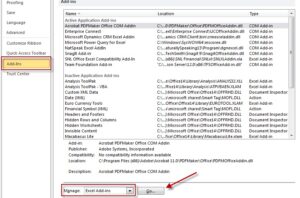
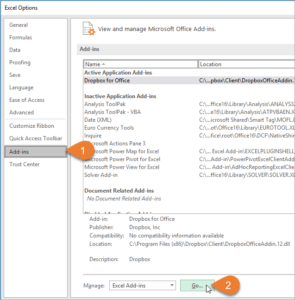
- Click the File tab, click Options, and then click the Add-Ins category.
- In the Manage box, click Excel Add-ins, and then click Go.
- The Add-Ins dialog box appears.
- In the Add-Ins available box.
- Select the check box next to the add-in.
- That you want to activate, and then click OK
The process to install an Excel add-in is similar to installing an XLAM add-in. Those that are installed in the Office16 folder will appear in the Add-Ins list box. To install an Excel add-in, select the appropriate option and click on “Add” to launch it.
Leave a Reply