
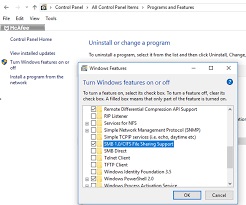
Enable SMB From Control Panel
In Windows, you can easily enable or disable SMB server by using PowerShell. Alternatively, you can use the Control Panel to do the same. Start by searching for “control panel” in the search bar. Then, select the “Programs” tab and click the “Turn Windows features on or off” option. Enable SMB From Control Panel
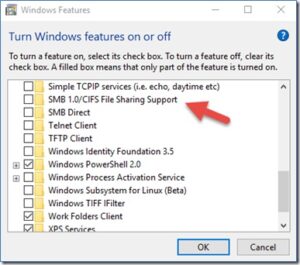
Windows 10 has an option to enable or disable SMB 1.0/CIFS file sharing support from the control panel. This option is located in the Programs and Features menu. Click SMBv1 or Disable SMBv1 to turn off or disable the protocol Google.
To disable SMB 1.0/CIFS file sharing support, you must be logged into your Windows operating system with administrator credentials. You will need to restart the system before SMB 1.0/CIFS file sharing is disabled. Similarly, if you’re upgrading your NAS, you should disable this protocol as well.
How To Disable SMB 1.0/CIFS File Sharing Support:
To enable SMBv1 and SMBv2 support, you must install and activate the Zappiti Player on your Windows 10 PC. If you’re using a networked NAS, you must make sure you activate Zappiti Player before you try to connect to the network.
Alternatively, you can enable SMBv1 support in Windows 10 by using Windows PowerShell. To run this command, run and in an elevated command prompt. Enter the following command to enable SMBv1 support in Windows 10: disable / enable SMBv1 in the Control Pane.
How To Enable SMB:
Disabling SMBv1 in Windows can prevent the Wanna Cry ransomware from infecting your system. However, it’s important to remember that there are many legacy software applications that need SMBv1 to function properly. Furthermore, it’s important to update your system with patches released by Microsoft, so that you can prevent future malware from compromising your system.
If you want to enable SMB on your PC, you need to open the Control Panel. Once you’ve opened the Control Panel, you can run the “regedit” command, which will open the Registry Editor. You’ll want to look at the value data, and make sure that it says “1” (SMB enabled). If the value is 0, then it means that SMB is disabled.
How To Enable SMB Windows 10:
To enable SMB on Windows 10, you have to update both your server and client. To do this, open the Control Panel and go to Network and Sharing Center. From here, find the SMBv2 service and click it. Once you’ve done this, you can connect to other computers and Windows devices via SMBv2 servers. In the Dialect column, you should see the servers that you’re able to connect to. Click the SMB icon in the list to launch the SMB server.
After enabling SMBv1, you can disable it again. To disable SMBv1, you should open the command prompt as an administrator. Then, type the command “dism” in the command prompt with the – option. Make sure to restart the system after making the changes.
How To Check For SMB 3.1:
If you’ve already enabled SMBv1 on Windows 10 or are planning to do so, you should follow the same steps to enable SMBv2 in Windows 10. If you don’t have administrator privileges, you can also use the command line or Windows PowerShell to make the changes. Once the changes are made, the change will last for 15 days and you should run a System Restore point to ensure that everything is running smoothly.
The first step in enabling SMB on Windows 10 is to enable the control panel. This is more user-friendly than the command line, and you can access it by pressing the Windows key. In the Programs and Features menu, select the Turn Windows features on and off option. Under the Windows Features section, find SMB 1.0/CIFS File Sharing Support. This will enable the protocol.
How To Enable SMB Windows 7:
SMB 3.1 is a security update that came out with Windows 10 and Server 2016. This new version of the protocol introduces stronger encryption protocols, as well as improved security. You can check whether your computer supports this security update by launching a command-line tool, such as map.
You can also check whether your PC supports SMB 3.1. This new version of the protocol is designed for modern Windows hosts. You can run the Get-SMB Server Configuration command in Power shell or the Command Prompt. If it’s enabled, you’ll see a True value. If not, make sure you have the latest version of Windows.
SMB Protocol In Windows 10:
- Click to open the search bar in Windows 10.
- Scroll down to SMB 1.0/CIFS File Sharing Support.
- Check the Net to SMB 1.0/CIFS File Sharing Support box and all other child boxes will be filled in automatically.
- Click Restart now to restart your computer.
SMB 3.1 has better security than SMB 2.0. It features a more secure encryption protocol that protects against man-in-the-middle attacks. It also supports a more secure dialect negotiation protocol and can block insecure guest authentication attempts.
Leave a Reply