
How to Enable SMB From PowerShell in Windows 10
If you have a Windows server, you may be interested in learning how to enable SMBv1 from PowerShell in Windows 10. Before you begin, make sure you have administrator rights on your PC. After you’ve got them, you can use the commands below to manage SMBv1. Enable SMB From PowerShell In Windows
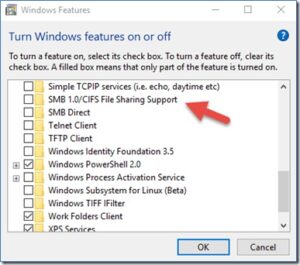
To enable SMB on a Windows PC, you can use the PowerShell command. Alternatively, you can open the Control Panel and type “SMB” in the search box. The Control Panel will show you the list of programs and features. You can then find the “Turn Windows features on or off” option Google.
You can also disable SMB1 via the command-line. To do this, you must first enable the Lanman Server service, which will disable file and printer sharing. However, you may encounter operational issues if you disable SMB1 completely. If you disable SMB1 from the PowerShell command, you should restart the computer before you can use the changes.
How To Enable SMB From PowerShell:
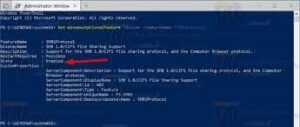
To enable SMB on a Windows PC, you need to enable the Lanman Server and Lanman Workstation services. These two services are built into every Windows computer. You can use the Get-Service Lanman* PowerShell command to check whether each of them is running.
SMBv1 is obsolete, but it is still available for some applications. You can find a list on the Microsoft website. You can also enable or disable the SMBv1 service by running PowerShell commands. Once you’ve run these commands, the computer will restart.
How Do I Enable SMB Direct On Windows 10:
There are two different versions of the SMB protocol: SMBv1 and SMBv2. SMBv1 and SMBv2 share the same stack, which means that they are similar. Using PowerShell, you can enable or disable SMBv1 or SMBv2 and SMBv3.
In addition to disabling SMB, you can also enable SMB compression. For example, you can change your computer’s default share to use CIFS for network connectivity. Samba is a popular open-source SMB implementation. Samba also has a Linux and macOS implementation. Another SMB implementation is NQ, which was developed by Visuality Systems.
How To Disable SMBv1 From PowerShell:
SMB is a file-sharing protocol that helps network users access files and other system resources. SMB was first adopted by Microsoft in 1990. However, it was outdated and had many security vulnerabilities. Microsoft later updated SMB to SMBv2 and SMBv3 versions. With the latest security updates, SMBv1 is disabled in Windows.
If you’re running Windows Server 2003 or an older operating system, you may need to disable SMBv1 for security reasons. This protocol has been proven insecure in recent attacks, including the Wanna Cry attack. You can read more about this in a Microsoft Support article.
How To Enable SMB Windows 10:
SMBv1 is a protocol that is used to share files and use services remotely. Its first version was released almost 30 years ago and has since been updated to fix several vulnerabilities. However, the MS16-114 security update has identified a vulnerability in SMBv1, making it essential to disable it and remove it from Windows. Fortunately, you can perform this task using PowerShell. If you want to disable SMBv1, run the following commands:
The first command is to open the Windows software manager. The next command runs Windows PowerShell as an administrator. Once the command runs, it will detect if SMBv1 is enabled or disabled. After it finishes, press Enter. If you’re using a Windows XP computer, you can also disable SMBv1 using the Windows software manager.
How To Enable SMB1 Windows 11:
If you’d rather not use PowerShell, there are three other ways to disable SMBv1 in Windows 10. One is to disable it in the Control Panel. The second method involves modifying the Windows registry. You need to have administrator privileges to change the registry.
Check SMB is Enabled from PowerShell:
- Open PowerShell as administrator.
- Check the SMB status on your Windows computer.
- Enable SMB from Windows PowerShell.
- Open Programs in Control Panel.
- Turn Windows features on or off.
- Enable SMB in Windows Features.
- SMB enabled and reboot.
- SMB key in the Windows registry.
If you’re using SMBv1 to share files, you can use the mssm-disable command in Windows. This will disable SMBv1 on your server. However, you’ll need to reboot your system after you disable SMBv1 using this command.
Leave a Reply