
Enable SMB From Registry Editor
To enable SMBv1 from Registry Editor, open the Group Policy Management console and change the value of the registry key to 0. Changing this value requires the user to reboot the computer. To undo the changes, delete the SMBv1 registry key. You must have SYSVOL access to modify this key. Enable SMB From Registry Editor
SMBv1 is a networking protocol that enables Windows devices to connect to a server that supports it. The protocol is disabled in the July Security update, but users of earlier builds of Windows 10 can still use SMBv1 on their PCs. The registry editor has some helpful tools to help you manage network settings Google.
First, open the Control Panel. You can manage the installed software and protocols from this panel. Select SMB Windows 10. You will find three sub-options: SMB server, SMB client, and automatic removal function. Checking the automatic removal option, will ensure that the SMBv1 is automatically deactivated when not in use.
How To Enable SMB From SMB3:
The next step is to open the System Configuration Utility. Right-click on Start and expand the Control Panel. Then, navigate to the Advanced system settings. You will see a SMBv2 option. Select it and click the Settings button.
If you’re having trouble connecting to other computers, you can use the registry editor to enable SMB3 on your computer. SMBv3 is a mandatory feature of Windows and enabling it from the registry editor will make the connection go through without error.
How To Enable SMB From SMB1:
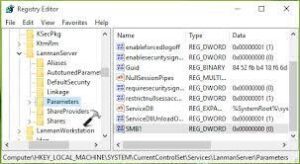
To open the registry editor, type “regedit”. After that, copy the path below and paste it into the address bar of the Registry Editor. Make sure that you change the value data to 1. If the value is 0, it means SMB is disabled. If it is set to 1, you should be able to see the SMB server’s IP address.
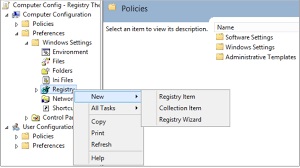
Enabling SMB3 from the registry editor is very simple. Open the Computer Configuration tree, which includes the Windows Settings and Preferences folders. Locate the mrxsmb10 value. Note that it is the default value. Change the value to 1 to enable the new SMB protocol.
How To Enable SMB From SMB1:
Now, you can choose the option to “Always” to require that your Windows 2000 or Windows Server 2003 server to perform SMB packet signing when you initiate a network connection. You can also select “When Possible” to make your client perform SMB packet signing when communicating with a Windows 2000 or Windows Server 2003 server.
Disable SMB1 from Registry Editor is a common method used to disable the protocol on Windows systems. You can disable this protocol for an individual PC or an entire network. First, you need to open the Registry Editor and select the path you highlighted in Step 1. Once there, double-click SMB1 and then type ‘0’ in the Value Data field. Once done, restart your PC. The next time you connect to a network, SMBv1 will be disabled.
Enable SMB1 Windows 10 CMD:
To disable SMBv1 in Windows 10, follow the instructions provided on Microsoft’s support page. It’s recommended to disable SMBv1 support on your network as this protocol lacks the security enhancements available in newer versions of the SMB protocol, including encryption, pre-authentication integrity checks, insecure guest authentication blocking, and protection against security downgrade attacks. The Microsoft Exchange Team has also recommended disabling SMBv1 as it poses security risks for vulnerable systems. Hackers can exploit SMBv1 vulnerabilities to execute commands on servers with administrative privileges.
How Do I Enable SMB Signing:
- Start the Registry Editor (Regedit.exe)
- Move to
- HKEY_LOCAL_MACHINE\System\Current Control Set\Services\LanMan Server\Parameters.
- From the Edit menu select New – DWORD value.
- Add the following two values Enable Security Signature and Require Security Signature if they do not exist.
Disabling SMBv1 on Windows 10 and Windows 8.1 is easy. To disable SMBv1 in Windows 8, go to the Control Panel. Select the features you want to turn off. Next, look for the SMB 1.0/CIFS File Sharing Support. Uncheck this option and restart your PC. If you are using Windows 7, you can also disable SMBv1 by editing the Windows registry.
Leave a Reply