How to Enable SMB Multichannel on SMB Server
To configure SMB multichannel on enable SMB server, first configure the settings for your network. You can do this through WMI or PowerShell. However, be aware that configuring SMB multichannel through WMI and PowerShell can result in less-than-ideal configuration and “shoot yourself in the foot”. It is best to leave the default setting, which will let SMB 3.0 automatically adjust the network.
SMB multichannel is an enhanced feature available in Windows Server 2012. It is a feature of the SMB 3.0 protocol, which can increase the throughput and performance of a network. It allows file servers to simultaneously transmit more data using multiple connections. This feature also improves network fault tolerance. SMB multichannel will automatically discover multiple available network paths and dynamically add them to the network as needed. You can easily enable SMB multichannel in Windows Server 2012 Google.
To configure SMB multichannel, you should ensure that your network adapters are both SMB capable and of the same type. This will ensure that the NICs are correctly identified by SMB. Then, check the SMB server to ensure that all SMB multichannel connections are valid.
How To Create SMB1 Or SMB3 Keys:
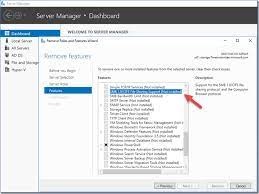
To configure SMB multichannel on SMB server, you must have two computers running Windows Server 2012 R2 and Windows Server 2012. Make sure you have no additional features installed. Check the SMB Multichannel option in the SMB Server properties. If it’s enabled, select RDMA or RSS for better fault tolerance. You should also configure the SMB protocol in the CIFS Share configuration. After that, you must enter a new administrator password.
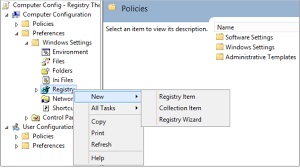
To enable SMB protocols on a Windows server, you can run Windows PowerShell and change registry keys. This will enable SMBv1 and SMBv2 protocols on the server. Then, open the SMB share configuration dialog in Windows Explorer.
How To Configure SMB Multichannel:
First, make sure that you enable NTP time synchronization on the server. This will ensure that the server’s time is synchronized with the Active Directory controller’s time. If NTP isn’t working, try disabling it or manually setting it. Also, make sure you’re in the right time zone for your server. For more information, read Configuring the date and time on your server.
Next, you’ll need to install the latest SMB version. Windows 8.1 and Windows Server 2012 R2 come with SMBv3 support. These versions have several improvements. The latest SMB 3.1.1 features encryption, symbolic links, and pre-authentication integrity.
How To Enable SMB On Windows 10:
SMB is a client-server communication protocol that was developed by the IBM group back in the 1980s. It provides a secure way for users to connect to remote servers and resources. Clients initiate the connection by sending an SMB request. The server then replies with an SMB response.
Go To Settings:
- Under Home Control Panel, select Turn Windows features on or off to open the Windows Features window.
- In the Windows Features box, scroll down the list,
- Clear the SMB 1.0/CIFS File Sharing Support check box, and select OK.
- After Windows applies the change, select Restart now on the confirmation page.
SMB has many advantages, including simultaneous access, parallel data access, and scalability. With SMB, you can control user permissions and manage the amount of bandwidth available. This allows for better file sharing.
Leave a Reply