How to Enable Tablet Mode in Laptop
If you’ve been wondering how to enable tablet mode on your laptop, this article will show you how to enable it and turn it off. The article also explains how to disable the Rotation lock on your laptop so you can use it for tablet purposes. Let’s get started! Activate the tablet mode by signing into your device and clicking the Settings icon. Once your device has signed in, tablet mode will turn your Start menu into a Start screen, with the taskbar’s icons replaced with the virtual desktops, search, and back buttons.
If you are unable to get your laptop to switch to tablet mode, you can perform a restore point to reset your PC to the previous state. Once you have completed the restore point, you should restart your computer in desktop mode. In some cases, a restore point can fix a Windows 10 laptop that is stuck in tablet mode. To use a restore point, you must be logged into your Microsoft account and have administrative rights to your PC Google.
To enable tablet mode, you need to go to Settings and select the System group. Then, select the Make Windows more touch-friendly” heading. Then, click the “Tablet mode” option. Once you have enabled tablet mode, the Start menu will change to the Start screen and the taskbar icons will change to the virtual desktops, back and search button. In the previous version of Windows, you can enable or disable tablet mode from the Control Panel.
How Do I Put My Laptop In Tablet Mode:
In order to turn tablet mode off in your laptop, you must first go to Settings and then click on Tablets. Here, you can enable or disable the tablet mode. Note that when in tablet mode, you cannot switch back to desktop mode. The only way to enable the desktop mode is to use the Windows key + D to open the desktop window. After opening the desktop window, press the arrow keys to move the files in the window.

To toggle between desktop and tablet modes, simply navigate to the Action Center and click on the option labeled “Tablet Mode.” After selecting this option, click on the clock icon to the right of the time and date. From here, select Change additional tablet settings. Click on the “Tablet Mode” option to enable the tablet mode. Once enabled, turn off tablet mode to return to the desktop. After the mode is disabled, restart the computer to switch back to the desktop mode.
How Do I Turn On Tablet Mode:
If you’re using a removable screen device like an iPad or an Android tablet, you’ll want to make sure that you turn off the Rotation Lock feature on your laptop. Rotation Lock prevents your laptop’s screen from automatically rotating while it’s in tablet mode, so you’ll need to remove the keyboard to rotate the screen. To turn on Rotation Lock, open the Settings app, then select System > Display. Then, click the Rotation Lock slider. If you don’t want the screen to rotate automatically, click on the “Off” position to prevent your device from enabling tablet mode. Be sure to reboot your laptop if the issue persists.
If you’ve tried the steps above, and still don’t see the Rotation Lock button, try updating the BIOS of your laptop. Then, go to the device’s settings and disable automatic Tablet Mode. Once the change takes effect, restart your computer. Once the change takes effect, the Rotation Lock button should be visible and working again.
How To Enable Tablet Mode In Windows 10:
If you are using Windows 10 on a 2-in-1 laptop, you may want to disable the tablet mode. To do so, open the Action Center on the taskbar and look for the “Tablet mode” button. Click on it, and toggle it on or off. That’s it! Tablet mode is now disabled. Read on to learn how to enable and disable it. This is especially helpful if you’re using Windows 10 on a tablet, as it will make your tablet and laptop useable on both sides of the screen.
If you’re having trouble enable tablet mode in laptop, you may want to check your system file and the registry key on it. If both of these haven’t helped, you may have to manually restore the system. In Windows 10, you’ll need to select the recommended restore point, but you can also manually restore the system. Click on the “Cancel” button at the bottom-left corner of the screen to end the process. If all else fails, your last option is to reset the computer to factory settings.
How To Change Tablet Mode To Desktop Mode:
Sometimes, Windows 10’s tablet mode doesn’t function properly. To fix this issue, you can switch back to desktop mode. The problem can also be caused by a pending Windows update. You can use Windows’ search bar to find the “classic shell” option. This option is found at the top of the search results. To use this mode, press and hold the Power and Volume up buttons simultaneously for at least 20 seconds.
Open Tablet Mode Settings:
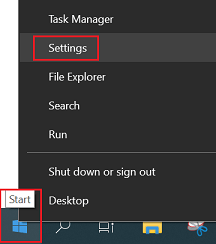
- Click Settings from the start menu.
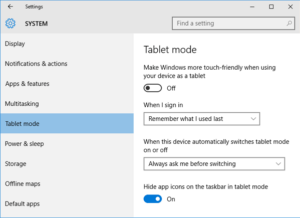
- Click System, then select Tablet Mode on the left panel. The sub-menu for tablet mode appears.
- Modify Make Windows easier to touch when you use your device as a Tablet to Turn on to enable Tablet mode.
- Set this to Off in desktop mode.
- Configure If this device automatically
- Changes the option to specify when to let you know Windows 10 changes modes in your 2-in-1.
To get back into tablet mode, restart the Windows Explorer. The easiest way to do this is to open the Action Center. Go to the bottom-right corner of your screen, and swipe inward. Tap on the chat bubble icon. To turn the mode back on, follow the steps below. If you have trouble with the process, consult a Microsoft Knowledge Base article.
Leave a Reply