
How to Enable Secure Boot on Your Computer
You’ve probably wondered how to enable secure boot on your computer. After all, most computers don’t even have the option, and it’s a good idea to use this technology. There are several different ways to accomplish this, including BIOS, UEFI, and Firmware and OS verification. Keep reading to learn more! Until next time, happy booting! We’ll be discussing these options one by one.
To enable secure boot on your computer, you must first disable Legacy Support. This setting is disabled when you are not using a bootable Windows operating system, such as an EFI one. To disable it, use the arrow keys to move down or up in the UEFI utility screen. You can also disable Secure Boot in the same way. In some cases, you may have to restore your computer to its factory state to enable Secure Boot again Google.

Enabling Secure Boot is not complicated, and the process only takes a few seconds. A new feature of the UEFI operating system is Secure Boot. It is a step in the process of securing your computer from malware attacks. It allows you to protect your computer by ensuring that it boots from a trusted source and doesn’t use unauthorized boot media. The UEFI secure boot software checks the digital signature of boot software and rejects malicious code.
How Do I Enable Secure Boot In BIOS:
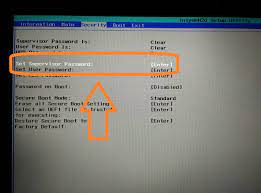
If you’re unsure how to enable secure boot in BIOS, you’re not alone. Fortunately, there are some easy steps to follow. Start by going into the UEFI utility screen. On the left hand side, you should see the Security tab. Click on it and then press the arrow key to navigate to the Secure Boot option. If Secure Boot is disabled, you may need to restore the PC to its factory state before reenabling it.
While you’re in the BIOS, press the up arrow key or the left arrow key to select System Configuration. You’ll see a section called “Boot Options.” Click on it. You’ll find a four-digit code at the top of this menu. Type this code into the box and hit Enter to activate the feature. After enabling Secure Boot, you should see the Windows logo.
How Do I Enable Secure Boot Capable verification:
To enable Secure Boot, you must enable Firmware verification on your device. This feature checks the signatures of pre-bootloader, kernel, and other files. Some devices require a platform key signed by Microsoft, while others do not. If your device supports Secure Boot, it will sign new DKMS modules. Installing new KEKs will re-enable Secure Boot validation and load the drivers as needed.
Cryptographic digital signatures are widely used to verify the integrity and authenticity of firmware. Many computing products do not ship with a Linux distribution’s KEK or DB certificates. Using a secure element allows you to isolate the public key and sign the firmware. Hence, the secure boot feature is also possible for non-bootROM microcontrollers. In addition to secure boot, firmware verification can also be used for runtime code and OTA update.
How To Enable Secure Boot Windows 11:
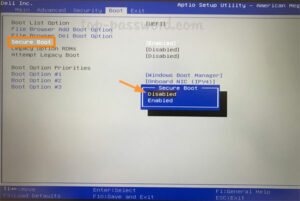
The UEFI utility can be used to check if Secure Boot is enabled on your PC. If the option is on, click the arrow key to navigate to the boot tab and then select Secure Boot. In order to enable Secure Boot again, you must restore the PC to its factory settings. You can read more about Secure Boot in Windows Developer Hardware docs.
Using verified boot can protect the system image, kernel, and root file system from exploitation. However, it cannot protect user data or system-wide state such as network settings, time zone, keyboard layout, VPD contents, etc. These stateful data are stored on a writable stateful file system, which affects the behavior of verified software. To mitigate this issue, you should ensure that your OS version is updated on a regular basis.
How To Disable Secure Boot In BIOS:
In order to disable secure boot on your PC, you must go to the BIOS menu. To do this, restart your laptop and press the F2 function key or the DEL button. Then, navigate to the security tab and change the secure boot setting from enabled to disabled. Your PC should now boot normally. To ensure that your computer will continue to boot properly, set the supervisor password to “admin”.
Enable Secure Boot:
- Remove any photo cards, hardware, or operating systems that do not comply with Secure Boot.
- Open the BIOS menu for PC: …
- Get the Secure Boot setting, and if possible, set it to Enable. …
- Save changes and exit.
- Insert a photo card, hardware, or operating system that does not support Secure Boot.
UEFI is the small memory chips in your motherboard that authenticate your system. If you are not using this setting, you can temporarily disable it. However, you should never disable Secure Boot by force. There are some situations where you can accidentally disable it by mistake. In those cases, the operating system may not have a valid security key, or it may pass all checks, but still fall foul of Secure Boot. Therefore, before you disable Secure Boot, be sure that the PC you’re using supports the UEFI boot mode.
Leave a Reply