
How to Enable Secure Boot in Mac
If you’re running a T2 system, the first step to enable secure boot in mac is to disable it. To do this, you can open the Startup Security Utility by pressing the Command () and R keys after the Apple logo appears. This will bring up a Terminal window where you can confirm the status of System Integrity Protection. The screenshot below shows the status as enabled. You’ll then need to restart your computer while holding the Command () and R buttons until macOS enters System Recovery mode.
To disable Secure Boot, you will need to enter the mac recovery mode. This is accessed by pressing the Command key and R at the same time. In the Recovery window, select Startup Security Utility. When prompted, select your account, choose “administrator”, and enter a password. Once you’ve completed these steps, you can safely reboot your Mac using a USB or a DVD. Once you’ve disabled Secure Boot, you’ll be able to boot from the external storage media without worrying about the password.
To disable Secure Boot, you need to enter the macOS Recovery mode. To do this, hold the Command key and click on the Startup Security Utility. You’ll be prompted to authenticate. Choose your administrator account and enter a password to disable Secure Boot. After the password is entered, click OK and you’ll see the Startup Security Utility. The Startup Security Utility allows you to select the OS you want to boot from.
Enable The Current Recovery Has No Access To Security Settings:
If you want to disable Secure Boot, you’ll need to access macOS recovery. To do this, hold down the Command key and select Utility. In the Startup Security Utility, select Startup Security Utility. When you’re asked to authenticate, select the Administrator account and then enter a password. If you’re still unsure of how to enable Secure Boot, try to install a third-party OS. The last step is to turn off the Firmware Password.

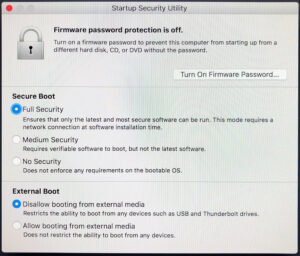
Enabling Secure Boot will protect the entire disk. The boot process is secured by encrypting the entire drive. Unlike the traditional boot process, the process of creating the kernel image is completely secure. You can create and use a strong password to prevent other people from booting the computer from any other device. The first step to enabling Secure boot is to make sure you’re using the correct version of the operating system. Once the installation has finished, you should restart the system to make sure it’s up to date.
Mac Startup Security Utility No Administrator Was Found:
It is important to remember that Secure Boot can’t verify untrusted operating systems. You have to install the latest operating system if you’re using a new machine. To enable Secure boot, you need to ensure that the platform key is signed by you. If the platform is signed by Microsoft, it will be unable to start. Likewise, enabling Secure boot on an old machine may not be safe.
Enabling Secure boot is also important if you want to protect your computer from malware. In addition to making sure your Mac is running the latest version of macOS, you should also enable it on your Windows PC. If Secure boot is disabled, it will make your computer vulnerable to malicious software and other threats. For instance, if you disable the security feature, your computer will be prone to boot kits and rootkits.
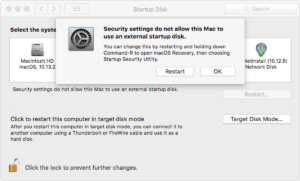
Security Settings Do Not Allow This Mac To Use An External:
In order to enable Secure boot, you must make sure you have a working Internet connection. Then, you need to update your macOS. To do this, you should choose the option “Startup disk.” You should also remember that setting Secure boot on Nosecurity will prevent malware from booting your Mac. But if you’re unsure, disable it. You’ll want to make sure that the OS is installed and that the operating system is configured properly.
Secure Boot settings:
- A warning will let you know that a software update is required to use this initial disk.
- Click Update to open the macOS installer, which you can use to reinstall macOS on the first disk.
- Or click Startup Disk and select a different startup disk, which your Mac will try to verify.
If you’re not sure how to enable secure boot in mac, you should first enable it on your Windows PC. By default, Secure boot is enabled when the Mac starts. This will prevent malware from running on your Mac while you’re using it. But if Secure boot is set to “Nosecurity”, you’ll never be able to install the operating system on your Windows PC. This setting will disable it when you use your operating system to access the Internet.
Leave a Reply