
How to Enable Auto Login in Windows 10
Whether you want your computer to automatically log in at startup enable auto login in Windows 10 when you shut it down, enabling auto login is an excellent feature. It’s possible to configure Windows to automatically log in, but you need to know how to edit the system registry to make it happen. It’s important to note that editing the registry may have unforeseen consequences, so you should first create a backup of the registry before proceeding. Then, you’ll need to follow the steps carefully to avoid any errors.
If you want to make Windows 10 login automatically, you must first set up your user account. You can do this by changing the default password for the user account in your Account settings. If you don’t want to change this password, you must re-configure your Windows 10 machine to allow automatic logins. In addition, if you need to change your password for any other reason, you should create a restore point before you try the automatic login method Google.

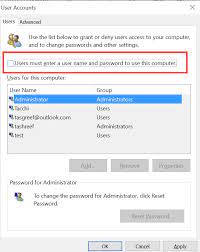
Go to the Start menu and run netplwiz as an administrator. In the run dialog box, open Advanced User Accounts. Type Default User Name and Default Password and click OK. In the User Account Control window, uncheck the “Users must enter a password to use this computer.”
How To Configure Windows 10 To Automatically Log In:
Likewise, you can use the registry to add an entry called Default User Name. In the New String Value box, type your user name and password and press Enter. You can also add the Auto Admin Logon entry by double-clicking it and adding value data. You may want to use a registry editor to add values for these settings. If these steps do not work, you can try the manual way.
If you would like to enable the auto login in Windows 10, you should configure Advanced User Accounts Control Panel. This program is not an applet in the Control Panel and you can access it by using the Run command in Windows 10. Open the Advanced User Accounts Control Panel by typing net piwi in the search box and press Enter. You will then be prompted to input your user name and password.
How To Configure Advanced User Accounts Control Panel:
Default Domain Name: By default, Windows 10 will use the domain name as your default domain when it comes to auto login. However, if you’d like to make it local, you can specify the computer name in the Default Domain Name parameter. This can be found under System Properties or with a hostname command. Once you’ve enabled auto login, Windows will automatically log you in with your account and skip the annoying password screen.
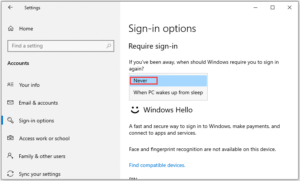
Confirm the settings by clicking on the slider on the right side of the dialog box. If you’re using the Standard User account, always notify me will enable it. If you’re using an administrator account, click the “Administrator” icon and confirm the changes. Changed the settings to “Never notify me” or “Always notify me” to enable Auto login in Windows 10, you can restart the computer to make them effective.
How To Create Default Password Entry For Automatic Logins:
To create Default Password entry for automatic logins, open the Security tab and navigate to the Security Policy sub-menu. Right-click on the ‘Default Password’ entry and choose New String Value. Type the name of the value into the Value data field. Next, select ‘Auto Admin Logon’ and click the ‘Change’ button. The Default Password value will now be set as the default password for Windows 10.
You can also change the password in the Security tab. This is the easiest way to change the password for Windows 10 and make it work automatically. Alternatively, you can enable automatic logins by editing the system registry. Just ensure that you have a backup of the registry before making any changes. In any case, you must follow the steps carefully. If you are unsure about the procedure, try deleting the Auto Admin Logon value to turn off auto login in Windows 10.
Auto Sign In Windows 10:
- Press Windows Key + R to open Run.
- In the Run dialog box type netplwiz and click OK. …
- Uncheck the “Users must enter a username and password to use this computer” box.
Click Install. - When you are asked to enter user information, enter the username and password to disable the password-based login.
- You may have to enter the username and password twice.
- Click OK to save and exit the window.
- On the next resume, you will be able to log in without entering your account password.
To enable automatic logins in Windows 10, you can use netplwiz or a registry editor. Click the ‘Users for this computer’ tab and select the appropriate account. If you’ve created an administrator account, then click the ‘Automatically sign in’ tab. Type the password for the account and click OK. Then, Windows will no longer prompt you for a password when you try to log in again.
Leave a Reply