
How to Enable Auto Login in Ubuntu
If you want to have access to important files and folders, you may be wondering how to enable auto login in Ubuntu. This feature is usually disabled by default. However, enabling automatic login is relatively easy if you’re a superuser. To enable it, click the automatic login button and switch it ON. That’s all there is to it! Once enabled, your system will automatically log in whenever you log in to it.
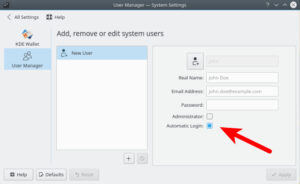
If you are using a Linux system, you may be wondering how to enable automatic login on your computer. It is possible to set automatic login for administrators and non-administrators, but this can be turned off for other users. In order to enable automatic login, you first need to enable it in the security settings of your system. To do so, navigate to System > Security > User Accounts and click the toggle button Google.
One of the most common problems with auto login on Ubuntu systems is that you can’t remember your password. This means that someone else could use your computer without knowing your password. Furthermore, automatic login won’t protect your important files from anyone who might steal them. To avoid this, enable automatic login on your computer if you are a single user. Then, you can choose whether to use a password or not, and it will log you in at the end of the boot process.
How Do I Make Ubuntu Not Ask For Password:
Another feature that you can enable is auto-login. If you don’t want to use a password every time you log in, you can enable this option to automatically unlock your keyring whenever you login. It is best to disable auto-login when you’re using a public computer. Then, you’ll be able to login to any website without any difficulty.
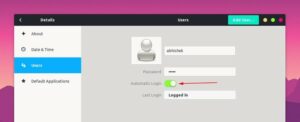
To enable auto login in Ubuntu, you will need to enable this option. By default, it is turned off, but you can turn it on by using the superuser account. To enable auto login, simply go to the Users panel, click the Automatic Login button, and set your preferences to “ON.”
How Do I Change My Login Settings In Ubuntu:
You can also disable auto login entirely by using the -force-validation option. This method only requires a password when the user has not logged in with a valid user name. Once enabled, auto login will log in at the end of boot process. It is recommended for lone users. However, you can use it for shared accounts as well. But it may take some time for you to use it, as other users may be able to access the same account.
If you take my suggestion, avoid using default login. There are several reasons for this. The first reason is that it makes your computer less secure. And if you use Ubuntu abnormally, do not forget your password. Now resetting the Ubuntu password is not a difficult task but an additional pain.
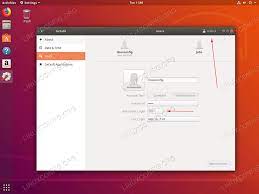
Enable Automatic Login:
- Open All Tasks of Tasks and start typing Users.
- Click Users to open the panel.
- Select the user account you want to log in automatically at first.
- Press Open in the top right corner and type in your password when prompted.
- Turn on automatic login switch.
Leave a Reply