
How to Enable Windows Search
Windows search indexes drives, folders and files on your computer to enable searches based on file contents, metadata properties, file names and other criteria. The index is locally managed and resides on your hard drive.
Windows 10’s Enhanced search mode can take a while to index your PC. You can speed up the process by excluding specific folders from the index.
Enabling Windows Search can greatly enhance the efficiency of locating files, applications, and settings on your system. This feature utilizes an indexing service to swiftly scan and retrieve information from your computer. Here’s a step-by-step guide to enable Windows Search:
Enabling Windows Search:
- Accessing Indexing Options:
- Go to the Windows Start Menu and type “Indexing Options” in the search bar.
- Click on “Indexing Options” from the search results to open the Indexing Options window.
- Modify Indexed Locations:
- In the Indexing Options window, click on “Modify” to choose the locations to index.
- Ensure that the folders containing the files you want to search through are selected. You can add or remove folders here based on your preferences.
- Checking Indexing Status:
- Within Indexing Options, check the current status of indexing. It may take some time for indexing to complete, especially if you’ve made significant changes to the indexed locations or if it’s the first time you’re setting it up.
- Enabling Windows Search Service:
- Press the Windows key + R to open the Run dialog box.
- Type “services.msc” and hit Enter.
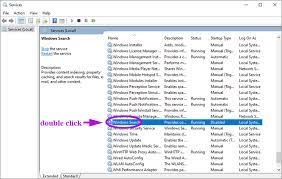
- In the Services window, locate “Windows Search” from the list of services.
- Right-click on “Windows Search” and select “Properties.”
- In the Properties window, ensure that the “Startup type” is set to “Automatic.” If not, change it to “Automatic” and click “Apply.”
- Next, click on “Start” if the service is not already running. Then click “OK” to close the Properties window.
- Adjusting Search Settings:
- Return to the Indexing Options window.
- Click on “Advanced” to modify advanced settings related to the index.
- Here, you can specify file types to be indexed, rebuild the index, or modify other settings to tailor the search functionality according to your needs.
- Verifying Search Functionality:
- Once indexing is complete, try searching for files or applications using the search bar in the Start Menu or File Explorer.
- Enter the keywords related to the file or application you are searching for and observe if the search results display relevant items.
- Troubleshooting:
- If you encounter issues with Windows Search, you might consider rebuilding the index. Go to Indexing Options > Advanced > Rebuild, and follow the prompts to rebuild the index.
- Regular Maintenance:
- Periodically check the Indexing Options to ensure that the folders you need are being indexed and that the indexing process is up-to-date.
How to enable Windows search
Windows Search indexes files and folders on a computer to provide faster, more enhanced searches. Its locally managed Index stores actual prose from documents and file contents as well as keywords, comments and metadata properties from other content such as Outlook, settings and the Control Panel.
Despite this, sometimes it’s necessary to disable Windows Search. This can be due to performance issues or when you want to disable certain search features, such as web results.
To disable Windows search, you must change a registry entry using the Command Prompt or another tool like iSunshare System Genius. There are several ways to do this, but each has different outcomes. For example, the Registry Editor method may not work on all computers and could even make your PC unstable. The other methods, however, are more reliable and should give you the results you want. You can also try to improve your search by trimming down which locations get indexed or by rebuilding the index.
Exclude specific folders from the search index
Unlike other search engines, Windows Search uses a locally managed index of files (including documents, programs, folders, photos, songs, videos, and desktop items). The index stores the names of the files and their file contents inside a dedicated database.
If you have a large amount of data to index, searches can take a while to complete. To speed things up, you can exclude specific folders from the search index.
You can do this by searching “indexing options” in the Start menu or using the Settings app. Select the indexing options result and click the “Modify” button.
This will open the indexing options window and allow you to specify which locations on your computer should be indexed by Windows Search. You can also pause the indexing process from this window. This will save your PC from unnecessary resource utilization while you work. However, this may impact performance when you do a search. You can always resume the indexing process later if you like.
Rebuild the search index
If you find that the search feature doesn’t work or produces inaccurate results, you may need to rebuild the index. This process will re-index all of the drives, folders, and file types that you’ve set up for search. This can take a long time to complete, but it should fix your problem.
To do this, open the Control Panel and select Indexing Options. Then, click the Rebuild button under Troubleshooting. Depending on the amount of data that you have set to index, this process can take up to a few days to complete. Google
You can also use the Indexing Options dialog to exclude specific folders from the search index. Just be sure to save any changes before exiting the Indexing Options dialog. For more information, see How to exclude folders from a Windows search index. This will help to make searches more efficient and accurate. It can also speed up your computer. However, this method is only recommended for users with a fast internet connection.
Disable Windows search
By default, Windows Search brings up web results as soon as you type anything in the search box. While this can be useful, it also uses up your computer’s resources and can be a security risk for multiple users.
To disable this feature, right-click on the Search Indexer process in Task Manager and select Stop. You will have to restart your computer for the changes to take effect.
If you’re not using search frequently, there’s no reason to keep it running in the background and eating up your CPU. However, if your hardware has low specifications, it may be worth disabling search to improve performance. Just remember that disabling search will make it harder to find files and applications on your computer. You should only disable it if you need to. For most users, keeping it enabled is a good idea. This post was made on r/Windows Questions, a subreddit for questions about Microsoft Windows and its related systems.
Conclusion:
Enabling Windows Search streamlines the process of finding files and applications on your system. By configuring indexing options and ensuring the Windows Search service is active, you can optimize and utilize this feature efficiently. Regular maintenance and occasional adjustments to settings can further enhance the search experience on your Windows system.
Leave a Reply