How to Enable Windows 10 Update
Enable Windows 10 update keep PCs secure and improve performance. However, they can be annoying when they interrupt work or require a restart.
Windows allows users to choose how updates are delivered, including pausing them for up to 35 days. This method is easy enough for most users, and it works on all editions of Windows 10 (even Feature Updates). This article will cover the steps to enable this setting.
Windows 10 updates are essential for maintaining system security, improving performance, and fixing bugs. To enable automatic updates on your Windows 10 system.
Follow These Steps:
Access Windows Update Settings: Click on the Start menu, then select “Settings” (gear-shaped icon) or use the shortcut “Windows key + I.” In the Settings window, click on “Update & Security.”
- Check Update Settings: In the Update & Security section, you’ll find various options. Click on “Windows Update” in the left-hand pane. Here, you can review the current update status and settings.
- Configure Update Options: Click on “Advanced options” to configure how updates are installed. You can choose between different update channels (like Beta or Release Preview) or pause updates temporarily if required.
- Enable Automatic Updates: To ensure updates are automatically downloaded and installed, toggle on “Automatic” under “Choose when updates are installed.” This setting will ensure that Windows 10 downloads and installs updates without requiring manual intervention.
- Restart Options: Under “Advanced options,” you can specify restart preferences. By default, Windows 10 will schedule restarts outside of active hours to minimize disruptions. Adjust these settings as needed.
- Metered Connection Settings (Optional): If you’re using a metered connection, such as a limited data plan or mobile hotspot, you can set it as a “metered connection.” Windows will then handle updates more conservatively to avoid excessive data usage.
- Check for Updates Manually (Optional): You can manually check for updates by clicking “Check for updates” in the Windows Update settings. This action will prompt Windows 10 to search for available updates immediately.
- Restart Your System: After updates have been downloaded and installed, Windows 10 might require a restart to complete the process. Ensure that your work is saved before allowing the system to restart.
-
updates on your Windows 10 system
- Monitor Update Progress: Keep an eye on the update process by periodically checking the Windows Update settings or the system tray icon for notifications. Windows 10 will notify you when updates are successfully installed or if any issues arise during the process.
- Troubleshooting Update Problems: If you encounter issues with updates, such as failed installations or errors, you can use the “Troubleshoot” option in the Update & Security settings. This tool helps diagnose and resolve common update-related problems.Remember, keeping your Windows 10 system updated is essential for security and performance. However, it’s also crucial to ensure that your system is compatible with updates and that you have a backup of essential data in case any unforeseen issues occur during the update process.
By following these steps and regularly checking for updates, you can ensure that your Windows 10 operating system remains secure and efficient.
1. Go to Settings
Windows Update is an essential part of keeping your computer running smoothly. Updating Windows can fix security vulnerabilities, bug fixes and new features that are added to the operating system software.
You can choose whether to download updates automatically or wait to install them if you like. If you opt to install them automatically, it is recommended that you do so when your computer is not being used or while on a WiFi network for maximum performance.
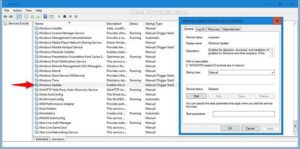
You can also decide on the settings for active hours if you want to prevent Windows from updating during your working day and choose how updates are downloaded. This can be done through the Configure Automatic Updates window, which is usually set to Not configured by default (see Figure 5) but can be changed to enabled. Alternatively, you can use the Registry to disable Windows updates. This is risky and is not recommended unless you are an experienced user of the Windows Registry.
2. Click Update & Security
Windows updates often include vital security patches so making sure computers are updated in a timely manner is important. Microsoft has a few different options for users to control how and when Windows updates are downloaded and installed. Google
Metered connections: This option limits the amount of bandwidth that is used for downloads and installs. While it doesn’t stop updates from downloading, it will only allow them to install on a schedule that you set. This can help reduce the risk of installing updates at a bad time or in a location with limited Internet connectivity.
Change active hours: This option allows you to tell Windows that your computer should be active and shouldn’t reboot for updates during a specific window of time. The default is business hours but you can choose a different window of time.
Registry change: For advanced users, you can enable Windows 10 Update by changing a registry value. To do this, open the Registry Editor by clicking the Start button and typing regedit. Right-click in the editor and click New > DWORD (32-bit) Value. Name the key AUOptions and select a value of 2. This setting will require that Windows 10 notifies you before downloading and before installing any updates.
3. Click Change PC settings
Windows automatically updates to fix bugs and introduce new features, so an up-to-date PC is less likely to be vulnerable to attacks. However, sometimes an update can break something important or slow down your device.
If you experience problems after installing updates, you can roll back to an earlier point in time using a system restore point. This can help you avoid having to reinstall all your apps and drivers from scratch.
In the Change PC settings window, you can choose how often Windows downloads and installs updates. You can also choose whether to receive updates for other Microsoft products when you update Windows, and if you use a metered connection, how long your device should wait between downloading and installing updates.
If you decide to pause updates, click the Advanced options link and select a date in the Pause until drop-down menu. You can pick a date up to 35 days in the future.
4. Click Change update settings
Windows updates can help improve your PC’s security, performance, and experience. But they can also cause problems, so you may want to disable them. If you’re concerned about problems, you can disable them temporarily using the settings app or permanently with Group Policy or the registry.
The Update settings page has a number of options that allow you to control how and when Windows downloads and installs updates. For example, you can change active hours so that updates don’t force-restart your computer while you’re working. And you can defer quality updates (which include security improvements) for up to 30 days.
You can even tell Windows that you have a metered Internet connection (which means that extra charges might apply), which allows you to limit how much data it uses when downloading updates. Changing these settings can take a few minutes, but it’s worth the peace of mind.
Leave a Reply