
How to Enable Windows Defender
Enable Windows Defender provides a base-level anti-malware function for all versions of Windows. If this program is disabled, the malware may not be detected and your PC will remain vulnerable to malicious software infections.
The program can be accessed through the Settings app, and to enable it you will need to complete a few Group Policy steps. These can be found under Computer Configuration -> Administrative Templates -> Windows Components -> Microsoft Defender Antivirus.
Enabling Windows Defender
Windows Defender is an inbuilt security feature in Windows operating systems. To ensure it’s active and protecting your system:
Method 1: Via Settings
- Open Settings: Click on the Windows icon in the taskbar, select “Settings” (gear-shaped icon).
- Update & Security: Inside Settings, choose “Update & Security.”
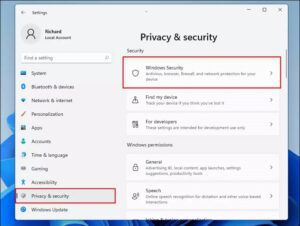
- Windows Security: Select “Windows Security” from the left pane.
- Open Windows Security Center: Click on “Open Windows Security” to access the Defender settings.
- Virus & Threat Protection: Click on “Virus & Threat Protection.”
- Security Dashboard: Here, you’ll find various options related to Defender.
- Turn On Real-Time Protection: Click on “Manage settings” under “Virus & Threat Protection Settings” and toggle on “Real-time protection.”
Method 2: Via Control Panel
- Open Control Panel: Search for “Control Panel” in the Windows search bar and open it.
- System and Security: Click on “System and Security.”
- Windows Defender Firewall: Inside this section, you might find options to enable Defender or access its settings.
Methods 3: Using Group Policy (Advanced Users)
- Open Group Policy Editor: Press Win + R, type “gpedit.msc,” and hit Enter.
- Navigate to Windows Defender Settings: Go to Computer Configuration -> Administrative Templates -> Windows Components -> Windows Defender Antivirus.
- Turn On Windows Defender: Double-click on “Turn off Windows Defender Antivirus” and select “Not Configured” or “Disabled” if you wish to enable it.
Method 4: Using Registry Editor (Advanced Users)
- Open Registry Editor: Press Win + R, type “regedit,” and press Enter.
- Navigate to Windows Defender Registry Key: Go to HKEY_LOCAL_MACHINE\SOFTWARE\Policies\Microsoft\Windows Defender.
- Modify Settings: Look for a DWORD value named “DisableAntiSpyware” and set its value to “0” to enable Defender.
Additional Tips:
- Update Windows: Ensure your Windows OS is up to date as Defender’s effectiveness relies on updates.
- Scan Regularly: Schedule regular scans or perform manual scans to check for malware.
- Enable Cloud-Based Protection: In Defender settings, enable “Cloud-delivered protection” and “Automatic sample submission” for enhanced security.
- Be Cautious: Always exercise caution when downloading files or clicking on unknown links, as Defender isn’t foolproof.
Conclusion:
Windows Defender serves as a fundamental defense against various threats. Enabling it ensures real-time protection and regular scans, contributing significantly to your system’s security. Whether through Settings, Control Panel, Group Policy Editor, or Registry Editor, following these steps helps activate Windows Defender, keeping your system safer from malware and other online threats.
Go to Control Panel
Windows Defender is a built-in security feature that protects your computer from malware, viruses, and other online threats. It also helps ensure that your operating system remains stable and secure. If you have been experiencing issues with Defender, there are several possible reasons why it might not be launching.
In many cases, it is due to corrupted system files. You can repair these files using the SFC scan tool. Another common cause is conflicting antivirus software that interferes with Windows Defender. You may have to uninstall your other antivirus software or make adjustments so that it doesn’t interfere with Windows Defender.
You can also try disabling the “Tamper Protection” setting. This feature prevents changes to the settings from other apps or from Command Prompt or PowerShell. This can be especially helpful if your other antivirus program is not working correctly.
To do this, open the Settings app and switch to the Privacy & security tab on the left sidebar. Then, select Windows Security and click the “Open Windows Security” button. This will open the Windows Security app in a dedicated window. On the Windows Security home screen, scroll down to the Virus & threat protection settings section and click Manage settings. Then, enable the Real-time protection toggle alongside other toggles on this page to get Windows Defender’s protection back up and running.
Click Security Center
In addition to being a powerful anti-malware tool, Windows Defender also provides other security tools such as the SmartScreen URL filter and file, folder and app protections. These features help protect against threats that might otherwise be missed by other antivirus software. Google
Some versions of Windows have a feature that allows you to configure how Microsoft security tools should operate on your system. This feature, called the Security Center, allows you to change how frequently Windows Defender should scan your system and other settings such as exclusions.
It is possible for the Security Center to turn off Windows Defender, either by accident or maliciously. For example, users can accidentally change the Group Policy setting that allows for the disabling of Microsoft Defender. Malware can also tamper with these settings to disable or uninstall the program.
Click Turn on Windows Defender
The built-in Windows Defender is an antimalware application that can stop security threats before they reach your system. It provides antivirus protection and is updated on an ongoing basis through Windows updates. I offers a variety of practical features, including personalization options and children and youth safety settings. It also offers real-time protection against viruses and malware, which runs a virus check on any file or application that’s downloaded, opened or started.
If you’re running Windows 10 or 11, enabling Windows Defender is simple. You can do it in the Virus & threat protection menu of the Windows Security app. This is the default security application in Windows 10.
You can also open the Virus & threat protection menu by clicking the Win logo on the taskbar and selecting “Settings.” Click the “virus & threat protection” link and then click the Turn on Windows Defender link.
If you can’t enable Windows Defender, the reason could be that it’s disabled in Group Policy or that there is a Registry edit preventing it from opening. To resolve the latter, press the Win key on your keyboard to bring up the Run utility and then type regedit into the command field. Press Enter to launch the Registry Editor. In the Registry Editor, navigate to HKEY_LOCAL_MACHINESOFTWAREPoliciesMicrosoftWindows Defender and create a new DWORD value named DisableRealtimeMonitoring. Set the value to 1.
Leave a Reply