
How to Enable Windows Defender in Windows 10
Enable Windows Defender In Windows 10 is a built-in antivirus and security tool. It protects against viruses, ransomware, malware, spyware, hackers, and other threats.
Windows 10 has improved the capabilities of the tool to include additional features like a full PC scan, Cloud-delivered protection and Automatic Sample Submission. This article will show you how to open, enable, configure & use Windows Defender.
Enabling Windows Defender in Windows 10 is a straightforward process that ensures your system has basic protection against malware and other threats. Here’s a detailed guide in 500 words:
Accessing Windows Security Settings:
- Start Menu: Click on the Start button located at the bottom left corner of your screen. You can also press the Windows key on your keyboard to open the Start Menu.
- Settings: In the Start Menu, look for the gear-shaped icon labeled “Settings” and click on it. This will open the Windows Settings panel.
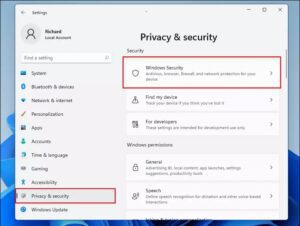
- Update & Security: Inside the Windows Settings, find and select the option that says “Update & Security.” This section contains various settings related to your system’s updates and security.
- Windows Security: On the left sidebar of the Update & Security menu, you’ll see several options. Click on “Windows Security,” which is usually represented by a shield icon. This will open the Windows Security dashboard.
Enabling Windows Defender:
- Virus & Threat Protection: Within the Windows Security dashboard, locate and click on “Virus & threat protection.” This section manages your system’s antivirus settings and protection status.
- Virus & Threat Protection Settings: Under the “Virus & threat protection” section, you’ll find various settings related to your system’s security.
- Real-time Protection: Look for the option labeled “Manage settings” or “Virus & threat protection settings.” Click on it to access the settings related to real-time protection.
- Turn On Real-time Protection: You’ll find a toggle switch associated with real-time protection. Ensure that this toggle switch is turned on to activate Windows Defender’s real-time monitoring feature. Real-time protection continuously scans files and activities in real-time to detect and prevent threats.
Troubleshooting:
If you encounter difficulties enabling Windows Defender, there are a few things you should check:
- Third-Party Antivirus Software: Some third-party antivirus programs automatically disable Windows Defender upon installation. If you have another antivirus installed, Windows Defender might be turned off. You might need to uninstall or disable the other antivirus software to enable Windows Defender.
- Group Policy or Registry Changes: In some cases, group policies or registry changes made by system administrators might prevent the user from turning on Windows Defender. If your system is managed by an organization, you might need administrative permissions to enable Windows Defender.
Final Steps:
After enabling Windows Defender, ensure it stays updated. Windows Defender regularly receives updates to its virus definitions, enhancing its ability to detect and remove new threats. Windows Update usually includes these updates, so ensuring your system is up-to-date will also keep Windows Defender updated.
Remember that while Windows Defender provides basic protection, for more advanced security needs or specific features, you might consider third-party antivirus solutions that offer additional functionalities.
By following these steps, you can enable Windows Defender on your Windows 10 system to provide essential protection against various types of malware and threats.
Check for updates
The Windows Defender security application checks for and installs updates. If you haven’t already done so, click the Windows icon in the bottom left corner of the screen — it looks like a gear — and select Settings. Then, click Update & security. Google
Select the Virus & threat protection option. In the Virus & threat protection window, click the blue “On” switch next to Cloud-delivered protection and click Yes when prompted.
You can also select the Quick scan or Full scan options to check your computer for malware. If you want to exclude specific files, folders, or file types, select Add an exclusion and enter the information. You can also change the scan frequency and set a schedule for scanning your computer. This setting is important because if you don’t have an antivirus program installed, you leave your computer vulnerable to cyber attacks. A good antivirus program is essential for anyone who uses the internet to access personal information or online bank accounts.
Turn on real-time protection
Windows Defender, also known as Microsoft Security Center in some versions of the operating system, provides real-time virus and malware protection for your PC. It’s the best and most easily recommended antivirus program to keep your computer safe from malicious software and files.
When enabled, Windows Defender scans every file and program on your local computer for signs of viruses or other malware. If it detects any, it will display a red or yellow warning in the lower right corner of your screen.
The default antivirus also occasionally blocks certain activities that you know are safe, such as installing trusted apps from a known source or opening files you’ve previously verified as safe. Fortunately, you can disable Defender’s real-time antimalware protection by using Group Policy. You’ll need to be logged in as an administrator to access these settings. Download the.reg file to add and modify the DWORD value. Once you’ve made the change, restart your computer to apply it.
Manage settings
Windows Defender is a free antivirus software that protects your computer from online threats like malware, hackers and more. It comes pre-installed with all Windows 10 systems to help you stay safe while connected to the internet. If you can’t open or use the built-in antivirus, it might indicate that something is wrong with your system.
Depending on your privacy preferences, you may want to change how it operates. This could include turning off the real-time protection feature if you’re worried about Microsoft collecting data on your browsing behavior. You can also enable a full or custom scan, as well as configure cloud-delivered protection. Alternatively, you can disable it permanently by clicking the blue switch next to “Cloud-delivered protection”. This will turn off real-time scanning, but it’ll still be capable of running background updates and protecting you from malware and viruses when your PC isn’t running. You can even continue using 3rd party antivirus software if you choose to do so.
Turn off real-time protection
You can disable real-time protection through the Windows Security settings, which allows you to toggle the option to Off. However, this is just temporary and Windows will turn the option back on.
You may want to turn off the feature if you are installing software that Windows Defender incorrectly flags as harmful and prevents from installing. You can also permanently disable Microsoft’s antivirus by installing a third-party antivirus solution, but it’s important to understand that doing so will leave your computer vulnerable to malware and other threats.
Alternatively, you can use a registry hack to turn off real-time protection in Windows 10. To do this, open the Registry Editor and navigate to HKEY_LOCAL_MACHINE SOFTWARE Microsoft Windows Defender Policies. Create a new DWORD value and name it Disable Realtime Monitoring. Set the value data to 1 and click OK. The next time you restart your computer, Windows Defender will not load and your system will be safe from malware. However, the registry hack will not work for all versions of Windows.
Leave a Reply