
How to Enable Windows Search Indexing
Enable Windows Search Indexing enhances file searching speeds within specific folders or across the entire PC. This feature also requires significant CPU resources.
You may want to turn off search indexing on computers with slow RAM and CPUs. But you can still use indexed data for searches in Outlook and other apps that rely on it.
Windows Search indexing is a feature that builds and maintains an index of the files and their contents on your computer. This index allows for faster search results when you use the search bar in File Explorer or on the Start menu.
Checking Current Indexing Status:
- Open Indexing Options: Press the Windows key, type “Indexing Options,” and select it from the search results.
- View Indexing Status: In the Indexing Options window, you can see the current status of indexing and the locations being indexed.
Steps to Enable Windows Search Indexing:
Follow these steps to ensure that Windows Search indexing is enabled:
1. Open Indexing Options:
- Press the Windows key, type “Indexing Options,” and select it from the search results.
2. Modify Indexed Locations:
- Click on the “Modify” button in the Indexing Options window.
- Ensure that the locations containing files you want to be indexed are checked. You can add or remove locations as needed.
3. Check Indexing Settings:
- Click on the “Advanced” button in the Indexing Options window.
- In the Advanced Options window, select the “Index Settings” tab.
- Ensure that the “Index encrypted files” and “Treat similar words with diacritics as different words” options are checked if needed.
- Review the File Types tab to make sure the file types you want to be indexed are selected.
4. Start or Rebuild Index:
- Go back to the main Indexing Options window.
- Click on the “Advanced” button.
- Click on the “Index Settings” tab.
- Click on “Rebuild” to rebuild the index if needed. This might take some time, depending on the number of files to be indexed.
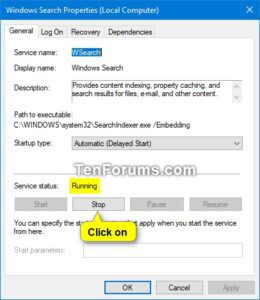
5. Check Windows Search Service:
- Press the Windows key + R to open the Run dialog box.
- Type “services.msc” and press Enter.
- Locate “Windows Search” in the Services window.
- Check if the status is “Running.” If not, right-click and select “Start” to activate it.
6. Optimize Indexing Options (Optional):
- To optimize indexing for better performance, you can limit the types of files being indexed or exclude certain folders with files that don’t require indexing.
- From the Indexing Options window, click on “Advanced” and then “File Types” to select or deselect file types for indexing.
- Use the “Index Properties and File Contents” option for faster search results.
7. Monitor Indexing Progress:
- Return to the Indexing Options window to monitor the progress of indexing.
- You can see the number of items indexed and the remaining items yet to be indexed.
8. Troubleshooting Indexing Issues:
- If you encounter issues with indexing, you can reset the index by going to Indexing Options > Advanced > Troubleshoot and follow the on-screen instructions.
- Ensure that your system is up to date with the latest Windows updates, as sometimes indexing issues are resolved with updates.
9. Reboot Your System:
- After making changes to the indexing settings or rebuilding the index, it might be beneficial to restart your computer to ensure that the changes take effect properly.
How to turn on search indexing
While Windows Search has been improved significantly with Windows 7, many users aren’t aware of its advanced facilities. One such feature is the ability to find text in files based on their properties. You can add other folders to the list easily.
Another option is to turn off the search indexer altogether, which won’t affect your ability to use Windows Search, but will save CPU and RAM resources. The downside is that searches will take longer as you’ll have to wait for the index to rebuild. This process can take quite a while, especially on slower computers. So, be sure to plan ahead and make a backup of the index before disabling it completely.
How to change the location of the search index
Windows Search uses an internal database that makes searching files much faster and more accurate. Whenever you search, it searches the index rather than searching your actual file system. That way, results are instant.
The indexing process can use a lot of CPU resources in the background, so you may want to limit it. The easiest way to do that is to open the Indexing Options window (type “indexing options” into the search box in the Start menu or in the Settings app, and click the top result).
Click Modify, and you’ll see a list of all locations currently indexed. The new location applies when the service restarts. Y
How to add files to the search index
The Windows Search process indexes files on your hard drive to make searching for them quicker and easier. This service is necessary for some apps, like Office and Windows Media Player, to function properly. However, if the search index uses too many system resources it can negatively impact your PC performance.
To control how many files the search index creates, open File Explorer and navigate to your hard drive. Click the drive icon, then select Properties from the menu. In the Indexing Options dialog box, uncheck locations you don’t want to include in the search index. If you work with files in foreign languages, you can configure the index to treat diacritics (small signs added to letters to change their pronunciation) as different words to help find them faster. To do so, click the Advanced button in the Indexing Options dialog box.
How to remove files from the search index
Windows Search uses an index to quickly look up files rather than searching each file in real time. This makes it much faster to find files, especially if you use the same words or file names when searching. Google
Indexing is enabled by default and can be modified via the Search Options window. You can add or remove folders, include or exclude specific files and modify how Windows Search indexes the contents of each file. This includes indexing for keywords, comments and metadata.
You can also change the location of the search index and configure settings such as enabling indexing for encrypted files. Windows also provides a troubleshooter for search that can help fix problems with the index. You can run this by typing search settings in the search box on your taskbar. This can be very helpful if your search results are slow and inaccurate. It can often be caused by corrupted indexes and rebuilding the index is a quick fix.
Leave a Reply