
How to Turn on Search Indexing in Windows 10 and Windows 11
Search indexing is an incredibly useful feature, but it can also place a burden on your system. This can slow down your computer when performing searches and can even cause errors such as the “search indexing was turned off” message.
Luckily, there are some ways to fix this issue. Here are a few potential solutions that you can try.
Enabling search indexing is a crucial aspect of optimizing the discoverability of content on a computer or a website. Search indexing allows for faster and more efficient searches by creating an organized catalog of content. Depending on whether you’re referring to a computer’s file system or a website’s search functionality, the process may differ slightly. Here’s a guide on how to turn on search indexing for both scenarios.
Computer File System Search Indexing:
Windows Operating System:
Step 1: Access Indexing Options
- Click on the Start button and type “Indexing Options” in the search bar.
- Select “Indexing Options” from the search results to open the configuration window.
Modify Indexing Settings
- In the Indexing Options window, click on the “Modify” button.
- Ensure that the locations you want to index are checked. By default, common folders like Documents, Pictures, and others are already indexed.
- If needed, click on “Show All Locations” to add or remove specific folders or drives from the index.
- Click “OK” to save the changes.
Step 3: Check Indexing Status
- Return to the Indexing Options window.
- Click on the “Advanced” button.
- Here, you can see the current indexing status and troubleshoot any issues if indexing is not occurring properly.
Step 4: Allow Time for Indexing
- Depending on the amount of data to be indexed, the process may take some time.
- Ensure your computer is connected to a power source and allow it to run while indexing completes.
MacOS:
Step 1: Spotlight Preferences
- Click on the Apple logo at the top-left corner and select “System Preferences.”
- Click on “Spotlight.”
Customize Indexing
- Go to the “Privacy” tab.
- Ensure that the folders you want to index are not listed here. Spotlight won’t index folders added to this list.
- Close the Spotlight Preferences window.
Step 3: Allow Time for Indexing
- After configuring the settings, the macOS Spotlight will automatically index the selected locations.
- Depending on the volume of data, it might take a while to complete the indexing process.
Website Search Indexing:
Using Content Management Systems (CMS) like WordPress:
Step 1: Install a Search Plugin
- Log in to your WordPress admin panel.
- Go to the “Plugins” section and click on “Add New.”
- Search for and install a search plugin like “WP Google Search” or “SearchWP.”
Step 2: Configure Search Settings
- Once installed, navigate to the settings of the plugin you chose.
- Follow the plugin’s instructions to specify the content you want to be indexed for search.
- Configure other settings such as search filters, display options, etc.
3: Index Content
- After configuring the settings, trigger the plugin to start indexing the content.
- Depending on the plugin and the size of your website, this process may take some time.
- Monitor the plugin dashboard or settings to track the indexing progress.
1. Go to Control Panel
Windows Search Indexing enhances the speed of searches by creating local indexes of content on your computer. It enables you to search files, folders, and other content on your computer quickly and easily, and can help troubleshoot search issues.
Some apps, including Outlook and the Settings app, rely on search indexing for fast results. Disabling indexing can slow down searching and other PC performance.
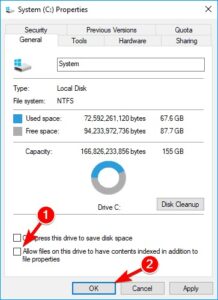
You can change which drives and folders are included in search indexing by clicking the Modify button in the Indexing Options window. The top pane displays all available locations, and the bottom pane displays the selected locations. Uncheck the boxes for the locations you don’t want to include in the index. Then click OK to save your changes. If you’re still experiencing slow search results, it may be time to rebuild the index. To do so, follow these steps:
2. Click System
Imagine if you searched for something on Google, and the results slowly appeared on the screen after you entered your query. That would be annoying, and you might leave the website or search again on a different engine. Search engines are able to deliver lightning-fast search performance because they have huge, perfectly organized catalog archives of all pages on the web — called indices. Google
Every time a web crawler discovers a new page, it adds it to the index. Then, when a user searches for a term, the engine checks its index to see if there’s anything that matches – and then displays the results.
To enable the best performance, it’s a good idea to keep search indexing enabled for folders that you frequently use. This way, you can save PC resources and still get fast search speed for these folders.
3. Click Indexing Options
Search indexing helps make finding files, folders, and even e-mails in Windows 10 and Windows 11 faster by allowing your PC to look through a database of locations. You can change what file types and locations are indexed by accessing the Indexing Options dialog box.
To open the Indexing Options window, click the Windows search bar and type indexing options. Then, in the Indexing Options window, select the Modify button to see a list of indexed locations. Check the boxes to include locations that you want Windows Search to index, and uncheck the boxes to exclude locations that you don’t want Windows Search to index.
You can also change the index location and how Windows Search treats encrypted files. Note that changing the Indexing options can cause an immediate rebuild of the search index, which can take hours to days depending on the size of your index. This can cause searches to fail while the index is rebuilding.
4. Click Rebuild Index
The search index helps Windows find files and folders quickly. However, it can take longer to locate files if the search index becomes corrupt or damaged. Rebuilding the search index helps to resolve these issues.
The indexing process uses memory and CPU resources, so it can cause the computer to slow down or become unresponsive. You can reduce the amount of time it takes to build the index by closing applications that use a lot of memory or installing more memory in the computer.
You can also change the location of the folders or drives you want indexed by searching for “indexing options” in the Start menu. For example, you can add a second hard drive to be indexed. Then you can run the command net start wsearch to restart the file indexing service. This may take a few minutes to complete. Then you can search for files and folders using the computer’s search feature.
Leave a Reply