How to Turn on Remote Desktop
To make your computer accessible to remote users, you must enable remote desktop. This is a simple process that you can do in the Settings app or through Control Panel.
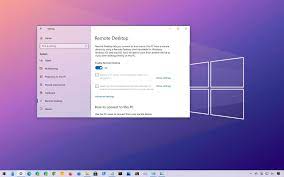
In addition to enabling remote desktop, you can also set options like requiring computers to use Network Level Authentication for connections. This makes connections more secure. The Settings page also displays the current Remote Desktop port if you need to reconfigure your router for external access.
Enabling Remote Desktop on a Windows computer allows you to access your machine from another device, providing a convenient way to control your computer remotely. Here’s a detailed guide on how to turn on Remote Desktop in Windows, covering the necessary steps, settings, and precautions. Please note that the steps may vary slightly depending on the version of Windows you are using.
Step 1: Check System Requirements
Before enabling Remote Desktop, ensure that your computer meets the necessary requirements:
- Operating System: Remote Desktop is available on Windows Professional, Enterprise, and Education editions.
- Network Connectivity: Both computers (host and remote) should be connected to the same network or have internet access.
- Firewall Settings: Ensure that Windows Firewall or any third-party firewall is configured to allow Remote Desktop connections.
2: Access System Properties
- Press
Win + Xand select “System” to open the System window. - Click on “Remote settings” on the left sidebar. This will open the System Properties window.
3: Enable Remote Desktop
- In the System Properties window, navigate to the “Remote” tab.
- Under the Remote Desktop section, check the box that says “Allow Remote Assistance connections to this computer.”
- Optionally, for more security, you can select “Don’t allow connections to this computer” or “Allow connections only from computers running Remote Desktop with Network Level Authentication (NLA).”
- Click “Apply” and then “OK” to save the changes.
4: Configure Firewall Settings
- Open the Windows Security app by searching for it in the Start menu.
- Click on “Firewall & network protection.”
- Click on “Allow an app through firewall.”
- Scroll down to find “Remote Desktop” and ensure that both Private and Public are checked.
- If “Remote Desktop” is not listed, click on “Change settings” and then “Allow another app.” Choose “Remote Desktop” from the list or browse and add it manually.
- Click “OK” to save the firewall settings.
5: Obtain the Computer’s IP Address
- Press
Win + Xand select “Command Prompt” or “PowerShell.” - Type
ipconfigand press Enter. - Note the IPv4 Address under the active network connection. This is the computer’s IP address.
6: Connect Remotely
- On the remote computer, open the Remote Desktop Connection app. You can find it by searching in the Start menu.
- Enter the IP address of the target computer in the “Computer” field.
- Click “Connect.”
- If prompted, enter the username and password of the target computer.
- You should now be connected to the remote computer.
7: Additional Tips and Considerations
- Security: Use strong, unique passwords for both computers and consider using Network Level Authentication (NLA) for added security.
- Dynamic DNS: If your computer’s IP address changes frequently, consider setting up Dynamic DNS to easily connect using a hostname instead of an IP address.
- Router Configuration: If connecting over the internet, configure your router to forward the Remote Desktop port (default is 3389) to the local IP address of your computer.
- Firewall Rules: Ensure that any security software on the host computer allows Remote Desktop connections.
By following these steps, you can successfully enable and use Desktop on your Windows computer, allowing for convenient remote access from another device.
1. Go to Control Panel
If you want to access your computer remotely, you need to turn on desktop. You can use it for many things, such as connecting to a work PC while at home or assisting with a computer problem on a friend’s machine. To set up desktop, you need to make sure the host computer is running a Windows version that supports it (Windows 10 or higher). You should also know its public IP address and ensure your firewall allows incoming connections.
To start the process, go to Control Panel and then open System and Security. From there, select Remote Desktop and then click the slider to enable it. When you do, a window will pop up asking if you’d like to accept connection requests from anyone or if you’d prefer to approve them individually. You can also change the device name and account settings in this window.
The next step is to configure your router for incoming remote desktop connections. If you want to prevent unauthorized people from connecting to your computer over the internet, check the “Allow connections only from computers running Remote Desktop with Network Level Authentication” option in the Advanced section of this window. This requires that people connect to the computer using its public IP address, which is usually different than its private IP address.
Once you’ve configured your router for incoming Remote Desktop connections, it’s time to test the settings by starting a remote session. Enter your Windows 11 computer’s name in the Computer field and click Show Options to see what options are available. You can then add your username if needed and check or uncheck the box to always ask for credentials when connecting. This is a good way to protect your computer from unwanted users. You can also check or uncheck the option to automatically minimize the remote window to the taskbar and choose whether or not you want to display the connection bar (which lets you know that a remote session is currently active).
2. Select System and Security
When you enable remote desktop in Windows, you give yourself the ability to connect and control a computer over the Internet or a private network. The feature is most commonly used to offer technical support to a user or access files and programs from a remotely located computer. However, you can also use the feature to play video games, transfer files and operate locally-attached peripheral devices.
To turn on remote desktop, open the Settings app on the computer that you want to manage from another computer. In the System and Security section, click Allow remote desktop connections to this PC. You will be asked to select a password, which is required for anyone who attempts to connect remotely to your computer. You can also choose to require computers that connect to this PC to use Network Level Authentication, which makes it more secure by forcing users to authenticate with the network before connecting to the device.
Click Apply, then click OK. This will set the default Remote Desktop port to 3389. You can change this if you have a custom RDP port number, or if your router is configured to restrict specific ports.
If you experience problems connecting to your computer using remote desktop, it may be an issue with your ISP’s security protocols. You can call your ISP to ask if their security protocols are thwarting the connection. Another possible issue is that your Microsoft account’s passwordless security or two-step verification is preventing the connection from being established. You can bypass this by creating a local account on the computer, which will be able to make remote connections without the limitations of a Microsoft account.
You can turn on desktop in Windows 10 and older versions of Windows using either the Settings app or the Control Panel. Once the feature is enabled, you can connect to the host computer with a modern Remote Desktop application (recommended) or with the built-in Desktop Connection app that comes with Windows.
3. Select Remote Desktop
For IT professionals, enabling remote desktop is an important part of getting a new computer or device up and running. With this tool, a computer administrator can connect to a remote computer and take control of it to troubleshoot issues, transfer files, install software, and more. This can be done from any location with an Internet connection, including across the world. For this reason, it is essential that you know how to turn on remote and configure the settings correctly.
The easiest way to do this is to use the Microsoft Desktop app. Windows 10 and 11 Pro, Education, and Enterprise have this installed by default. However, you can also download the app on other versions of Windows.
To access the app, click on the Start button and type “remote desktop” or “mstsc”. This will open the Desktop Connection window where you can set various options.
These include screen size, login information, and availability of local drives, printers, and keyboard. You can also decide whether to allow the remote session to reconnect if the connection drops. You can also select the option to allow or deny connections from a list of users. By default, members of the Administrators group will have access.
You can also enable Network Level Authentication for added security. This feature allows the desktop connection to verify the identity of the connecting user against a trusted list. This will enhance the security of RD Session Host server connections.
You can also add firewall rules to allow Desktop through the Windows Firewall. If your PC is a member of the Pepperdine network, you should follow these instructions to allow Remote Desktop through the Pepperdine network firewall. You may need to contact your ISP to make this happen.
Leave a Reply