
How to Enable Active Directory in Windows 10
Enable Active Directory In Windows 10 is a centralized user and computer management system that helps ensure security on Windows domain networks. It provides administrators with the ability to manage user accounts, computers, and security groups.
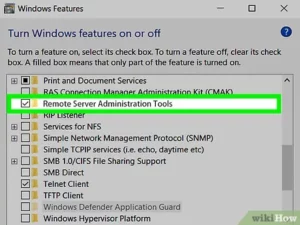
To enable active directory, you must first install the Remote Server Administration Tools (RSAT). For all versions of Windows 10 except version 1803 and older, RSAT is included as a feature on demand in Settings.
Enabling Active Directory (AD) on Windows 10 involves a series of steps that include installing the necessary components, configuring settings, and promoting the system to a domain controller.
Follow These Step:
1: Verify Windows 10 Edition
Ensure that you are using a Windows 10 Pro, Enterprise, or Education edition, as these editions support the installation of the Active Directory Domain Services (AD DS) role.
2: Install Active Directory Domain Services
- Open the “Server Manager” by pressing the Windows key, typing “Server Manager,” and selecting it from the search results.
- In the Server Manager, click on “Manage” in the top-right corner and select “Add Roles and Features.”
- Click “Next” until you reach the “Select server roles” page.
- From the list of roles, select “Active Directory Domain Services” and follow the wizard to install the required features.
- Once the installation is complete, click on “Promote this server to a domain controller” to configure the server as a domain controller.
3: Configure Domain Controller
- In the “Deployment Configuration” page, select “Add a new forest” and provide a root domain name for your Active Directory domain.
- Set the Domain and Forest functional levels. Choose the appropriate level based on your environment and click “Next.”
- Set the Directory Services Restore Mode (DSRM) password and click “Next.”
- On the “DNS Options” page, leave the default settings and click “Next.”
- Review the NetBIOS domain name, and click “Next.”
- Choose the location for the AD DS database, log files, and SYSVOL, or leave the default settings, and click “Next.”
- Review the configuration options, and click “Next” to proceed.
- Click “Install” to begin the installation process.
- After the server restarts, log in with your domain credentials.
4: Post-Installation Configuration
- Open “Server Manager” and verify that the “Active Directory Domain Services” role is installed.
- Open “Active Directory Users and Computers” to manage users and groups.
- Open “Active Directory Sites and Services” to manage sites and replication.
- Open “Active Directory Domains and Trusts” to manage domain trusts.
5: Configure Group Policy
Group Policy allows you to configure settings for users and computers in your domain. To configure Group Policy:
- Press Win + R, type “gpedit.msc,” and press Enter to open the Group Policy Editor.
- Navigate to “Computer Configuration” > “Policies” > “Windows Settings” > “Security Settings” > “Restricted Groups.”
- Right-click on “Restricted Groups” and choose “Add Group.”
- Add the desired groups to control membership.
- Configure additional Group Policy settings as needed.
6: Create Organizational Units (OUs)
Organizational Units help organize and manage objects in Active Directory. To create OUs:
- Open “Active Directory Users and Computers.”
- Right-click on the domain and choose “New” > “Organizational Unit.”
- Enter a name for the new OU and click “OK.”
- Move users, groups, and computers into the newly created OU.
7: Manage Users and Groups
- To create a new user, right-click on the desired OU and choose “New” > “User.” Follow the wizard to set up the user account.
- To create a new group, right-click on the desired OU and choose “New” > “Group.” Follow the wizard to set up the group.
- To manage user properties, right-click on a user and choose “Properties.” Configure settings such as account options, profile, and security.
8: Configure DNS Settings
Active Directory relies heavily on DNS. Ensure that your DNS settings are correctly configured:
- Open “Control Panel” > “Network and Sharing Center.”
- Click on your network connection, then click “Properties.”
- Under “Networking,” select “Internet Protocol Version 4 (TCP/IPv4)” and click “Properties.”
- Set the preferred DNS server to the IP address of the domain controller.
9: Test Active Directory
- Use “Active Directory Users and Computers” to verify user and group configurations.
- Test user logins to ensure that authentication is working.
- Verify that Group Policy settings are applied correctly to computers and users.
By following these steps, you should have successfully enabled and configured Active Directory on Windows 10. Remember that managing Active Directory requires ongoing maintenance and monitoring to ensure the security and efficiency of your domain.
Requirements
Active Directory is a specialized database that stores data objects in your network environment. It uses a hierarchical structure to store data so you can locate devices connected to your network quickly and easily. It also helps ensure that all users can access the necessary resources on the network, such as computers, printers, and other applications. Active Directory can even help you maintain network security by applying group policy.
To work with Active Directory, you need to have an administrator account and a domain name or IP address. You can also install a special tool called the Remote Server Administration Tools (RSAT) to enable you to manage the directory. RSAT is available for Windows 10, Windows 11, and older versions of Windows that are still supported by Microsoft.
If you want to use the RSAT tool, you can open the Settings app and select “Apps & features.” Click the ‘Add a feature’ button and then add the ‘RSAT: Active Directory Domain Services and Lightweight Directory Services Tools’ optional feature. Then, reboot your computer to apply the changes.
You can also troubleshoot problems with your Active Directory configuration using the Windows Event Viewer. The event viewer can track events that are related to Active Directory, including errors and warnings. It can also be used to check whether the RSAT tool is working properly.
Installation
Enable Active Directory In Windows 10 is a central directory service that stores all of the login information for a network. Users can then log into the network from a single location, rather than having to enter their username and password on every individual computer or printer they use. This allows for much more efficient management of the network and helps keep security in check.
The ADUC is a management tool that allows IT professionals to manage the local Active Directory environment from the Microsoft Management Console (MMC). It allows them to create users, groups, and organizational units, as well as make changes to existing objects. In addition, it lets them view and connect to the domain from a workgroup computer.
When it comes to installation, the process is relatively straightforward and shouldn’t take long at all. However, it’s important to remember that you can only install RSAT on a server or workstation that is joined to the domain. Otherwise, attackers can use it to gain privilege escalation and exfiltration capabilities on the server.
To install it, you need to open the Windows Settings app and click the link labelled “Manage optional features.” Select the option that says ‘RSAT: Active Directory Domain Services and Lightweight Directory Services Tools’ and then click install. Once it’s complete, you should see the folder Windows Administrative Tools appear in the Start menu.
Configuration
The configuration process for active directory may seem complicated at first, but with the right tools and knowledge, you can set up a secure environment in no time. The main component of the process is preparing a domain controller for use in your network. This includes naming the server, installing software on it and setting up a trust relationship between the domain controller and other computers in your network. Once these steps are complete, you can start using the active directory features.
The Active Directory Users and Computers console allows administrators to manage user accounts, computer accounts, security groups, and group policies in a Windows domain. It also lets them organize the accounts into organizational units to make it easier for them to manage permissions and access to resources.
You can use the console to perform a variety of tasks, including creating new user accounts and deleting existing ones. You can also move objects within a container or OU, and you can delegate administration rights to a specific user or group. The console also offers an easy-to-use search function, which makes it easier to find objects that are hard to locate in a large database.
To install the Enable Active Directory In Windows 10 Users and Computers console, you need a Windows workstation that is running at least version 1809 of Windows. You can either download an MSI file with the Remote Server Administrator Tools or use the optional features in Windows Settings to install the tools. Once the installation is complete, you can launch the tool from the Start menu.
Troubleshooting
If the Active Directory Users and Computers (ADUC) snap-in is not responding or is slow to load on a Windows workstation, there may be a problem with DNS. Flushing the DNS cache might resolve the issue. Alternatively, the ADUC snap-in could be blocked by a security policy that restricts LDAP access to servers. Changing the LDAP port setting on the domain controller to permit all traffic might also solve this problem.
Another common troubleshooting issue involves the ADUC snap-in not opening. This could be caused by a problem with the domain controller or the AD database. In addition, the ADUC snap-in might be disabled by a security policy or by antivirus software. To troubleshoot this, run dcdiag on the domain controller. This command runs a series of tests and provides a pass/fail or warning for each test.
The ADUC snap-in can be used to manage Active Directory objects, including users, computers, organizational units (OU), and groups. You can also use it to create and delete user accounts and to configure security options. The ADUC snap-in also allows you to change passwords and security policies.
Active Directory is a Microsoft service that manages users and their access to resources, such as files, printers, and networked computers. It is an essential part of many businesses and is used to provide a single sign-on experience for users. Active Directory is available on both Windows servers and desktops, and it includes a number of administrative tools for managing the system.
Leave a Reply