
How Do I Enable Remote Desktop?
Enable Remote Desktop Many businesses now employ remote workers to help maintain high levels of excellence and efficiency. These employees work from home or other locations away from the office, using a desktop computer tower with monitor and mouse/keyboard.
How do I enable Remote Desktop on a Windows computer? This article will cover the following: 1. Open the Control Panel. 2. Go to System Properties. 3. Select the Remote tab. 4. Click Allow remote connections to this computer.
Enabling Remote Desktop allows you to connect to your computer remotely, either from another device on the same network or over the internet. The steps for enabling Remote Desktop can vary slightly depending on the operating system you are using. Below are instructions for enabling Remote Desktop on Windows and macOS:
Windows:
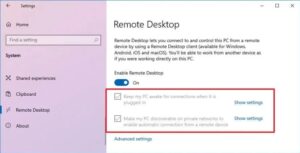
- Windows 10:
- Right-click on the Start button and select “Settings.”
- Click on “System” and then choose “Remote Desktop” from the left sidebar.
- Toggle the switch under “Enable Remote Desktop” to ON.
- Windows 7/8:
- Right-click on “Computer” and select “Properties.”
- Click on “Remote settings” in the left sidebar.
- Under the “Remote Desktop” section, select the option that says, “Allow connections from computers running any version of Remote Desktop (less secure).”
- Windows Server:
- Open “Server Manager.”
- Navigate to “Local Server” in the left sidebar.
- Find the “Remote Desktop” section and click on the disabled status link.
- In the System Properties window, select the “Allow remote connections to this computer” option.
macOS:
- Enable Remote Management:
- Open “System Preferences.”
- Click on “Sharing.”
- Check the box next to “Remote Management.”
- Allow Remote Apple Events (optional):
- In the Sharing preferences, click on “Remote Apple Events.”
- Check the box next to “Remote Apple Events” if you want to allow remote access for automation using AppleScript.
Note:
- Ensure that the computer you want to connect to has a static IP address or a DHCP reservation to avoid IP address changes.
- Make sure that the computer’s firewall is configured to allow Remote Desktop connections.
- Use strong, secure passwords for user accounts on the computer.
- Consider using a Virtual Private Network (VPN) for added security, especially if accessing your computer over the internet.
1. Open the Control Panel
Using the Control Panel is one of the easiest ways to enable Remote Desktop. If you have the Windows Tools option in your Control Panel enabled, you can use this to quickly open a new Remote Desktop Connection session from there. Otherwise, you can use the Ctrl + Shift + Esc hotkey to access Task Manager, then click File at the top of that window and select Run process from the list. This will open a small window that allows you to enter the mstsc process command. Google
Once you have done this, the System Properties window will appear. In the System Properties window, you will need to change the Allow remote connections to this computer setting to yes. You should also make sure that it is set to only allow connections from computers running Remote Desktop with Network Level Authentication support. This will help to prevent unwanted connections from connecting to your computer. Once you have finished, click OK to save the settings.
2. Go to System Properties
You can enable Remote Desktop by visiting System Properties through the Run command. Once you open the System Properties screen, check the Allow remote connections to this computer option.
Once you click this option, select the users that can remotely connect to your computer. You can also choose to require computers to use Network Level Authentication to connect, which makes your connection more secure.
When you’re done selecting the user accounts that can remote access your computer, click OK. You can also disable RDP through this window, if desired. It’s important to note that some registry issues can prevent this option from appearing. If this is the case, it’s recommended that you scan your PC using a reliable registry cleaner like Auslogics Registry Cleaner. This program will analyze safe areas of your registry and remove any errors that may be interfering with the ability to enable Remote Desktop. After running this tool, the option should appear again in the Settings menu.
3. Select the Remote tab
When using the Remote Desktop Connection tool, there are a number of options available. One is the option to show the session window on all monitors if you have a multi-monitor setup, and another is the ability to choose the color depth of the remote session.
Regardless of which method you use to enable Remote Desktop, once it is enabled you will need to verify that incoming connections are allowed to the computer. The best way to do this is to open the System Properties window again, and select the Remote tab.
From here you can select the option to allow incoming Remote Desktop connections from computers running Remote Desktop with Network Level Authentication (which allows older versions of Windows to connect). You can also add accounts that should be allowed to remotely access the computer, and click OK. To add an account, simply type in the name of the user account, and click Check Names.
4. Click Allow remote connections to this computer
If you want to grant someone remote access to your computer, they’ll need an account with administrative privileges on the other side. On the computer where you’d like to give them access, click the setting for Select users that can remotely access this computer and add the account you want them to use.
On some older versions of Windows, you’ll need to enable Network Level Authentication, which helps protect the computer by requiring a username and password to connect. You can do this in the same Settings menu.
If you don’t have access to the computers on which you need to enable RDP, you can use a command-line tool like PowerShell to do it from your own computer. However, this can cause serious conesequence if done incorrectly. For this reason, it’s generally best to use the Settings option instead.
Leave a Reply