How to Turn on Remote Desktop Windows 10
Turn On Remote Desktop Windows 10 is a convenient feature for managing your PC remotely. However, it could be an easy target for hackers.
To prevent this, users should enable the feature through their firewall. This will prevent attackers from accessing the computer’s internal files. To do this, users can follow the following steps.
Enabling Remote Desktop on a Windows 10 computer allows you to access your machine from another device, providing a convenient way to manage your system remotely. Follow the steps below to turn on Remote Desktop in Windows 10.
Step 1: Check System Requirements
Before proceeding, ensure that your system meets the following requirements:
- Windows 10 Pro, Enterprise, or Education edition.
- A reliable internet connection.
- Permission to access the computer remotely.
2: Open System Properties
- Right-click on the Start button and select System.
- In the System window, click on Advanced system settings on the left sidebar.
3: Access Remote Settings
- In the System Properties window, navigate to the Remote tab.
- Under the Remote Desktop section, check the box that says “Allow remote connections to this computer.”
- Optionally, you can uncheck the box that says “Allow connections only from computers running Remote Desktop with Network Level Authentication (recommended)” for broader compatibility.
4: Configure Remote Desktop Connection
- Click on the “Advanced settings” link.
- In the Advanced Settings window, you can configure various options, such as network-level authentication and security. Adjust these settings according to your preferences.
5: Confirm Firewall Settings
- Press Windows + S to open the search bar and type “Windows Defender Firewall.”
- Click on “Windows Defender Firewall with Advanced Security.”
- In the left pane, click on “Inbound Rules.”
- Scroll down and ensure that there are rules allowing “Remote Desktop (TCP-In)” traffic. If not, you may need to create a new rule.
6: Find Your Computer’s IP Address
- Press Windows + X and select “Command Prompt” or “Windows PowerShell.”
- Type “ipconfig” and press Enter.
- Look for the “IPv4 Address” under the active network connection. This is your computer’s IP address.
7: Configure Router for Port Forwarding (If Necessary)
If your computer is behind a router, you may need to set up port forwarding to allow remote desktop traffic to reach your computer. Refer to your router’s manual or online resources for instructions on port forwarding.
8: Install Remote Desktop App on Client Device
On the device you want to use to connect remotely:
- Press Windows + S and type “Remote Desktop Connection.”
- Open the Remote Desktop Connection app.
- Enter the IP address of your Windows 10 computer and click “Connect.”
- If prompted, enter the username and password for your Windows 10 computer.
9: Troubleshooting
If you encounter issues, consider the following:
- Ensure that both devices are connected to the internet.
- Check firewall settings on both the local and remote machines.
- Verify that Remote Desktop is enabled on the Windows 10 computer.
- Confirm port forwarding settings on the router if applicable.
10: Security Considerations
Remote Desktop involves security risks, so take the following precautions:
- Use strong passwords.
- Regularly update your Windows 10 system.
- Consider using a virtual private network (VPN) for an added layer of security.
By following these steps, you can successfully enable and use Remote Desktop on your Windows 10 computer, providing convenient access from other devices.
Configuration
If you want to connect to another computer with Remote Desktop, the host computer must be turned on, running Windows 10 Home or higher, have a network connection and be configured to allow incoming connections (this may involve configuring your router). You will also need the name of the remote PC, its IP address, a Microsoft account with administrator privileges and a way to access that account.
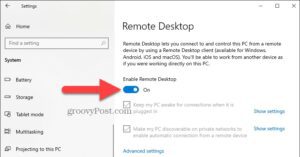
The Remote Desktop experience on Windows 10 makes it easy to connect to computers over the local network and Internet. It’s a new experience that replaces the built-in legacy Remote Desktop Connection program. To enable it, click Start, type “remote desktop” and select the option that appears.
Once the remote desktop feature is enabled, the Windows 10 operating system will automatically deploy the necessary rules in the firewall. However, you may need to manually add these rules if you’re using a third-party firewall.
The remote desktop window will appear on the screen of the computer you’re connecting to. As needed, you can add other users who can remotely connect to this computer by clicking Select users that can remotely access this PC. Members of the Administrators group automatically have access. You can also change the default port for incoming connections or configure other settings to optimize your RD session. This is a great way to access your computer when you’re traveling and need to work on something at home.
Troubleshooting
The technology of remote desktop is a great way for people to access their server from anywhere in the world. This is especially beneficial for people who travel a lot and technical support professionals. However, it is important to know how to troubleshoot remote desktop windows 10 if the system isn’t functioning as it should.
One common issue is that the firewall is blocking RDP ports. This can be caused by a number of reasons, including security software, third-party apps, and network issues. If this is the case, the user should try disabling and enabling the firewall to resolve the problem.
Another possible issue is that the computer is in Sleep or Hibernate mode. To resolve this, the user should ensure that the computer is awake and try connecting again.
It is also possible that the RD session IP address is incorrect. To resolve this, the user should double-check the IP address and network name. They should also check that they are using the correct password.
To change the RDP port, users should use a network registry connection or PowerShell with admin/elevated permissions. They should navigate to HKEY_LOCAL_MACHINESYSTEMCurrentControlSetControlTerminal ServerWinStationsRDP-TCPPortNumber and set the value fDenyTSConnections to 0. This will change the default port for RDP. The user should then restart the terminal server to apply the changes. They should then test the RDP connection to determine if the problem has been resolved.
Additional settings
Remote Desktop is an important feature for businesses that need to manage multiple computers across a network. It can help with troubleshooting issues, accessing files and much more. Users can use the feature for work or from home, and it is available on Windows 10 Home and Windows 10 Pro. The feature can be enabled in Control Panel or using the modern Settings app. When the feature is enabled, it will automatically add the necessary rules to the built-in Microsoft Defender firewall. It will also enable Network Level Authentication.
After enabling the feature, users will need to configure the remaining settings for their computers. The default settings will allow all members of the Administrators group to connect remotely, but users can change the options as needed. They can choose to keep their computer awake and discoverable for connections and set the maximum color depth for their sessions.
The other options that can be configured include the ability to select the keyboard layout and whether sounds should play on the remote computer or the local device. The last option lets users configure when and where keyboard shortcuts will apply. They can also adjust the display settings, such as if the session should be displayed in full screen or in a resizable window. They can also decide to hide the connection bar and command bar when they are connected.
Security
Remote desktop applications work by mirroring the computer environment on one device onto another. This includes the mouse and keyboard inputs, as well as file transfer capabilities. This allows users to access and control the host computer from a different device, such as a Windows or Mac machine, or even a mobile phone or tablet. As such, security measures are required to keep the host computer protected from hackers. The first step is to enable the feature in the firewall by opening the Windows Security application and selecting the option for Firewall & network protection. Then, select “Allow an app or feature through Windows Firewall” and choose “Remote Desktop.”
Users should also set a password for the user account on the host computer. This can be done by going to the User Accounts section of the control panel and clicking “Change user account password.” In addition, they should enable NLA on their router, which thwarts false connections and certain attacks, such as Denial of Service attacks that could overload a network.
Finally, users should ensure the remote desktop feature is enabled in the system settings. They should then open the Remote Desktop window and slide the switch to “On.” To activate NLA, click Advanced Settings toward the bottom of the window and place a checkmark in the Require computers to use network level authentication (NLA) box. This ensures that only users who are authenticated can connect to the computer remotely.
Leave a Reply