
How To Turn Remote Desktop On In Windows 8
Turn Remote Desktop On The Windows Remote Desktop feature is useful, but it also opens your system to hackers. To keep your system secure, you should disable the feature unless you absolutely need it.
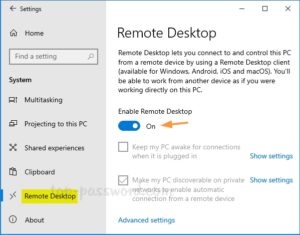
Here is how you can enable the feature in Windows 10/11 through the Settings app or Control Panel. This will allow you to connect to your computer from anywhere, even through a firewall.
Enabling Remote Desktop on a Windows 10 computer is a straightforward process that allows you to access your machine from another location. This feature is particularly useful for troubleshooting, remote collaboration, or managing your system when you’re away from your computer. Here’s a comprehensive guide on how to turn on Remote Desktop in Windows 10, explained in detail with important considerations.
Step 1: Check System Edition
Before you begin, verify that your Windows 10 edition supports Remote Desktop. Remote Desktop is available on Windows 10 Pro, Enterprise, and Education editions. If you’re using Windows 10 Home, you’ll need to upgrade to a supported edition.
2: Access System Properties
- Right-click on the Start button in the bottom-left corner of your screen.
- From the context menu, select “System.”
- In the System window, click on “Advanced system settings” on the left sidebar.
3: Navigate to the Remote Tab
- In the System Properties window, go to the “Remote” tab.
- Under the Remote Desktop section, check the box labeled “Allow remote connections to this computer.”
4: Advanced Settings
- Click on the “Advanced settings” link to configure additional options.
- In the Advanced Settings window, you can adjust settings like Network Level Authentication (NLA) and user authentication. NLA provides an extra layer of security by requiring the connecting device to authenticate itself before a session is established.
5: Confirm Firewall Settings
Windows Firewall may block Remote Desktop connections by default. To check and modify firewall settings:
- Press Windows + S to open the search bar and type “Windows Defender Firewall.”
- Click on “Windows Defender Firewall with Advanced Security.”
- In the left pane, click on “Inbound Rules.”
- Scroll down to ensure that there are rules allowing “Remote Desktop (TCP-In)” traffic. If not, you might need to create a new rule.
6: Get Your Computer’s IP Address
- Open a Command Prompt or PowerShell window. You can do this by pressing Windows + X and selecting “Command Prompt” or “Windows PowerShell.”
- Type “ipconfig” and press Enter.
- Look for the “IPv4 Address” under the active network connection. This is the IP address you’ll use to connect remotely.
7: Configure Router for Port Forwarding (If Necessary)
If your computer is behind a router, you may need to set up port forwarding to allow Remote Desktop traffic to reach your computer. Refer to your router’s manual or online resources for instructions on port forwarding.
8: Install Remote Desktop App on the Client Device
- On the device you want to use for remote access, press Windows + S and type “Remote Desktop Connection.”
- Open the Remote Desktop Connection app.
- Enter the IP address of your Windows 10 computer and click “Connect.”
- If prompted, enter the username and password for your Windows 10 account.
9: Troubleshooting Tips
If you encounter issues during the setup or connection process, consider the following troubleshooting tips:
- Ensure both devices are connected to the internet.
- Check firewall settings on both the local and remote machines.
- Verify that Remote Desktop is enabled on the Windows 10 computer.
- Confirm port forwarding settings on the router if applicable.
10: Security Considerations
While Remote Desktop is a powerful tool, it comes with security considerations. To enhance security:
- Use strong, unique passwords for your Windows 10 account.
- Keep your Windows 10 system up-to-date with the latest security patches.
- Consider using a virtual private network (VPN) for an additional layer of security.
By following these steps and considerations, you can successfully enable and use Remote Desktop on your Windows 10 computer, allowing convenient access from other devices. Remember to prioritize security measures to safeguard your system during remote connections.
Windows 10
With remote desktop tools, you can control a device even when you are not physically present. This is possible through the Remote Desktop Protocol (RDP). You can enable remote desktop connections on your Windows 10 devices in four ways: via Settings, via Control Panel, via PowerShell, and via Command Prompt. In addition, you can also deploy the necessary rules through Microsoft’s built-in firewall.
If you’re using the default RDP port, the computer must be configured for remote access through your router. To do this, visit the Settings app, choose System, and turn on the “Allow remote connections to this computer” switch. If you want to add additional security features, click on the Advanced options. From there, you can enable the option to require computers to use Network Level Authentication. This will make your connection extra secure and thwart certain attacks, like Denial of Service attacks.
You can also enable remote desktop in Windows 10 through the Remote Desktop app. This is available for Windows 10, Windows 8.1, and Windows 7 PCs. You can download the app from the Windows Store. However, the Home edition of Windows 11 doesn’t include support for remote desktop connections. If you’re trying to connect to a Home edition of Windows, you’ll need to install the Remote Desktop app on that device. You can also create a shortcut on your desktop to access the app quickly.
Windows 8
If you want to connect your Windows 8 PC or tablet to another computer (also called the host) in a different location, you can use Microsoft Remote Desktop to do it. You can access the programs and files on that computer, just as if you were in front of it. Remote Desktop is a powerful tool for business and home users.
It allows you to access your work computer from your home computer, or vice versa. This means you can work from home or on the go, and still have access to all your important documents and applications. You can even access legacy x86 apps and games, and transfer files at a faster rate than a traditional local network connection.
The first step to setting up remote desktop in Windows 8 is ensuring that the computers are on the same network. Then, you can open the Remote Desktop Connection program on both computers and select “Connect to a desktop”. Enter the name of the host computer into the field, and then click “Connect”.
If you’re using a dynamic DNS service (which many internet providers offer) you can avoid having to find your home computer’s public IP address every time you need to connect to it remotely. You can instead just use the remote desktop program to connect to your home computer’s public DNS domain.
Windows 7
There are several remote software applications available in the market that can allow you to access and control a computer from another location. These apps can be very useful for IT professionals and business users, as they can enable them to provide technical support to employees or customers from anywhere in the world. However, not many people know that Windows 7 also has its own built-in remote desktop feature. This guide will teach you how to turn it on.
The first step is to enable Desktop on the computer that you want to connect to. This can be done by opening the System Properties window and selecting the Remote tab. You can then choose the options that you need. For example, if you want to make your PC accessible to other computers on the same network, select “Allow connections from any version of Desktop.” If you prioritize security, you can opt for a more secure option by selecting Allow connections only from computers running a specific version of Remote Desktop with network level authentication.
You can also configure the settings to ensure that your computer is always available for connections by clicking Show settings and selecting “Allow remote connections to this computer.” To facilitate this, you must make sure that the computer is awake and discoverable, and you must allow Remote Desktop connections through your firewall.
Windows XP
In order to use the Remote Desktop feature included in Windows XP Professional, you will need a computer that has both the server software installed and client software on it. You will also need an internet connection that gives you a stable public IP address (not a dynamic IP). For more information about this process, please see: How do you enable remote desktop on a Windows XP computer?
If you have followed the instructions to install the server software and enable remote desktop on your computer, you will be able to connect from any computer on your home network. You will be able to remotely access programs, files, and networks saved on your XP computer. However, this is only possible if you refrain from saving Purdue data locally on your laptop or home computer, and instead keep it safely stored in your network directory on ECN’s servers (and backed up daily).
To allow non-administrator users to remotely access your computer, log in to the administrator account and right-click My Computer, then select Properties. Click the Remote tab, and check ‘Allow remote connections to this computer’. Click the ‘Select remote users’ button and add the username of the person you want to grant access to.
Once you’re connected, it will be like you are working at the office, even though you are sitting in your living room or kitchen. You’ll be able to see the screen of the office computer and even use the mouse and keyboard as if you were sitting at the desk.
Leave a Reply