
How to Turn on Remote Desktop Connection
Turn On Remote Desktop Connection is an excellent tool for employees who work from home and IT help desk teams that offer services to businesses located afar. It can be used to share files, provide a real-time view of all features, troubleshoot problems and execute many other remote activities flawlessly.
To enable remote desktop, the computer should be turned on and must have a network connection. Also, it should be configured to allow connections from computers that use Network Level Authentication.
Enabling Remote Desktop Connection on a Windows computer allows you to access your system from another location, providing convenience and flexibility. The process involves configuring settings, ensuring security, and troubleshooting potential issues. In this guide, I’ll walk you through the steps to turn on Remote Desktop Connection on a Windows PC.
Step 1: Check System Requirements
Before enabling Remote Desktop, ensure that your computer meets the necessary requirements. To use Remote Desktop, you need a Professional, Enterprise, or Ultimate edition of Windows. Additionally, verify that your computer is connected to a network.
2: Open System Properties
- Press
Win + Pause/Breakto open the System Properties window. - Click on “Advanced system settings” on the left sidebar.
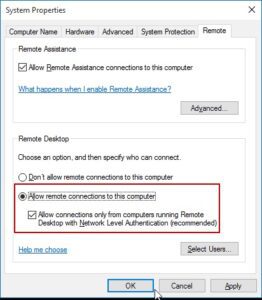
Step 3: Navigate to the Remote Tab
- In the System Properties window, navigate to the “Remote” tab.
- Look for the section titled “Remote Desktop” and check the box that says “Allow Remote Assistance connections to this computer.”
4: Enable Remote Desktop
- Below the “Remote Desktop” section, you’ll find a subsection named “Remote Desktop.” Select the option that says, “Allow remote connections to this computer.”
- If your computer is behind a router, you might need to set up port forwarding for port 3389 (the default port for Remote Desktop) to your computer’s local IP address.
5: Configure Network Level Authentication (Optional)
Network Level Authentication (NLA) adds an extra layer of security. To enable NLA:
- In the “Remote” tab, click on the “Advanced settings” button.
- Check the box that says, “Require Network Level Authentication for remote connections.”
Step 6: Adjust Firewall Settings
- Open the Control Panel and go to “System and Security.”
- Click on “Windows Defender Firewall.”
- In the left sidebar, click on “Allow an app or feature through Windows Defender Firewall.”
- Scroll down to find “Remote Desktop” and make sure both Private and Public are checked.
Step 7: Find Your IP Address
To connect remotely, you’ll need the IP address of the computer:
- Open the Command Prompt (
Win + R, typecmd, and press Enter). - Type
ipconfigand press Enter. Look for the IPv4 Address, which is your local IP address.
Step 8: Connect Remotely
- On the remote computer, open the Remote Desktop Connection application (
Win + R, typemstsc, and press Enter). - Enter the IP address of the target computer and click “Connect.”
- If prompted, enter your username and password for the target computer.
Troubleshooting Tips:
- Firewall Issues: Ensure that your firewall is not blocking Remote Desktop. Check the firewall settings on both computers.
- User Permissions: Make sure the user account you are using has the necessary permissions to access the computer remotely. You may need to add the user to the “Remote Desktop Users” group.
- Dynamic IP Address: If your IP address changes frequently, consider using Dynamic DNS to assign a hostname to your computer.
- Router Configuration: If you’re connecting from outside your local network, configure your router for port forwarding to your computer.
How to turn on remote desktop connection?
Using remote desktop connection, you can access and control your office PC from anywhere. This tool is very useful for allowing employees and business associates to work from home or while traveling. However, it is essential to enable remote desktop connection before you can use it. You can enable remote desktop in Windows by going to the settings or using the downloadable app. You can also enable remote desktop by using the command prompt. This method will allow you to enable remote desktop even if your computer is behind a firewall. However, it provides less functionality and validation than the newer options in the settings.
Start on the host computer (the PC that you will be connecting to). Click the Microsoft logo and select Settings.
1. Go to Control Panel
Remote desktop is a technology that allows users to remotely control another computer over the internet or on a local network. Users can access Windows programs and files on the host computer from the client machine using a mouse and keyboard as if it were their own. This is an effective way to work with clients from a distance. However, you need to know how to enable remote desktop connection on the host computer and how to set up port forwarding for the router if your computer connects over the internet.
You can find the Remote Desktop settings in the Control Panel under System and Security. The first thing to do is to enable the “Allow connections to this computer” option. You can also choose to require computers to use Network Level Authentication to connect, which will add an extra layer of security. You can also see the current RDP port if you need to configure your router to allow incoming Remote Desktop connections outside your network.
If you have a third-party firewall or antivirus software, it may block your remote desktop connection. You can try disabling them to check if you can connect successfully. In addition, your Internet Service Provider (ISP) may also have security protocols that thwart remote desktop connection. Therefore, it’s a good idea to call your ISP and ask them to disable any security features that may be blocking your connection attempts.
2. Click on System and Security
Before you can remotely access a Windows PC, it needs to be set up for remote connections. You can use the built-in Microsoft tools or download an RD client app on your phone or tablet to get started. To enable remote desktop connection, you’ll need to have administrator privileges on both the client and host computers.
Click the “Allow remote connections to this computer” radio button on the System and Security window on your work PC. You should see a checkbox next to it that says Private and Public, which indicates that it’s enabled.
You can also check the box that says Require computers to have network level authentication before connecting, which ensures a more secure connection by thwarting certain attacks. This option is especially important if you have a dynamic IP address, which can change.
If you want to keep a computer’s IP address the same, you can set up a static address on your router. You’ll need to know your host computer’s IP address, which you can find by clicking the magnifying glass icon on the taskbar, typing cmd, and then pressing Enter. The black Command window that appears will display your computer’s current IP address. Write down this number as you’ll need it to connect to your Pepperdine networked computer.
3. Click on Remote Desktop
If you have a Windows computer and you are on a different network from that computer, the first step is to enable remote desktop connection. This will allow you to connect to the computer from any device. It will also make it easier to troubleshoot problems and access files on the computer. It is important to remember that you should use a secure VPN or a remote gateway in order to keep your connections private.
On the host PC, go to the Settings app and select System. Turn on the slider for Enable Remote Desktop. You will need to allow the RDP app through Windows firewall in order to ensure your connection is secure. You should also consider using two-factor authentication on your RDP connection, which will require you to verify your identity using either a push notification in the DUO app or a phone call.
Then, on the computer that you wish to connect to, open the Remote Desktop Connection software. Type the name of the PC that you want to connect to in the Computer field. You will need to have the IP address of the PC and a username. If you have a remote gateway, it will also need to be configured in order to work properly.
Alternatively, you can use the Command Prompt to enable remote desktop connection. This method is slightly more complicated, but it will provide you with greater security and control over your connection.
Leave a Reply