How to Allow Pop Ups in Chrome
Allow Pop Ups In Chrome Some websites use pop ups to perform actions such as logging in, linking social media accounts, or offering customer service. Unfortunately, these can be dangerous and can infect your computer with malware.
By default, Chrome blocks pop-ups. However, you can easily change this setting and allow them on a case-by-case basis.
Allowing pop-ups in Google Chrome is a straightforward process, and it can be done in just a few steps. Pop-ups can be helpful for certain websites or applications, but it’s essential to manage them to prevent unwanted interruptions. In this guide, I’ll provide you with detailed instructions on how to allow pop-ups in Google Chrome, both for specific sites and in general.
Method 1: Allow Pop-ups for Specific Sites
- Open Google Chrome: Launch the Google Chrome browser on your computer. Make sure you are using the latest version to access the most up-to-date features.
- Access Site Settings: Navigate to the website for which you want to allow pop-ups. Once you are on the site, click on the padlock icon or the “Secure” label in the address bar.
- Open Site Settings: In the dropdown menu, click on “Site settings.” This will open a new tab where you can customize various settings for the specific website.
- Adjust Pop-ups Setting: Scroll down to the “Content” section, and find the “Pop-ups and redirects” option. You can use the dropdown menu to change the setting to “Allow” for pop-ups on that particular site.
- Reload the Page: After making the changes, close the Site Settings tab and reload the webpage. The pop-ups for that site should now be allowed.
2: Allow Pop-ups in Chrome Settings
- Open Chrome Settings: Click on the three vertical dots in the top-right corner of the Chrome window to open the menu. Select “Settings” from the dropdown.
- Scroll Down to Advanced Settings: Scroll down to the bottom of the Settings page and click on “Advanced” to reveal additional settings.
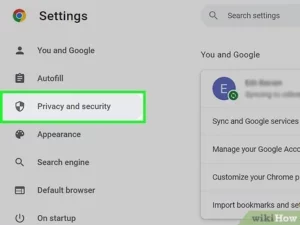
- Privacy and Security: Under the “Privacy and security” section, find and click on “Site settings.”
- Pop-ups and Redirects: Look for the “Pop-ups and redirects” option. You can toggle the switch to allow or block pop-ups globally.
3: Use the Address Bar
- Visit the Website: Open Google Chrome and navigate to the website for which you want to enable pop-ups.
- Address Bar Pop-up Icon: Click on the padlock icon or “Not secure” label in the address bar. A menu will appear.
- Pop-ups Setting: Find the “Pop-ups” option in the menu. You can change the setting to “Always allow on this site” to allow pop-ups for the current website.
4: Chrome Extensions
- Install Pop-up Blocker Extension: Open the Chrome Web Store and search for a pop-up blocker extension. Install a reputable extension that allows you to manage pop-ups effectively.
- Configure Extension Settings: Once installed, go to Chrome’s Extensions page (chrome://extensions/) and locate the pop-up blocker extension. Configure its settings to allow pop-ups on specific sites or in general.
Final Tips:
- Update Chrome: Ensure that your Chrome browser is up to date to access the latest security and feature updates.
- Be Cautious: While pop-ups can be necessary for certain sites, be cautious about enabling them globally. Unwanted pop-ups can pose security risks.
- Clear Cookies and Cache: If you encounter issues with pop-up settings not taking effect, try clearing your browser’s cookies and cache.
In conclusion, managing pop-ups in Google Chrome involves adjusting settings either for specific sites or globally through the browser settings. Following these detailed instructions should help you allow pop-ups based on your preferences and improve your browsing experience.
Settings
Pop-up windows can be distracting and annoying, but some websites use them for important features. For example, many sites offer chat support or log-in services through a pop-up window. Others use them to display advertising. Most web browsers block pop-up windows by default, but you can allow them on a per-site basis.
When a website attempts to open a pop-up window, Chrome will alert you. If you want to allow the pop-up window, click the blue link at the top of the dialog box. If you want to allow the site to launch pop-ups in the future, select “Always allow pop-ups and redirects from [site].”
Alternatively, you can enable or disable all pop-up blockers in Chrome by selecting the menu button (which looks like three little black dots on top of each other) in the upper right corner of the browser window, then clicking Settings. You can also manage the pop-up & redirect settings on a per-site basis by going to the site settings page in Chrome.
You can change your Chrome pop-up & redirect settings in the Settings page by clicking the menu button and selecting “Settings.” From the Settings page, click the tab called Security and privacy. On the left side of the screen, click “Site settings.” You can then choose whether to allow or block pop-ups and redirects on a per-site basis.
Permissions
Many Chrome users are unaware that they can adjust an extensions permissions to limit its access to their data. These permissions can be limited to specific websites or even revoked entirely.
This feature was introduced with the Chrome 92 update and gives the user more control over how much information an extension can have access to. With a few taps, the user can see a full list of permissions granted to a site and change them as needed.
The permissions that are available vary depending on the extension, but they typically include the ability to read sensitive files and use computer devices such as cameras and microphones. Each permission is described with a short description, which helps the user understand how the information will be used. The user can also choose a scope of use (all sites, specific sites or on click).
For developers, the new permission controls offer better visibility and more control over what information is shared with the web. It is also easier to test how a particular feature will work with different browsers and devices. It can also lead to fewer prompts and simpler updates, since the developer only needs to ask for the required permissions once. Google is planning to introduce additional features that will make it easier to revoke and block website permissions in the future.
Exceptions
Pop-up windows are distracting, slow web page load times, and sometimes contain malware. Some websites use them to offer important features, however, such as allowing you to print forms and statements from ParishSOFT or chat with customer service representatives. While most browsers block pop-up windows, it is possible to allow them for specific sites and configure settings that prevent them from showing up when you visit other websites.
In the Chrome menu, click the three horizontal dots in the upper right corner of the window. This opens the settings menu, which allows you to bookmark a site, check your history, and manage pop-ups. The options in this menu are the same across all devices and browsers that run Chrome.
To allow pop-ups for a particular website, click the Settings button and select Site settings. In the Site settings dialog, find the Pop-ups and redirects option and switch it to Allow. This will turn the toggle at the top of the window blue and will override the default setting that blocks pop-ups for all sites.
You can also add an exception to a specific site by selecting the Exceptions button and typing in the address of the website. You can also disable the toggle at the top of the screen to return to the default setting of blocking all pop-ups.
Filtering
Pop-up windows can be annoying and distracting, and they can also contain malware. That’s why most browsers block them by default. However, some websites use pop-ups for useful purposes, such as downloading an app or chatting with customer service. In these cases, you may need to allow pop-ups for a specific website. To do so, open Chrome and click the three dots at the top right. Select More and then Settings. Then, scroll down to the “Privacy and security” section and click Site settings.
From here, you can add a website to the “Allow” or “Block” lists for pop-ups. To enable a site to show pop-ups, click the three dots next to that website’s name and then choose either “Block” or “Always allow.” You can also edit these permissions by clicking the button on the left side of the page.
This method works on both the desktop and mobile versions of Chrome. It’s important to note that if you’re using a third-party pop-up blocker, this will interfere with your ability to enable pop-ups. If you’re using a third-party blocker, disable it before trying to enable pop-ups in Chrome. To do this, open the web browser and tap the lock icon in the address bar. This will open the Settings menu. Then, click or tap “Privacy and security” and then scroll down to the Content settings section.
Leave a Reply