How Allow Pop Ups on Chrome
Many pop-ups are annoying, but some can contain malware. To allow them in Chrome, click the three dots in the upper-right corner and select Settings in Allow Pop Ups On Chrome.
If you want to see a specific website’s pop-up windows, add that site to the exception list. This will allow you to view their content without changing your preferences.
Allowing pop-ups on Chrome is a straightforward process. Pop-ups can be enabled or disabled through Chrome’s settings. Here’s a step-by-step guide on how to allow pop-ups in Chrome:
Method 1: Using Chrome Settings
- Open Chrome: Launch Google Chrome on your device.
- Access Chrome Settings:
- Click on the three vertical dots located in the top right corner of the browser window. This will open a drop-down menu.
- From the menu, select “Settings.”
- Navigate to Site Settings:
- In the Settings tab, scroll down and click on “Privacy and security.”
- Access Pop-ups and Redirects Settings:
- Within the “Privacy and security” section, find and click on “Site settings.”
- Allow Pop-ups for All Sites:
- Look for the “Pop-ups and redirects” option and click on it.
- Toggle the switch to enable or allow pop-ups. You can switch it on to allow all sites to show pop-ups.
- Add Exceptions (Optional):
- If you want to allow pop-ups for specific sites while keeping them blocked for others, click on “Add” under the “Allow” section.
- Enter the URL of the website you want to permit pop-ups for and click “Add.”
- Save Changes:
- After making changes, click on “Done” or “Save” to apply the settings.
Method 2: Allowing Pop-ups for Specific Sites
- Access Chrome Settings:
- Follow steps 1-4 from the previous method to reach the “Pop-ups and redirects” settings.
- Allow Pop-ups for Specific Sites:
- Under “Pop-ups and redirects,” ensure the toggle switch is turned off (to block pop-ups by default).
- Click on “Add” under the “Block” section.
- Enter the URL of the website you want to allow pop-ups for and click “Add.”
- Customize Pop-up Settings:
- Chrome offers additional settings for pop-ups on a per-site basis.
- Click on the menu button (three vertical dots) on the right side of the URL bar when visiting a site.
- Select “Site settings.”
- Find the “Pop-ups and redirects” option and adjust the settings as needed for that specific site.
- Save Changes:
- After configuring the pop-up settings for specific sites, make sure to save any changes you’ve made.
Additional Tips:
- Extensions and Third-Party Software:
- Sometimes, browser extensions or third-party software can interfere with pop-up settings. Disable extensions one by one to identify any conflicts.
- Reset Chrome Settings:
- If you encounter persistent issues, you might consider resetting Chrome settings to default. Go to Chrome settings > Advanced > Reset and clean up.
Remember, enabling pop-ups might expose you to unwanted or potentially harmful content. Exercise caution while allowing pop-ups and ensure you trust the websites you’re enabling them for. This guide should help you configure Chrome to allow pop-ups based on your preferences.
1. Open the Chrome browser.
Pop-up windows can be annoying and distracting, but some websites need them for essential functionality. For example, banks use them to log in and retail sites use them to chat with customer service. Most web browsers, including Chrome, block pop-ups by default, but you can allow them for specific sites.
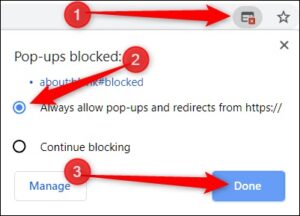
If you’re using Chrome on a desktop computer, click the three dots in the upper-right corner and then click Settings. Scroll down and click Privacy and security. Click Site settings. Then, select the site you want to enable pop-ups for and then click Always allow pop-ups and redirects. Click Done. Your change will take effect immediately.
2. Click the three dots in the upper-right corner.
Pop-up windows can be annoying, but they can also be useful. For example, some Penn-affiliated websites use pop-ups to allow you to log in or open a customer service chat window.
Note: These three dots are sometimes called the “kebab menu” or the’meatball menu,’ but do not confuse them with the Google-provided hamburger icon which is used for navigation in other Google products. Clicking these three vertical dots will open a smaller inline menu with additional options.
You can change your pop-up blocker settings for individual sites on a case-by-case basis, whether you’re using a desktop computer or a Chrome mobile browser app on an iPhone or iPad. To do this, follow these steps: Google
3. Click Settings.
A pop-up is an advertisement window that opens in the foreground of a user’s Web browser. Some Internet users find pop-ups annoying, while others use them for purposes such as logging in to websites.
To disable Chrome’s pop-up blocker, click the three dots in the upper-right corner of the browser and select Settings. On the resulting screen, click Privacy and security. In the Permissions section, click Allow pop-ups from [site]. This allows all sites to open pop-up windows when you visit them. You can also customize permissions on a site-by-site basis. For more information, see Google Chrome answers. Devon Delfino is a Brooklyn-based freelance journalist who writes about personal finance, culture, and politics.
4. Click Privacy and security.
Google Chrome prevents pop-up windows by default, but some sites use them for important features. If you want to allow pop-ups on a specific site, click the three dots in the upper-right corner and select Settings. Then click Privacy and security.
This opens a window that lists your browser’s privacy settings. If the toggle switch is off (grey), click it to turn it on.
You’ll also find a list of sites that you have allowed to show pop-ups. If you need to change an existing site, click the name and make your changes. The changes will apply to all websites visited in Chrome until you change them again.
5. Click Site settings.
If a popup window appears in your Chrome browser, it is because the site wants to show you something. To allow popups from a specific website, follow these steps:
While most people use pop-up blockers to avoid annoying ads, some pop-ups are actually useful. For example, some retail websites offer pop-ups to confirm downloads or open customer support chats. To allow pop-ups from a specific website, click the ellipsis in the upper-right corner of your browser and then click Settings. On the pop-ups and redirects page, click the toggle switch to change it from Blocked to Allowed. Repeat this process for any other sites you want to allow pop-ups from.
6. Click Pop-ups and redirects.
Most web browsers block pop-up windows, but sometimes you need to use them to log in or interact with a website. This wiki How will show you how to change your browser’s pop-up settings so that you can allow a specific website’s pop-ups.
Click the three stacked dots in the upper-right corner of the Chrome window, then select Settings. On the Settings page, click Privacy and security. On the privacy and security page, click Site settings. This opens the Pop-ups and redirects section. Switch the toggle to Off to turn off pop-ups, or to On to enable them. In the Exceptions field, type or paste a website address to add it to the list of websites allowed to open pop-ups.
Leave a Reply