
How to Enable Virtualization in Windows 10
If you are wondering how to enable virtualization on Windows 10, then read this article. This new version of Windows comes with native support for hardware virtualization, and you can enable this feature if you wish. You’ll need to install the proprietary client software Hyper-V in order to use this feature. After installing it, you’ll need to reboot your PC, and you’ll need to follow the directions on the next screen to enable it.
To enable virtualization, you first need to enter the BIOS, which is the part of your PC that boots up. This is the section that contains the settings that allow your system to create virtual machines. The BIOS settings must be enabled in order for Hyper-V to work. To get into your BIOS, press the Windows key + I, and then click Update and Security. From there, navigate to the Recovery settings page. Select the Restart Now button and then click Advanced startup. Once the screen appears, locate the Troubleshoot section and click Advanced Options. In this window, you should see the option to enable Virtualization.
To enable Hyper-V, open the Control Panel and press the Windows key and I key. Go to the Advanced tab and then click on Virtualization Technology. Press Yes to confirm. Finally, hit the Enter key to save your changes and reboot. If the issue still persists, you can use the same steps to re-enable virtualization on Windows 10. If you’ve forgotten how to enable virtualization on Windows 10, don’t worry; this article will show you how to enable it again.
Enable Virtualization Settings On Windows 10
Once you’ve made the necessary changes, you’ll need to reboot your PC to complete the process. After the reboot, the computer will automatically launch the software, which will then allow you to use the virtual machine. Once it’s working, you’ll be able to use virtualization on your PC and test new programs. Just remember to check for the requirements for your processor. You’ll also need to be sure that your graphics card supports Secondary Level Address Translation.
If you’re not sure how to enable virtualization on Windows 10, you can check your BIOS settings to see whether it’s supported. The BIOS is responsible for booting your computer, and it includes settings that allow you to use Hyper-V. To enable Hyper-V, you can open Windows settings by pressing the Windows key and I. From there, click Update and Security and then choose Restart Now. In the Recovery tab, you can also click the Restart Now button to restart.
Enable Hyper-V In Windows:
Next, open the Control Panel by pressing the Windows key and I key. From there, click the Recovery tab. You can find it in the left side panel. Here, you’ll need to enable Hyper-V in Windows by ticking the box. Then, you’ll need to reboot your computer. You can use the F10 key to enable virtualization in windows 10. Once you’ve enabled the software, it will run on your PC.
Then, select the BIOS tab and tap the touch screen to enter BIOS Setup. From there, you’ll need to click the Virtualization tab. When you’re done, your system will be ready for use. Once you’ve finished, reboot your computer to apply the changes. Once you’ve enabled virtualization, your computer will have the ability to boot in a separate virtual environment. So, if you’re using a virtual machine, make sure you have enough RAM.
Once you’ve enabled virtualization, you’ll need to reboot your PC. The BIOS is the chip that controls booting, so you need to make sure you have a BIOS that has the correct settings. Then, go to the Advanced Startup tab and select the Hyper-V option. After restarting, you’ll need to hit the Windows key again to exit the BIOS. Afterwards, your computer will reboot to enter the Advanced startup tab.
Follow This Steps:
-
- Restart your computer and enter the BIOS setup by pressing the appropriate key (usually F2, F12, or Delete) during startup.
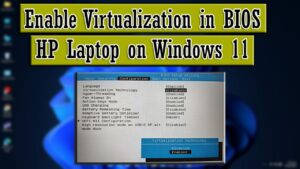
- Once in the BIOS setup, look for the “Virtualization” option. This can usually be found in the “Advanced” or “CPU” section.
- If the “Virtualization” option is disabled, use the arrow keys to highlight it and press Enter to select it.
- Change the setting to “Enabled” and press Enter.
- Save and exit the BIOS setup by pressing the appropriate key (usually F10).
- Once your computer has restarted, open the Task Manager by pressing Ctrl+Shift+Esc.
- Click on the “Performance” tab, and then click on “CPU” in the left-hand menu.
- Look for the “Virtualization” option in the right-hand pane. If it says “Enabled,” then virtualization is now enabled on your computer.
Note: Some computers may have a different BIOS setup process or may not support virtualization. If you are unsure, consult your computer’s documentation or contact the manufacturer for assistance.
Leave a Reply