How to Enable Telnet on Windows 10
Enable Telnet On Windows 10 is a great tool for troubleshooting and managing remote systems. However, it’s disabled by default in Windows 10. If you try to launch telnet from Command Prompt, you get the error “not recognized as an internal or external command, operable program or batch file.”
The good news is that you can enable it in a few easy steps. You can do it from Control Panel, PowerShell or Command Prompt.
Enabling Telnet on Windows 10 involves a few steps, and it’s essential to follow them carefully to ensure a successful setup. Telnet is a protocol that allows you to access remote computers and devices over a network. Here’s a step-by-step guide on how to enable Telnet on Windows 10:
Step 1: Open Control Panel
- Press the
Windows key + Xto open the Power User menu. - Select “Control Panel” from the menu.
2: Access Programs and Features
- In the Control Panel, click on “Programs.”
- Under “Programs and Features,” click on “Turn Windows features on or off.”
3: Locate Telnet Client
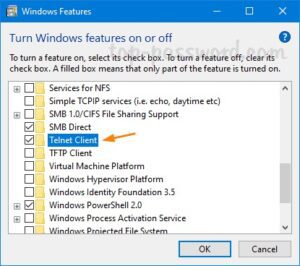
- In the “Windows Features” window, scroll down and find “Telnet Client.”
- Check the box next to “Telnet Client” to enable it.
- Click “OK” to apply the changes.
4: Verify Telnet Installation
- Open the Command Prompt by pressing
Windows key + Xand selecting “Command Prompt” or “Command Prompt (Admin).” - Type
telnetand press Enter. - If Telnet is successfully installed, you will see a Telnet prompt.
5: Enable Telnet Server (Optional)
Enabling the Telnet Server allows your computer to be accessed by others using Telnet. Keep in mind that Telnet is an insecure protocol, and using it over the internet is not recommended.
- Go back to the “Windows Features” window.
- Scroll down and find “Telnet Server.”
- Check the box next to “Telnet Server.”
- Click “OK” to apply the changes.
6: Start the Telnet Service
- Press
Windows key + Rto open the Run dialog. - Type
services.mscand press Enter to open the Services window. - Scroll down and find the “Telnet” service.
- Double-click on “Telnet” to open its properties.
- In the “Startup type” dropdown, select “Automatic.”
- Click “Start” to initiate the Telnet service.
- Click “OK” to save the changes and close the properties window.
7: Configure Windows Firewall
- Press
Windows key + Ito open the Settings. - Click on “Update & Security” and then select “Windows Security.”
- Click on “Firewall & network protection.”
- Click on “Allow an app through firewall.”
- Scroll down and ensure that both “Telnet Client” and “Telnet Server” are enabled for the desired network types (Private or Public).
8: Test Telnet Connectivity
- Open the Command Prompt.
- Type
telnet <hostname or IP address>and press Enter. - Replace
<hostname or IP address>with the address of the remote server or device. - If successful, you will establish a Telnet connection.
Congratulations! You have successfully enabled and configured Telnet on your Windows 10 machine. Keep in mind that Telnet is considered insecure, and it’s recommended to use more secure alternatives, such as SSH, for remote access. If you’re using Telnet over the internet, consider implementing additional security measures, such as VPNs or firewalls, to protect your system.
1. Open Control Panel
Telnet is a program that lets you connect to remote computers and execute commands. It is used by network administrators to troubleshoot issues and manage remote systems. It is also a fun tool to play with and learn about.
The telnet command is not enabled by default on Windows 10 due to security reasons. When you try to launch it, you will receive an error message saying that “telnet is not recognized as an internal or external command, operable program or batch file.” This tutorial will show you how to enable telnet on Windows 10.
You can enable the telnet feature in two ways – through Control Panel and using Windows PowerShell. To use the PowerShell method, open a Command Prompt or PowerShell as administrator and then type dism /online /Enable-Feature /FeatureName:TelnetClientand press Enter. You will need to restart your computer after enabling the feature.
2. Turn on or off the feature
If you want to enable the Telnet feature on your Windows 10 computer, then you need to open Control Panel and click on Programs and Features. Select the option “Turn Windows features on or off” from the left pane, and then check the box next to Telnet client.
After enabling the feature, you can start using it by opening Command Prompt and typing in the telnet command. This will open a new command line with the name Microsoft Telnet, and you can then enter commands to connect to another computer or network device. However, be aware that Telnet is unencrypted and could be vulnerable to attackers. It is best to only use it on trusted systems. It is also a good idea to install a firewall to prevent any attacks from happening. Also, make sure you have the latest updates on your operating system to minimize security risks. You can get the latest updates by downloading the Windows Update from Microsoft.
3. Install the client
Telnet is a network protocol that allows users to connect to and manage remote computers. It is commonly used to access servers or to troubleshoot problems with devices like routers and switches. It can also be useful for working from home, as it provides a way to work on a computer remotely without using a VPN connection.
To enable telnet on windows 10, open an elevated Command Prompt or Windows PowerShell. Then, type dism /online /Enable-Feature /FeatureName:TelnetClient and press Enter. This will install the Telnet client on your computer.
Although telnet isn’t secure, it has its uses. It can be used to connect to and control equipment, including legacy systems that only support it. It can also be used for troubleshooting and testing network services. However, it’s important to use a strong password and data encryption when using telnet. This will protect your information from unauthorized users. Additionally, you should only use a trusted computer to access the telnet server.
4. Run the client
The Telnet client is an application that enables you to use telnet commands. It is a useful tool for network administrators and developers to test their networks.
There are several ways to enable telnet on windows 10 computers. One way is to open the Control Panel and select Programs and Features. From there, click the Turn Windows features on or off option. In the Windows features window, scroll down and check the box next to Telnet Client.
Leave a Reply