How to Enable Telnet in Windows 11
Enable Telnet In Windows 11 is a network protocol that allows you to connect to another computer. It is no longer widely used, but it is still a useful tool for some people.
Although telnet is considered outdated, Microsoft has included it in its latest operating system, Windows 11. However, it is disabled by default. In this article, we will share a few methods to enable telnet in windows 11.
Enabling Telnet on Windows 11 can be done through the Windows Features settings. Telnet is a simple network protocol that allows you to access another computer or device remotely. Follow these steps to enable Telnet on Windows 11.
-
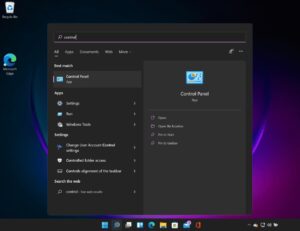
Accessing Control Panel:
- Press
Win + Xand select “Settings” from the menu. - In the Settings window, click on “System.”
- Navigate to the “Apps” section on the left sidebar.
- Scroll down and click on “Optional Features.”
- Press
- Locate Telnet Client:
- In the Optional Features window, wait for the list to populate.
- Scroll down to find and select “Telnet Client.” You might also want to select “Telnet Server” if you plan to use Telnet for remote connections to your computer.
- Enable Telnet:
- Click on the “Install” button next to “Telnet Client.”
- If you’re enabling the Telnet Server as well, click on the “Install” button next to “Telnet Server.”
- Wait for Installation:
- Allow some time for the Telnet components to be installed. Windows will notify you when the installation is complete.
- Verify Installation:
- Once the installation is finished, you can verify that Telnet is installed by opening the Command Prompt.
- Type
telnetand press Enter. If Telnet is installed successfully, you’ll see the Telnet command prompt.
- Using Telnet:
- To connect to a remote host, type
telnet [hostname]and press Enter. Replace[hostname]with the actual hostname or IP address of the remote server.
- To connect to a remote host, type
- Configuring Telnet Server (Optional):
- If you installed the Telnet Server, you might need to configure it to start automatically with Windows.
- Open the Services application by pressing
Win + Rto open the Run dialog, typeservices.msc, and press Enter. - Find the “Telnet” service, right-click on it, and select “Properties.”
- In the “Startup type” dropdown menu, select “Automatic” to ensure the Telnet Server starts with Windows.
-
Firewall Configuration (Optional):
- If you have a firewall enabled, you might need to allow Telnet traffic.
- Open the Windows Security app.
- Click on “Firewall & network protection.”
- Click on “Allow an app through firewall.”
- Locate and enable “Telnet Client” and “Telnet Server” in the list.
- Testing Telnet Connection:
- To test your Telnet connection, open the Command Prompt.
- Type
telnet [hostname] [port]and press Enter. Replace[hostname]with the remote host’s name or IP address and[port]with the port number you want to connect to.
- Disabling Telnet (Optional):
- If you decide you no longer need Telnet, you can disable it by going back to the “Optional Features” section in the Settings app.
- Find “Telnet Client” and “Telnet Server” in the list and click on the “Uninstall” button.
- Security Considerations:
- Telnet sends data in plaintext, so it’s not a secure method for remote access. Consider using more secure alternatives like SSH.
By following these steps, you can enable Telnet on Windows 11 and use it for remote connections. Remember to exercise caution when using Telnet, especially over untrusted networks, due to its lack of encryption. Consider using more secure alternatives like SSH for remote access when possible.
1. Open the Command Prompt.
Telnet is a command-line tool that can be used to connect to remote computers. It can be useful for administrators and other users who need to access their computer remotely. It can be used for a variety of tasks, such as editing files or running programs on a remote computer. I can also be used to manage hardware, such as switches and routers, remotely.
There are several different ways to enable telnet in windows 11. The easiest way is to use PowerShell. This method is faster than the GUI method and requires only a single command.
To use PowerShell, open the Command Prompt and type “Windows PowerShell” in the search box. Then, right-click and select “Run as administrator”. Type “Enable-WindowsOptionalFeature -Online -FeatureName TelnetClient” and press Enter. After the feature is enabled, restart your computer. The Command Prompt will display a message saying Microsoft Telnet>. You can then begin using the program.
2. Type “Enable-WindowsOptionalFeature -Online -FeatureName TelnetClient”
If you’re a tech-savvy user, you may need to enable telnet in windows 11 for troubleshooting purposes. However, it’s important to recognize the risks involved in using telnet and consider alternative protocols such as Secure Shell (SSH).
To enable telnet in Windows, open the Command Prompt as administrator. Type “Enable-Windows Optional Feature -Online -Feature Name Telnet Client” and press Enter. This will install the telnet client on your computer. Once the feature is enabled, you can use the telnet command to connect to a remote server.
Once the telnet feature is enabled, you can connect to a remote server by opening the Command Prompt and typing “telnet” followed by the server address. This will open a new Command Prompt window and allow you to issue commands to the server. To disconnect, type exit in the command prompt.
3. Click “OK”
Telnet is an old protocol that allows remote access to a computer. Open the Control Panel (in large icons view) and click “Programs”. Select the “Turn Windows features on or off” link. In the window that opens, check the box next to “Telnet Client”. Click OK. Windows will now begin to install the Telnet Client feature.
Once the feature is installed, a Command Prompt will display a message that says “Microsoft Telnet>” (where commands are entered). You can now use the Telnet command to connect to remote computers. To exit the Command Prompt, press “exit” or click on the X in the bottom-right corner of the window.
4. Restart
Telnet is a communication protocol that allows you to connect to a remote computer and control it. It was developed in 1969 and is a good alternative to SSH, but it doesn’t offer encryption, so it’s not a great option for sensitive information such as passwords or usernames.
You can enable telnet in windows 11 by using the Command Prompt. To do this, open the Command Prompt as an administrator. Type dism /online /Enable-Windows Optional Feature –Feature Name Telnet Client, then press Enter. This will enable the Telnet client in your computer, but it may take a few minutes for it to complete the process. The best way to avoid this is to only use it when necessary and on a secure connection. Also, you should always keep your system updated to avoid being vulnerable to attacks.
Leave a Reply