
How to Enable Telnet on Windows Using CMD
Enable Telnet On Windows Using CMD is a network protocol that allows you to connect to remote systems. It is available on Windows computers, and can be enabled in a few simple steps.
This article will cover how to enable Telnet on your computer using both Control Panel and Windows PowerShell. Once you’ve done this, you can begin using Telnet to connect to remote servers and troubleshoot issues.
Enabling Telnet on Windows using the Command Prompt (CMD) involves a few simple steps. Telnet is a protocol that allows you to connect to remote computers over a network. Windows operating systems come with Telnet Client disabled by default for security reasons, but you can enable it through the Command Prompt. Below is a detailed guide in words.
Enabling Telnet on Windows using CMD
Telnet is a basic, text-based tool that allows communication with other computers over a network. By default, Telnet is not enabled on Windows for security reasons. However, you can enable it using the Command Prompt.
Step 1: Open Command Prompt with Administrative Privileges
To enable Telnet, you need to run the Command Prompt as an administrator.
- Search for CMD:
- Press
Windows key + Sto open the search bar. - Type “cmd” or “Command Prompt.”
- Right-click on “Command Prompt” in the search results.
- Select “Run as administrator” from the context menu.
Alternatively, you can press
Windows key + Xto open the Power User menu and choose “Command Prompt (Admin).” - Press
- User Account Control (UAC) Prompt:
- If prompted by User Account Control, click “Yes” to allow Command Prompt to make changes to your device.
Step 2: Check if Telnet is Installed
Before enabling Telnet, check if it is already installed on your system.
telnet
If Telnet is not recognized as a command, you need to install it. Otherwise, you can proceed to the next step.
Step 3: Install Telnet Client
To install the Telnet Client, use the following command:
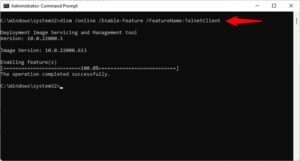
dism /online /Enable-Feature /FeatureName:TelnetClient
This command uses the Deployment Image Service and Management Tool (DISM) to enable the Telnet Client feature. Allow the process to complete; it might take a few moments.
Step 4: Verify Telnet Installation
After the installation is complete, verify that Telnet is now recognized as a command.
telnet
You should see the Telnet command prompt if the installation was successful.
Step 5: Enable Telnet Server (Optional)
By default, the Telnet Server feature is not installed on Windows. If you want to enable the Telnet Server, you can do so using the following command:
dism /online /Enable-Feature /FeatureName:TelnetServer
Keep in mind that enabling the Telnet Server could pose security risks, so use it cautiously and only in secure environments.
Step 6: Start Telnet Service
To start the Telnet service, you can use the following command:
sc start Telnet
This command uses the Service Control (sc) tool to start the Telnet service. If successful, you should see a message indicating that the service has started.
Step 7: Set Telnet to Start Automatically (Optional)
If you want the Telnet service to start automatically with Windows, you can set it to automatic using the following command:
sc config Telnet start=auto
This command configures the Telnet service to start automatically during the system boot.
Step 8: Test Telnet Connection
Now that Telnet is installed and enabled, you can test a connection to a remote server. Replace “example.com” with the actual hostname or IP address of the target server.
telnet example.com
If successful, you will establish a Telnet session with the specified server.
Step 9: Disable Telnet (Optional)
If, for any reason, you want to disable Telnet, you can do so using the following command:
dism /online /Disable-Feature /FeatureName:TelnetClient
This command disables the Telnet Client feature. Alternatively, for the Telnet Server:
dism /online /Disable-Feature /FeatureName:TelnetServerInstalling Telnet
Telnet is a network protocol that allows you to connect to remote servers and devices. It is a popular tool for network administrators and developers. However, it can pose a security risk because it is not encrypted and can be exploited by hackers. If you are using an unsecured network, it is recommended that you switch to a more secure protocol such as SSH or SFTP.
Enabling Telnet on Windows is a simple process. All you need to do is open Command Prompt and type telnet. You will then be prompted to enter your username and password. After that, you can start using the telnet client.
You can also install telnet through the Server Manager graphical interface. To do this, follow these steps:
Enabling Telnet
Telnet is not included by default in Windows and must be installed or enabled. Using the “Turn Windows features on or off” tool located in Control Panel will allow you to do this easily. Once the feature is enabled, telnet will be available to use from Command Prompt.
Telnet offers a way to connect to a remote server and manage the computer or device from that point. It is often used for troubleshooting network issues and transferring files between systems. It is also used to connect to old system software that may no longer be supported by modern operating systems.
To enable telnet on your computer, open the Command Prompt window and enter dism /online /Enable-Feature /FeatureName:TelnetClient. Click the “OK” button and wait for the process to complete. You may need to restart your computer after this is completed. Then relaunch the Command Prompt and type telnet to start the Microsoft Telnet Client. Enter quit to exit the telnet session.
Disabling Telnet
Telnet is a network protocol that can be used to remotely access devices and control them from the command line. It is not secure, however, and can be vulnerable to cyberattacks if not properly configured.
In this article, we will show you how to disable telnet on your Windows 10 computer using the command prompt. You can also use other methods to remove telnet from your system, but this method will be the most efficient.
To disable telnet on your Windows 10, open the control panel and select “Programs and features”. Then, click “Turn Windows features on or off”. In the window that appears, select the “Telnet client” option and uncheck it. Click OK to confirm, and then reboot your computer. Once you have rebooted, you should be able to access telnet from the command prompt. You can now use telnet to manage your remote computers and devices. You can also use telnet to troubleshoot networking issues.
Removing Telnet
Enable Telnet On Windows Using CMD is a powerful network protocol that allows users to remotely connect to other computers and execute commands. It is a command-line tool that can be installed on Windows, macOS and Linux operating systems. The telnet feature is not enabled by default on Windows computers, so it must be installed or enabled.
To Enable Telnet On Windows Using CMD, open the Control Panel and select Programs and Features. In the Windows Features window, check the box next to Telnet Client. When prompted to restart your computer, click OK.
If you would like to disable telnet, launch PowerShell and run the dims /online /Disable-Windows Optional Feature /Feature Name Telnet Client command. The command will take a few seconds to complete and will give a success message when finished. Once the command is finished, you can close the PowerShell window and relaunch Command Prompt. Telnet is not as secure as more modern network protocols, so it should only be used in a few specific situations. It is also not recommended for use with unsecured networks because the data that is exchanged between endpoints is not encrypted.
Conclusion
Enabling Telnet on Windows using CMD involves a series of commands to install and configure the Telnet Client and, optionally, the Telnet Server. Remember to use Telnet cautiously, especially in untrusted network environments, as it transmits data in plaintext. Always consider security implications before enabling Telnet services, and disable them when not in use.
Leave a Reply