How to Enable Screen Recording on Android
Enable Screen Recording On Android after teasing the feature before the launch of Android 11 last year, Google has now made screen recording available on all Android smartphones. You can enable the feature by swiping down twice to access your smartphone’s Quick Settings panel and selecting the Screen Recorder option.
This is a great tool to have in case you want to show a friend how to use an app or just capture a cool video clip of your gameplay.
Enabling screen recording on Android has become easier with newer versions of the operating system. However, the exact steps can vary slightly depending on the device and Android version. Here’s a comprehensive guide that covers the general steps to enable screen recording on Android:
1. Check Android Version:
Before proceeding, ensure that your Android device is running Android 5.0 (Lollipop) or a newer version. Screen recording features may differ slightly between versions.
2. Native Screen Recording: Many Android devices come with a built-in screen recording feature. To check if your device has this feature:
- Swipe down from the top of the screen to open the notification shade.
- Look for a “Screen Recording” or similar toggle in the Quick Settings menu. If present, tap it to start screen recording.
3. Using Google Play Games: Google Play Games app also offers a screen recording feature for gaming purposes. Follow these steps:
- Install Google Play Games from the Google Play Store if you haven’t already.
- Open the app, go to a game, and click on the camera icon to start recording.
4. Third-Party Apps: If your device doesn’t have a built-in screen recorder, you can use third-party apps from the Play Store. Some popular choices include AZ Screen Recorder, DU Recorder, and Mobizen.
- Download and install your preferred screen recording app.
- Open the app and follow the on-screen instructions to configure settings.
- Start recording by tapping the appropriate button or using a floating icon.
5. Using Quick Settings: On some devices with newer Android versions, screen recording may be accessible through Quick Settings:
- Swipe down the notification shade twice to reveal Quick Settings.
- Look for a “Screen Record” or “Screen Capture” tile and tap it to start recording.
6. Developer Options:
If your device doesn’t have a native screen recording feature, you can enable it through Developer Options. To enable Developer Options:
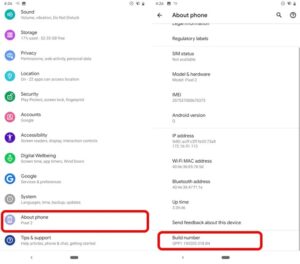
- Open “Settings” and go to “About phone.”
- Find the “Build number” entry and tap it seven times to unlock Developer Options.
Once Developer Options are enabled:
- Open “Settings” and go to “System” or “System and updates.”
- Look for “Developer options” and enter.
- Enable “Feature flags” and “Show screen recording.”
Now, you should be able to find the screen recording option in Quick Settings or Settings.
7. ADB Commands: For advanced users, you can use Android Debug Bridge (ADB) commands to enable screen recording. This method requires a computer and a USB cable. Here’s a simplified guide:
- Install ADB on your computer. Connect your Android device to the computer.
- Open a command prompt or terminal window.
- Enter the following command:
adb shell settings put global settings_screenrecord_long_press true - Press the power button and choose “Start recording” from the power menu.
8. Troubleshooting: If you encounter issues, consider the following:
- Ensure your device is updated to the latest Android version.
- Check your device’s user manual or the manufacturer’s website for specific instructions.
- If using a third-party app, make sure it has the necessary permissions to record the screen.
9. Editing and Sharing: After recording, you can find your videos in the device’s gallery or the app you used. Use video editing apps to trim or enhance your recordings before sharing them.
10. Privacy and Security: Be cautious when recording sensitive information or interacting with secure apps, as screen recording may capture this data. Respect privacy and adhere to app-specific recording policies.
1. Go to Settings
Screen recording is a great feature for Android smartphones that allows users to record whatever is on their smartphone screens. This can be useful for a variety of reasons, including troubleshooting issues, creating how-to videos for friends, or just showing off a new high score on a video game.
In order to record your screen on an Android device, you will first need to enable the option in your phone’s Quick Settings menu. To do this, swipe down twice from the top of your screen to open the Quick Settings menu, then scroll down until you see the “Screen recorder” tile. Tap the tile to begin recording your screen. If you want to include audio with your recording, tap the “Record audio” option and select whether you want to record media sounds or your microphone.
After your recording is complete, you can use the tools in the video editor to trim and rotate it as needed. You can also choose to save a copy of your recording by tapping the “Save a copy” button at the top of the screen. Once saved, your video will be available in your Gallery app where it can be shared on social media or with others. You can also download the video to your computer for further editing and enhancements.
2. Tap on Security
Depending on your model of phone and its Android version, the process for recording your screen may vary. In general, you’ll start by swiping down from the top of your device to open the Quick Settings panel, and then looking for the screen recorder icon.
The screen recorder will ask you for permission to begin recording. You’ll be able to see what type of information the tool will have access to, and you can also choose whether or not to record media sounds and your microphone.
Once you’re ready to begin your recording, tap the “Start” button. The video will be stored as a file on your device in the Movies folder of your Google Photos app. You’ll be able to view the video from within the Photos app or through another compatible third-party viewer.
Before you record, it’s a good idea to make sure your system resources aren’t being occupied by other apps and processes. This will help ensure the quality of your recording.
If your phone doesn’t have a built-in screen recorder, you can try a third-party app like AZ Screen Recorder. It’s a popular free option that offers a variety of features, including customizable video resolutions and bitrates.
3. Tap on Privacy
Screen recording on an android is a great way to share tips or help troubleshoot with friends. It also lets you make videos to post online or send in a text message. However, it’s important to take a few steps to protect your privacy. These Android privacy tips will keep your personal info out of the wrong hands and ensure that only you have access to the content that you’re capturing.
Tap on the Screen Recorder icon in your quick settings menu to enable the feature. A countdown will appear before your recording begins. To stop the recording, swipe down on your screen and select the notification that appears or tap the Screen Recorder icon again.
When you’re finished with your recording, it will be saved to the app where you store photos and videos (which is usually in Google Photos). From here, you can edit your video and share it on social media or via a text message or email. You can also view a list of all of your recordings in the Google Photos app by tapping the video icon in the top right corner of the screen.
If you use a third-party screen recording app, it’s a good idea to review your privacy options regularly. Unused apps can take up resources and open doors to sensitive information that might better be kept closed. You should also consider deleting any apps you haven’t used in a while, as they can cause performance issues on your device.
4. Tap on Screen Recorder
Screen recording allows you to create a video of what is being displayed on your phone’s display. This can be useful if you want to show someone how to do something on your phone or if you want to make a tutorial for an app that you use. You can use the built-in screen recorder on your android device or you can download a third-party application that will give you more control over your recordings.
Once you have enabled the Screen Recorder, you will need to give it permission to record your activity. This will open a page that will tell you what information it will have access to, and you will be given the option to allow or deny it certain types of data. Once you have finished setting up your preferences, you can click on “START RECORDING” to begin the recording process.
When you are finished recording, you can tap the Stop button in your notification panel or in the Quick Settings menu. The recording will be saved as a video file in the Movies folder of your Google Photos app.
If you want to edit your screen recording, you can do so using the video editor in Google Photos. This will allow you to trim the beginning of your video, change its angle or tilt, and even add music to the recording. To trim the beginning of your video, drag the bar on the left side of the timeline toward the right until you reach the point where you would like to start the recording.
Conclusion
Enabling screen recording on Android involves checking for native features, using third-party apps, exploring Developer Options, or employing ADB commands for advanced users. Choose the method that suits your device and preferences. Always be mindful of privacy and security considerations while recording your screen.
Leave a Reply